Falling is scary. But what many seniors don't realize is that sometimes the fall itself isn't the most dangerous part: it's not being able to get back up. Being stuck on the floor for hours can lead to serious complications like dehydration, pressure sores, pneumonia, and hypothermia.
The good news? Learning how to safely get up after a fall is a skill you can practice and improve. This isn't about preventing falls altogether (though that's important too). This is about building a backup plan: a sequence of movements that can help you regain your footing when a fall does happen.
Let's walk through the five essential steps every senior should know, practice, and have confidence using.
Why Knowing How to Get Up Matters
About one in four older adults falls each year, according to the CDC. While preventing falls is the goal, having a recovery plan is equally crucial. Many seniors who fall and can't get up remain on the floor for an hour or longer, which dramatically increases their risk of hospitalization, injury complications, and long-term mobility loss.
Learning these steps doesn't mean you're expecting to fall. It means you're being prepared, practical, and proactive about your safety. Just like knowing CPR or keeping a first aid kit, this is simply smart planning.
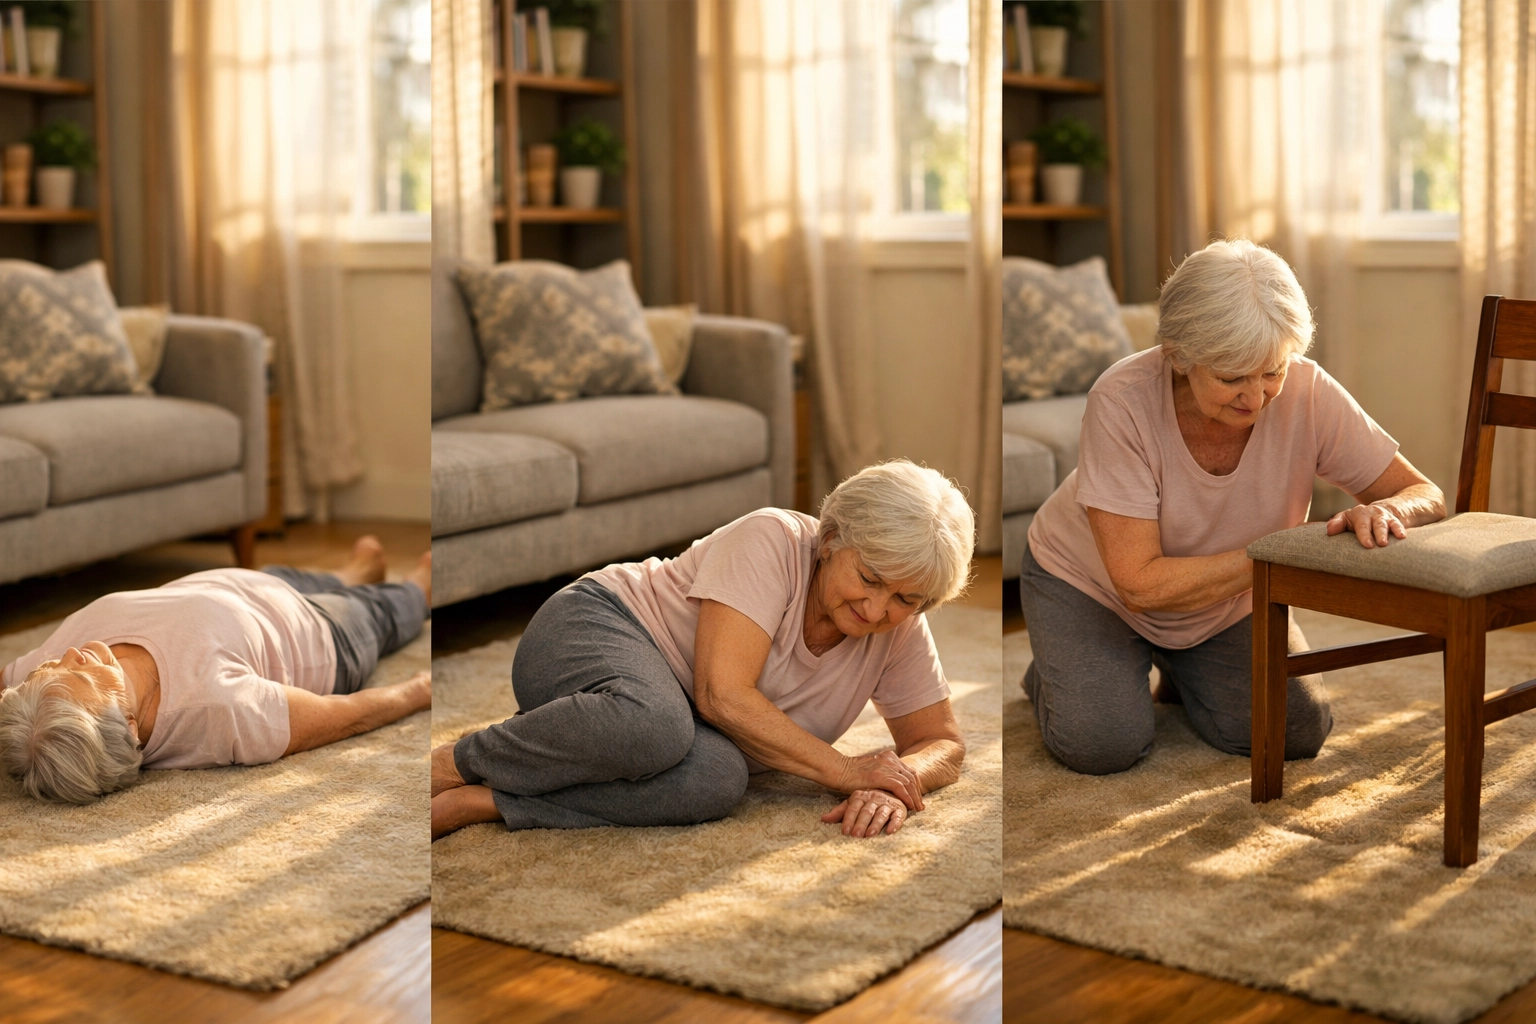
The 5-Step Method to Get Up After a Fall
This method progresses through a series of positions that gradually bring you from lying down to standing. Each position gives you a chance to rest, assess how you're feeling, and gather your strength for the next movement.
Step 1: Pause and Assess
Before you move at all, take a moment. This is hard when you're on the floor and feeling vulnerable, but rushing increases your risk of making things worse.
Ask yourself:
- Am I injured? Do I feel sharp pain anywhere?
- Am I dizzy or disoriented?
- Can I move my arms and legs?
- Is anything broken?
If you suspect a serious injury: like a broken bone, severe pain, or inability to move: don't attempt to get up. Call for help using a medical alert device, phone, or by calling out to someone nearby.
If you feel relatively okay and nothing seems broken, you can proceed to the next step.
Step 2: Roll to Your Side
From lying on your back, roll onto your side. Choose whichever side feels more comfortable or is closer to a piece of sturdy furniture.
Here's how:
- Bend your knees if possible
- Turn your head in the direction you want to roll
- Let your body follow your head as you roll onto your side
- Rest here for a moment
This side-lying position is more stable and gives you better leverage for the next movement. Take your time. There's no rush.
Step 3: Push Up to Side-Sitting
From your side, you're going to push yourself up into a sitting position.
- Place your top hand flat on the floor in front of your chest
- Use that arm to push your upper body up
- Your bottom arm can help support you
- Let your legs stay bent and pointing to the same side
You're now in what's called a "side-sitting" position: seated on the floor with both legs to one side and your hands supporting you. Rest here. Catch your breath. Make sure you're not feeling dizzy.

Step 4: Move to Hands and Knees
This is where you'll need a bit more strength and coordination, but it's manageable when you take it slowly.
- From side-sitting, lean forward and place both hands on the floor
- Shift your weight onto your hands
- Bring one knee forward, then the other
- You should now be on all fours: hands and knees on the ground
This position (sometimes called "quadruped") is surprisingly stable. It's the position babies use when they're first learning to move around, and it gives you a solid base. Rest here as long as you need.
Step 5: Crawl to Support and Stand
Now you need to find something sturdy to help you stand: a chair, couch, bed, countertop, or wall with a grab bar. If you're not already next to something, crawl to the nearest sturdy object.
Once you're there:
- Place your hands on the sturdy surface (chair seat, bed edge, etc.)
- Bring one foot forward so you're in a half-kneeling position (one knee down, one foot flat on the floor)
- Push down through your front foot and pull up with your arms
- Bring your back leg forward to join the front leg
- Stand up slowly
Once standing, don't rush off. Hold onto your support, make sure you're steady, and let any dizziness pass before you walk anywhere.
When This Method Won't Work
This five-step approach works well for many seniors, but it's not right for everyone or every situation. You might need to call for help if:
- You suspect a fracture or serious injury
- You're in severe pain
- You feel extremely dizzy or confused
- You've tried and don't have the strength to complete the movements
- You're in a very tight space with no room to maneuver
- You have specific medical conditions that limit your mobility significantly
There's no shame in calling for help. Medical alert systems, 911, or a family member are all appropriate responses when you need assistance.
Building the Strength to Make This Work
Knowing the steps is one thing. Having the strength and flexibility to actually do them is another. That's why practicing these movements and building your physical capacity is so important.
Exercises to Support Floor Recovery
The movements required to get up from the floor require core strength, upper body strength, and leg strength. Here are exercises that target those areas:
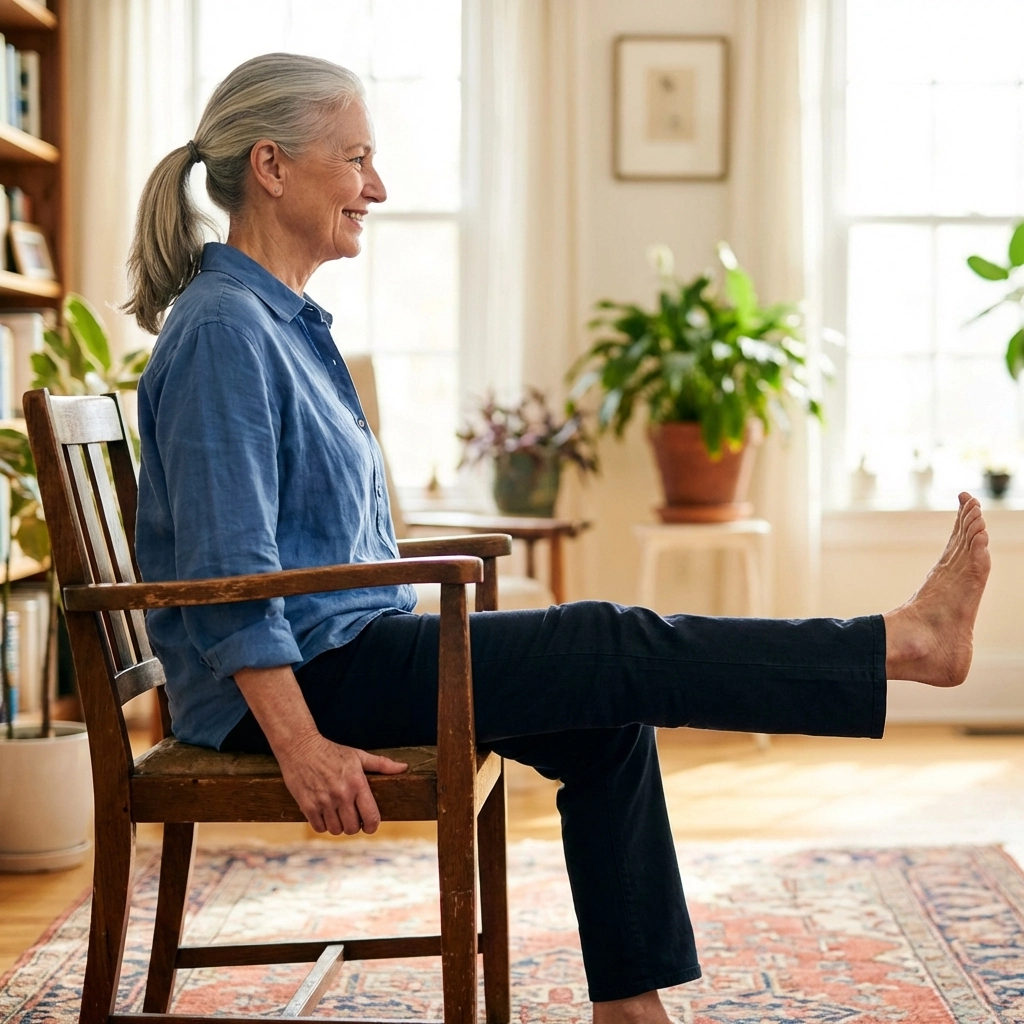
Seated Leg Lifts
- Sit in a sturdy chair
- Straighten one knee, lifting your foot off the ground
- Hold for 5 seconds
- Lower slowly
- Repeat 10 times on each leg
This builds the quadriceps strength you need for the final push to standing.
Chair Push-Ups
- Sit in a sturdy chair with armrests
- Place your hands on the armrests
- Push down to lift your bottom slightly off the seat
- Lower back down
- Repeat 5-10 times
This builds the arm and shoulder strength needed to push yourself up from the floor.
Calf Raises
- Stand holding a countertop or chair back
- Rise up on your tiptoes
- Lower back down
- Repeat 10 times
Strong calves improve your overall balance and help with the transition to standing.
Modified Planks
- Kneel on the floor with your hands flat in front of you
- Hold this hands-and-knees position for 10-30 seconds
- Focus on keeping your core engaged
This builds the core stability you need for the hands-and-knees position.

The CDC recommends strength and balance exercises at least three times per week. Even 10-15 minutes a session can make a real difference in your ability to recover from a fall.
Practice Makes Confident
Here's the thing about these five steps: they feel awkward the first time you try them. Getting down on the floor and back up isn't something most seniors do regularly. But that awkwardness is exactly why practicing matters.
How to Practice Safely
Don't practice alone the first several times. Have a family member, friend, or physical therapist with you. They can spot you, offer encouragement, and help if you get stuck.
Start with a modified version:
- Practice on a soft surface like a yoga mat or carpeted floor
- Begin from a seated position on the floor rather than lying down
- Just practice the hands-and-knees to standing portion at first
- Gradually add earlier steps as you build confidence
Make it part of your routine:
- Practice once or twice a week
- Do it at a time when you're not tired
- Wear comfortable, non-slip clothing
- Clear the area of obstacles
Many physical therapists teach this exact sequence as part of fall recovery training. If you have access to physical therapy, ask your therapist to work through these steps with you.
What to Do After You're Up
Once you're back on your feet, don't just carry on as if nothing happened. Falls are important signals that something needs attention.
Take these steps:
- Sit down in a safe spot and rest
- Check yourself for any injuries you might have missed
- Drink some water
- Tell someone what happened: even if you feel fine
- Call your doctor to report the fall
Your doctor will want to know about any fall because they can help identify why it happened. Was it a medication side effect? Balance issues? Vision problems? Environmental hazards? Addressing the root cause prevents future falls.
Building a Safety Network
Part of fall recovery planning is making sure you have ways to call for help when needed. Consider:
- Medical alert systems (devices worn as pendants or bracelets)
- Keeping a phone within reach in every room
- Teaching family members or neighbors to check in regularly
- Using voice-activated devices for emergency calls

Being able to get up after a fall is empowering. It gives you confidence and independence. But having backup support systems doesn't diminish that: it enhances your safety.
The Bottom Line
Learning how to get up after a fall isn't pessimistic: it's practical. These five steps provide a clear, methodical way to recover your footing when a fall happens. With practice, the movements become more natural. With the right exercises, you build the strength to execute them confidently.
Start by talking to your doctor or physical therapist about whether this method is appropriate for you. If you get the green light, practice with supervision until you're comfortable with the sequence. Build your strength with targeted exercises. And remember: the goal isn't just getting up: it's staying safe every step of the way.
Falls may be common, but being trapped on the floor doesn't have to be. With preparation, practice, and the right approach, you can face the possibility of a fall with a solid recovery plan in place.

