Falls happen. Even with the best prevention strategies in place, there may come a time when you or a loved one ends up on the floor unexpectedly. What matters most in that moment isn't dwelling on how it happened: it's knowing exactly what to do next.
Learning how to get up safely after a fall is one of the most practical skills any senior can master. It's not about admitting defeat or expecting the worst. It's about being prepared, building confidence, and maintaining independence even when things don't go as planned.
Why This Skill Matters More Than You Think
Many seniors who fall and can't get up on their own end up lying on the floor for extended periods, sometimes hours. This situation, often called a "long lie," can lead to complications like dehydration, pressure sores, hypothermia, and even pneumonia. Beyond the physical risks, the psychological impact can be significant. The fear of falling again: or of being unable to get up: can lead to reduced activity, social isolation, and a rapid decline in overall mobility.
But here's the encouraging news: most people can learn techniques to get themselves up safely after a fall. With practice and the right approach, you can dramatically reduce the anxiety around falling and maintain greater independence in your daily life.
The First Few Moments: Stay Calm and Assess
The immediate seconds after a fall are crucial. Your first instinct might be to jump up quickly out of embarrassment or shock, but resist that urge.
Take a moment to breathe. Lie still for at least 30 seconds to recover from the initial shock and let your body settle. This pause gives you time to check in with yourself before attempting to move.
Ask yourself these questions:
- Am I in pain anywhere specific?
- Can I move my arms and legs?
- Did I hit my head?
- Do I feel dizzy or disoriented?
- Is anything visibly injured or positioned oddly?
If you're experiencing severe pain, can't move a limb, suspect a fracture, or hit your head hard, don't try to get up on your own. Call for help immediately using your phone, medical alert system, or by calling out to someone nearby.
If you feel relatively okay and don't suspect a serious injury, you can proceed with getting yourself up using the safe technique outlined below.

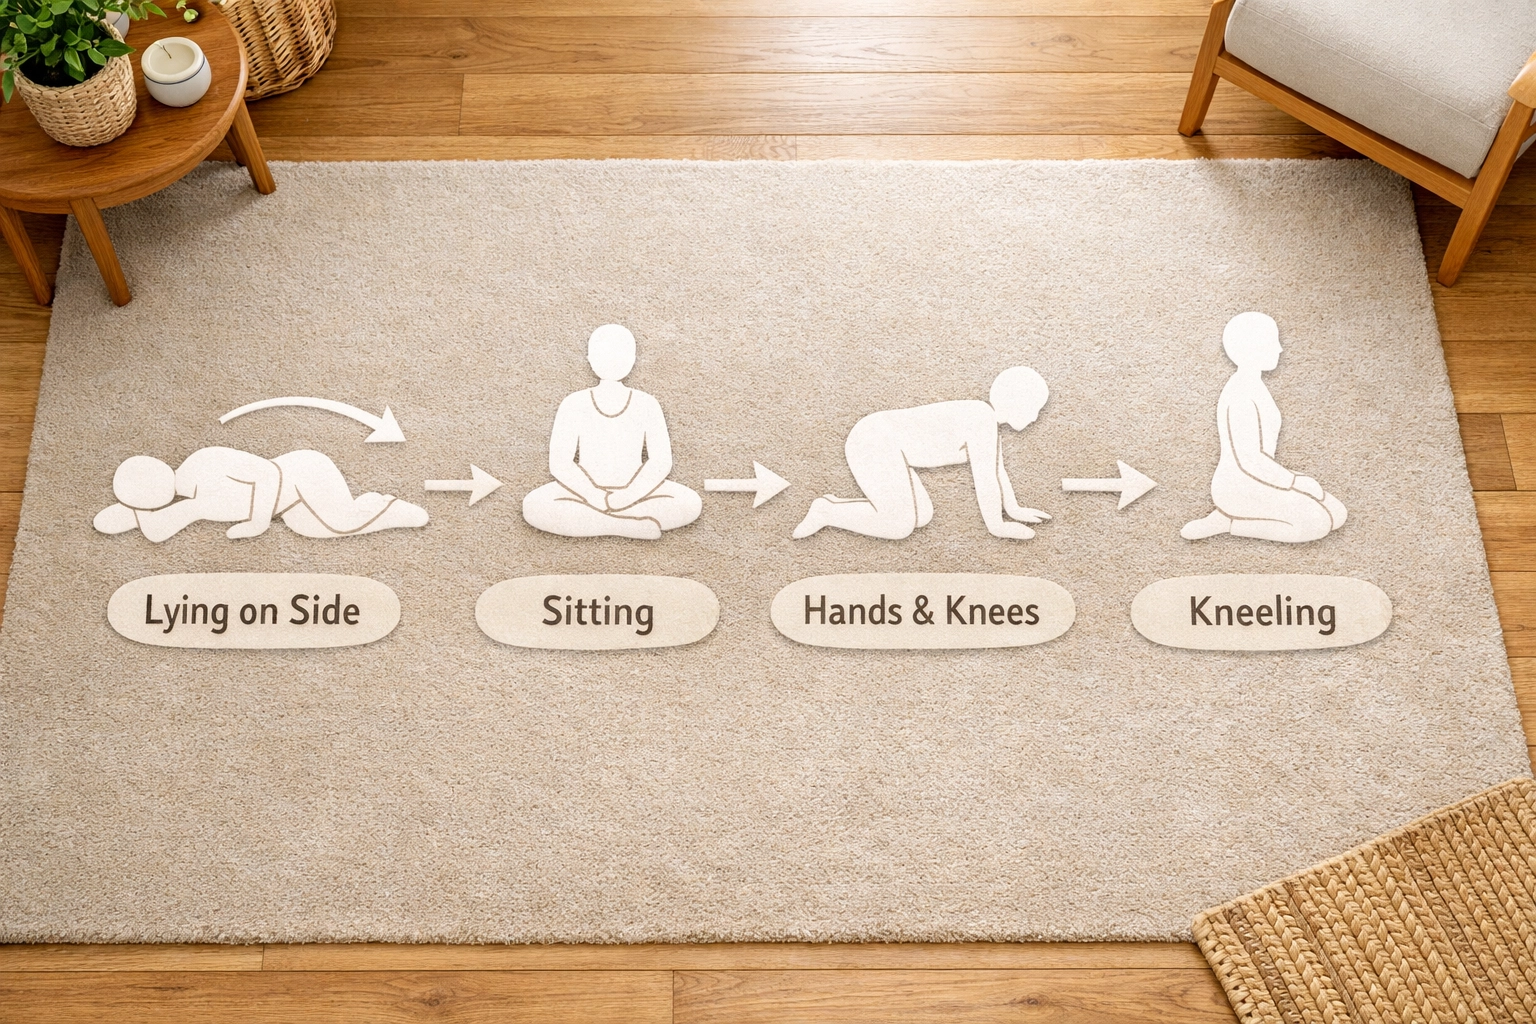
The Sequential Method: Your Step-by-Step Guide
This proven technique takes you from lying on the floor to standing through a series of intermediate positions. The key is moving slowly and deliberately, using support surfaces throughout the process. Never rush: each position should feel stable before you move to the next.
Step 1: Roll to Your Side
From lying on your back, roll onto your side: whichever side feels most comfortable and has the most room to maneuver. Bend your knees slightly and extend your lower arm out in front of you for support. This arm will help prop up your upper body in the next step.
Step 2: Push to a Seated Position
Using your upper arm (the one that's not extended on the floor), push yourself up into a side-sitting position. Your legs should be pointing in the same direction with knees bent, and you'll be sitting up with your weight supported by one or both hands on the floor beside you. Take a breath here. Make sure you feel stable.
Step 3: Get on All Fours
From the seated position, shift your weight forward and place both hands on the floor in front of you. Bring your knees under you until you're on your hands and knees. This prone kneeling position is your base camp for the rest of the journey up.
Step 4: Crawl to Support
Look around and identify the nearest sturdy support: a heavy chair, a couch, a bed frame, a toilet, or a wall. Don't worry about how it looks. Just crawl slowly toward that support surface. This might feel humbling, but it's the safest approach.
Once you reach your support surface, position yourself so you're facing it directly, still on your hands and knees.
Step 5: Move to High Kneeling
Place both hands firmly on your support surface: whether that's the seat of a chair, the edge of a bed, or a sturdy table. Push yourself up so you're kneeling upright with your knees still on the floor, but your hands are now holding the support at a higher level. Your torso should be more vertical now.
This high kneel position lets you rest while preparing for the next transition. Make sure the support surface isn't going to slide or tip before putting your full weight on it.
Step 6: Half-Kneel Position
This is often the trickiest step, so take your time. From high kneeling, bring one foot forward and plant it flat on the floor in front of you, creating a 90-degree angle with that knee. Your other knee stays on the floor behind you.
Choose whichever leg feels strongest to bring forward first. Keep both hands firmly on your support surface for balance. This half-kneel position is essentially a lunge, and it sets you up perfectly for the final push to standing.
Step 7: Stand Up
Take a breath and prepare for the final push. Using the strength in your front leg (the one with the foot planted on the floor) and maintaining your grip on the support surface, push yourself up to standing. Engage your core, keep your back relatively straight, and avoid bending at the waist.
Once standing, hold onto your support for as long as you need. Don't rush to walk away. Make sure you feel steady, your balance is good, and any dizziness has passed.
The Backward Chaining Approach: Practice Makes Perfect
If the sequential method feels overwhelming or you want to build confidence gradually, consider the backward chaining technique. This approach involves practicing each step in reverse order, starting from the easiest position and working backward toward the floor.
Here's how it works:
Start by practicing standing next to a sturdy support surface. Then practice getting into the half-kneel position from standing and returning to standing. Once that feels comfortable, practice the high kneel to half-kneel transition. Continue working backward through each position until you've practiced the entire sequence.
This method has a powerful psychological benefit: you always end in a more confident position than where you started, which builds positive associations with the practice rather than anxiety.

Essential Safety Considerations
Regardless of which method you use, keep these important guidelines in mind:
Always use sturdy support. A heavy dining chair, couch, bed frame, or countertop works well. Avoid anything on wheels, lightweight furniture, or unstable surfaces.
Engage your legs, not just your arms. Your legs contain your body's largest muscle groups and are designed for this kind of work. Relying too heavily on your arms can strain your shoulders and make the process harder than it needs to be.
Keep your knees bent throughout. Avoid bending at the waist or trying to stand up with straight legs. Bent knees give you better leverage and reduce the risk of straining your back.
Move slowly and pause between positions. There's no prize for speed. Each transition should be deliberate, and you should feel stable at each stage before moving to the next.
Don't practice alone initially. When you're first learning this technique, always have someone nearby: a family member, friend, or physical therapist. They shouldn't help you get up, but they can provide reassurance and call for help if needed.
Building Strength and Confidence Through Practice
The best time to learn fall recovery techniques is before you actually need them. Just like fire drills prepare you to exit a building calmly during an emergency, practicing floor-to-standing transitions prepares your body and mind for a real fall.
Work with a physical therapist to develop a practice routine that's appropriate for your current fitness level. They can assess your specific needs, identify which steps might be challenging for you, and suggest modifications if needed.
Some physical therapy offices have padded mats where you can practice these techniques safely. At home, you might practice on a carpeted floor with plenty of cushions nearby for comfort.
Regular practice does two important things: First, it builds the specific strength and coordination needed for each transition. Second, it creates muscle memory so your body knows what to do even in a moment of stress or confusion.
Consider incorporating exercises that strengthen the muscles you'll rely on during a floor recovery:
- Leg strengthening exercises like squats and lunges
- Core stability work
- Arm and shoulder strengthening for pushing movements
- Balance training
- Flexibility work, especially for the hips and knees
When to Call for Help Instead
While learning self-recovery techniques is valuable, you also need to know when to ask for assistance. Call for help immediately if:
- You suspect any broken bones or serious injury
- You experience chest pain or difficulty breathing
- You hit your head and feel confused or dizzy
- You're in severe pain that worsens with movement
- You've been lying on the floor for more than a few minutes and feel weak or unwell
- You've tried the technique and simply can't manage it safely
Having a medical alert system or keeping your phone within reach at all times provides peace of mind. There's no shame in calling for help when you need it: that's exactly what these resources are for.
The Confidence Factor
Learning how to get up after a fall does something remarkable: it reduces the fear of falling itself. When you know you have the skills to handle a fall, you're less likely to develop the anxious, tentative movement patterns that actually increase fall risk.
This confidence translates into maintaining a more active lifestyle, which in turn keeps your muscles strong and your balance sharp. It's a positive cycle that reinforces itself.
Many seniors report that simply knowing they could get up if they fell: even if they hope never to use the skill: gives them the courage to keep doing the activities they love. Walking in the park, gardening, playing with grandchildren, or taking a gentle exercise class all feel less risky when you have a backup plan.
Making It Part of Your Routine
Consider floor-to-standing transitions as a legitimate exercise in their own right. Some seniors incorporate simplified versions into their regular fitness routine, using the practice as a functional movement exercise that builds real-world strength and coordination.
Even if you don't do the full sequence regularly, periodic practice every few weeks helps maintain the skill and keeps the movement patterns fresh in your mind.
Moving Forward with Confidence
Falls are a reality for many seniors, but they don't have to mean the end of independence or confidence. By learning and practicing safe recovery techniques, you're taking a proactive step toward maintaining your autonomy and reducing the potential complications that can follow a fall.
Remember that this skill is just one piece of a comprehensive approach to fall prevention. Continue working on strength, balance, home safety modifications, regular vision checks, appropriate footwear, and all the other factors that reduce your risk of falling in the first place.
But when prevention isn't enough: because sometimes it isn't: you'll have the knowledge and practiced skills to get yourself back on your feet safely. That's not preparing for the worst. That's simply being smart, prepared, and empowered to handle whatever comes your way.

