When you decide it is time to look at making a home more accessible, it usually comes from a place of care. Maybe you have noticed a loved one is a bit steadier when they hold onto the furniture, or perhaps a recent hospital stay has made everyone realize that the stairs aren't as safe as they used to be.
Hi, I’m Brian Kerr, and I’ve spent a lot of time looking at how we can make homes safer. At Fall Guys Products, our goal is always to keep people moving confidently. But here is the thing: a home mobility assessment isn't just a checklist. It is a deep dive into how a person interacts with their environment.
Often, families jump straight into buying equipment without a full assessment, or they perform an assessment that misses the mark. These mistakes can lead to more than just wasted money: they can lead to a false sense of security that actually increases fall risks.
Let’s walk through the seven most common mistakes people make during home mobility assessments and, more importantly, how you can fix them to create a truly safe environment.
1. Assessing the House, Not the Person
The biggest mistake I see is when people treat a mobility assessment like a home inspection. They look for loose floorboards or steep stairs, which is great, but they forget to look at the person living there.
A house doesn't fall; a person does. If you only look at the physical environment, you are only solving half the puzzle. You might install a ramp that meets every building code in the book, but if the person using it doesn't have the upper body strength to navigate a manual wheelchair up that incline, the ramp is useless.
How to Fix It:
Start with a functional assessment. Watch your loved one move. How do they sit down in their favorite chair? Do they "plop" or descend with control? How do they navigate the transition from carpet to tile? A proper assessment should consider their balance, gait, strength, and even their cognitive state. If they struggle with memory, a complex multi-step mobility device might not be the safest choice.

2. The "Equipment Overkill" Trap
It is easy to get overwhelmed by the sheer amount of mobility gadgets available. I’ve seen homes that look more like a hospital wing than a residence. While the intention is safety, "equipment overkill" can actually create new hazards.
When you clutter a small hallway with multiple rails, walkers, and lifts, you are reducing the "clear floor space." This makes it harder to maneuver and can actually create tripping hazards with the very items meant to prevent falls.
How to Fix It:
Prioritize "least-restrictive" interventions. Can a simple grab bar solve the problem, or do you really need a full transfer lift? Sometimes, rearranging furniture to create a wider path or removing a thick rug is more effective than adding a new piece of hardware. Always ask: "Does this piece of equipment solve a specific, documented problem, or is it just 'nice to have'?"
3. Ignoring the "1:12" Rule and Other Installation Standards
Ramps are one of the most common home modifications, but they are also frequently installed incorrectly. A common mistake is making a ramp too steep because there isn't enough room in the yard or driveway.
A ramp that is too steep is essentially a slide. For a person using a walker or a manual wheelchair, a steep incline requires an immense amount of physical exertion and presents a significant risk of tipping backward.
How to Fix It:
Follow the ADA (Americans with Disabilities Act) standard of a 1:12 rise-to-run ratio. This means for every 1 inch of vertical rise, you need 12 inches of horizontal ramp. If the porch is 24 inches high, you need a 24-foot ramp. It sounds like a lot of space: and it is: but it is the only way to ensure the incline is safe for independent use. If you don't have the space, you might need to look at a vertical platform lift instead.
4. Forgetting the Future (Progressive Conditions)
A mobility assessment is a snapshot in time. However, mobility is often fluid. One mistake families make is assessing for today's needs without considering tomorrow's reality. This is especially true for progressive conditions like Parkinson’s, MS, or different types of dementia.
If you install a permanent fixture that only works for a person who can still stand, you may find yourself having to tear it out and start over in six months when they require a seated transfer.
How to Fix It:
Talk to the person’s doctor or physical therapist about the expected trajectory of their mobility. If the condition is progressive, look for "modular" or "adaptable" solutions. For example, choose a bed rail that can be adjusted in height or a bathroom setup that can accommodate both a standing user and, eventually, a shower chair.

5. Overlooking Lighting and Visual Perception
Mobility isn't just about muscles and joints; it’s about what the eyes see and how the brain processes it. Many assessments focus on the floor but forget the lighting.
As we age, our eyes require significantly more light to see clearly. Shadows can look like holes or obstacles, and "glare" on a shiny hardwood floor can make it look like water, causing a person to hesitate or change their gait: which leads to a fall.
How to Fix It:
An assessment should include a "light meter" check or at least a subjective evaluation at different times of the day. Fix flickering bulbs, add motion-activated nightlights along the path to the bathroom, and ensure that light switches are accessible at both the top and bottom of the stairs. Reducing glare is just as important as adding light; look for matte finishes on floors and avoid high-gloss waxes.
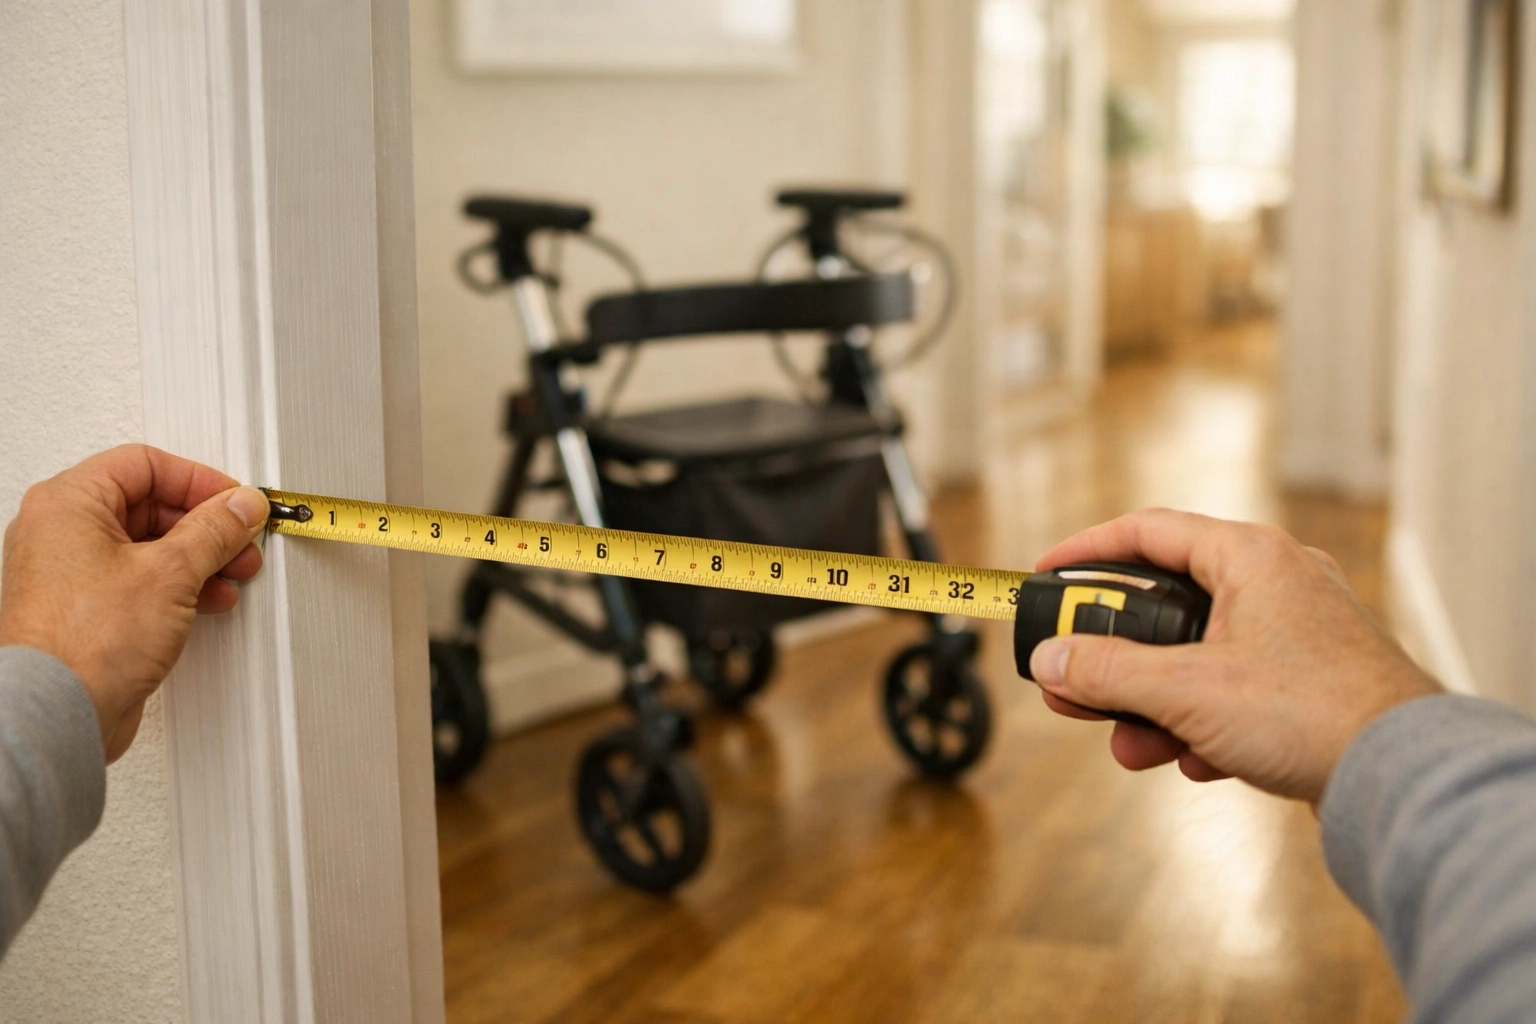
6. Not Checking the Specs (Weight and Dimensions)
This sounds like a "common sense" point, but you would be surprised how often it is missed. Every piece of mobility equipment has a weight capacity. Exceeding that limit isn't just a suggestion; it’s a structural risk.
Similarly, people often buy equipment without measuring their doorways. A standard walker or wheelchair might fit through a front door but get stuck at the bathroom door, which is often narrower in older homes.
How to Fix It:
Always verify the "Weight Capacity" and the "External Width" of any device. During your assessment, take a tape measure to every doorway and hallway the person will use. Remember to account for hand clearance: if a walker is 24 inches wide and the door is 26 inches wide, that only leaves an inch on each side for the person's hands. That’s a recipe for bruised knuckles and frustration.
7. The Lack of Training and Follow-Up
The final mistake is assuming that once the equipment is installed, the job is done. A mobility assessment is only successful if the person knows how to use the new tools.
I’ve seen many cases where a perfectly good transfer pole or assist rail sits unused because the senior is afraid of it or doesn't understand how to grip it properly. Even worse is when they use it incorrectly: like pulling on a rail that is designed for pushing: which can lead to a fall.
How to Fix It:
A proper assessment must include a training phase. This isn't just a five-minute demonstration. It involves watching the user perform the task multiple times. Use the "Teach Back" method: have them explain to you how they are going to use the device before they do it.
Furthermore, schedule a "re-assessment" for two weeks after installation. This is the "settling-in" period where you can see if the equipment is actually being used and if any new issues have cropped up.
The Role of the Professional
While you can certainly do a preliminary sweep of a home, there is no substitute for a professional eye. Physical Therapists (PTs) and Occupational Therapists (OTs) are trained specifically to bridge the gap between human clinical needs and environmental modifications.
They don't just see a staircase; they see the "climbing pattern" of the individual. They don't just see a bathroom; they see the "transfer mechanics" required to get on and off a commode safely.
If you are feeling overwhelmed, bringing in a professional to conduct or review your home mobility assessment is the best "fix" of all. It ensures that the modifications you make are actually helping, rather than adding to the problem.
Summary of the Assessment Workflow
To avoid these mistakes, try following this workflow for your next assessment:
- Observe the Person: Watch them perform daily tasks without any changes first. Take notes on where they struggle.
- Measure Everything: Doors, heights of chairs, heights of toilets, and the person’s own height and weight.
- Identify Specific Barriers: Is it the rug? Is it the low light? Is it the lack of a handhold?
- Standardize Your Solutions: Ensure any ramps or rails meet safety codes (like the 1:12 ramp rule).
- Simulate and Train: Before permanently bolting anything down, simulate the movement. Once installed, spend time practicing.
- Review and Adapt: Re-evaluate as health needs change.
Safety in the home is about empowerment. It’s about giving someone the tools they need to stay in the place they love. By avoiding these common assessment mistakes, you aren't just "fixing a house"; you are protecting a way of life.

