Stairs are often the most intimidating part of a home for those of us focusing on longevity and safety. They represent independence: the ability to access the second floor or the basement: but they also represent a significant risk. According to many safety assessments, the staircase is one of the most frequent locations for falls in the home.
However, a staircase doesn't have to be a hazard. Often, the "danger" of a staircase isn't about the stairs themselves, but about small, correctable habits and environmental factors that we’ve overlooked for years. By identifying these common mistakes, we can transform a potential risk into a safe, navigable part of our daily routine.
In this guide, we’ll walk through the seven most common mistakes people make with stair safety and provide practical, educational steps to fix them.
1. The "Hurry Up" Mentality
The most frequent mistake isn't structural; it’s behavioral. We often treat stairs as a transition zone: something to get through as quickly as possible so we can get to the "real" part of our day. We might rush to answer a ringing phone, grab the doorbell, or simply move out of habit.
Rushing changes our gait. It causes us to lean forward, shifts our center of gravity, and reduces the amount of attention we pay to where our foot meets the tread. When we hurry, we are also more likely to take a "shallow" step, where only the ball of the foot makes contact with the stair, increasing the risk of a slip.
How to Fix It:
- The Three-Point Rule: Always aim to have at least two points of contact (both feet) on a stable surface before moving the next foot. Ideally, maintain three points of contact by keeping a firm grip on the handrail.
- Mindfulness over Speed: Treat the staircase as an activity in itself. Focus on the sensation of your foot landing firmly and squarely on each tread.
- Wait for the Phone: If the phone rings or someone is at the door, let it go. It is better to return a call or miss a visitor than to risk a fall by rushing.
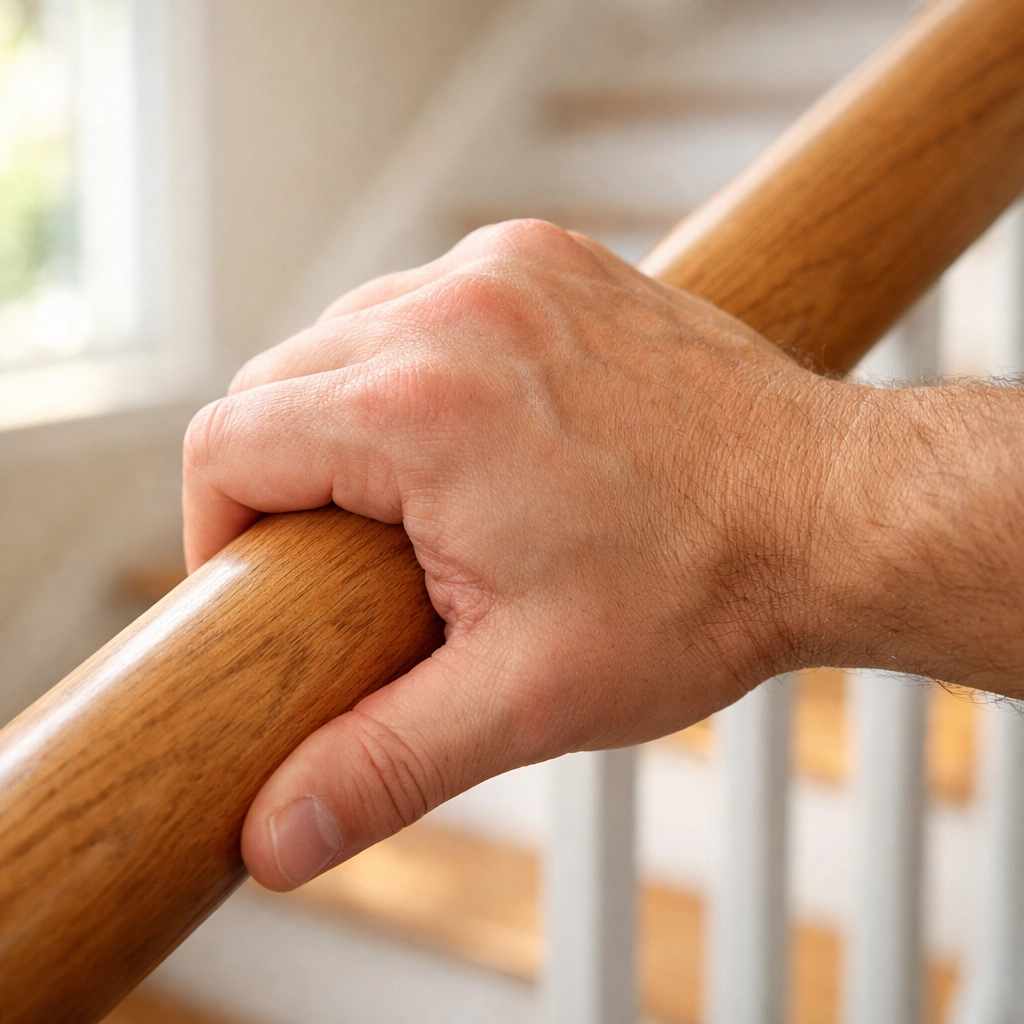
2. Neglecting the "Power" of the Handrail
Many homes have handrails that are more decorative than functional. They might be too thick to grip, too thin to lean on, or placed at an awkward height. Worse yet, many people only use the handrail when they feel unsteady, rather than using it as a proactive safety tool every single time.
A handrail shouldn't just be something you "touch" for balance; it should be something you can "grip" for support. If your hand cannot comfortably wrap around the railing: forming what therapists call a "power grip": the rail isn't doing its job.
How to Fix It:
- Check the Shape: The ideal handrail is round or oval with a diameter of about 1.25 to 2 inches. This allows your fingers and thumb to meet, providing the most security.
- Double Up: If your staircase only has a rail on one side, consider installing a second one on the opposite wall. Having support for both hands significantly increases stability and reduces the physical strain on your legs.
- Height Matters: Handrails should generally be between 34 and 38 inches above the "nosing" (the edge) of the stair. If yours is too low, you’ll find yourself leaning too far forward.
3. Ignoring Inconsistent Step Dimensions
The human brain is an incredible pattern-recognition machine. When you walk up a flight of stairs, your brain "maps" the height (riser) and depth (tread) of the first two steps. It then assumes every subsequent step will be exactly the same.
The mistake occurs when steps are inconsistent. If one riser is even a quarter-inch higher than the rest, or if a tread is slightly shallower, the "rhythm" of your walk is broken. This often leads to a trip on the way up or a "drop" sensation on the way down.
How to Fix It:
- The Visual Marker: Use high-contrast anti-slip tape or a strip of bright paint on the edge of each step. This helps your eyes clearly define where one step ends and the next begins, which is especially helpful if the steps are all the same color or material.
- Measure Your Stairs: If you’ve recently moved or are concerned about a specific staircase, use a ruler to check the consistency. If there are major variations (more than 3/8 of an inch), it may be worth consulting a carpenter to level the treads.
- Focus on the First and Last: Statistically, most accidents happen on the first or last step. Pay extra attention as you transition from the floor to the staircase and vice versa.
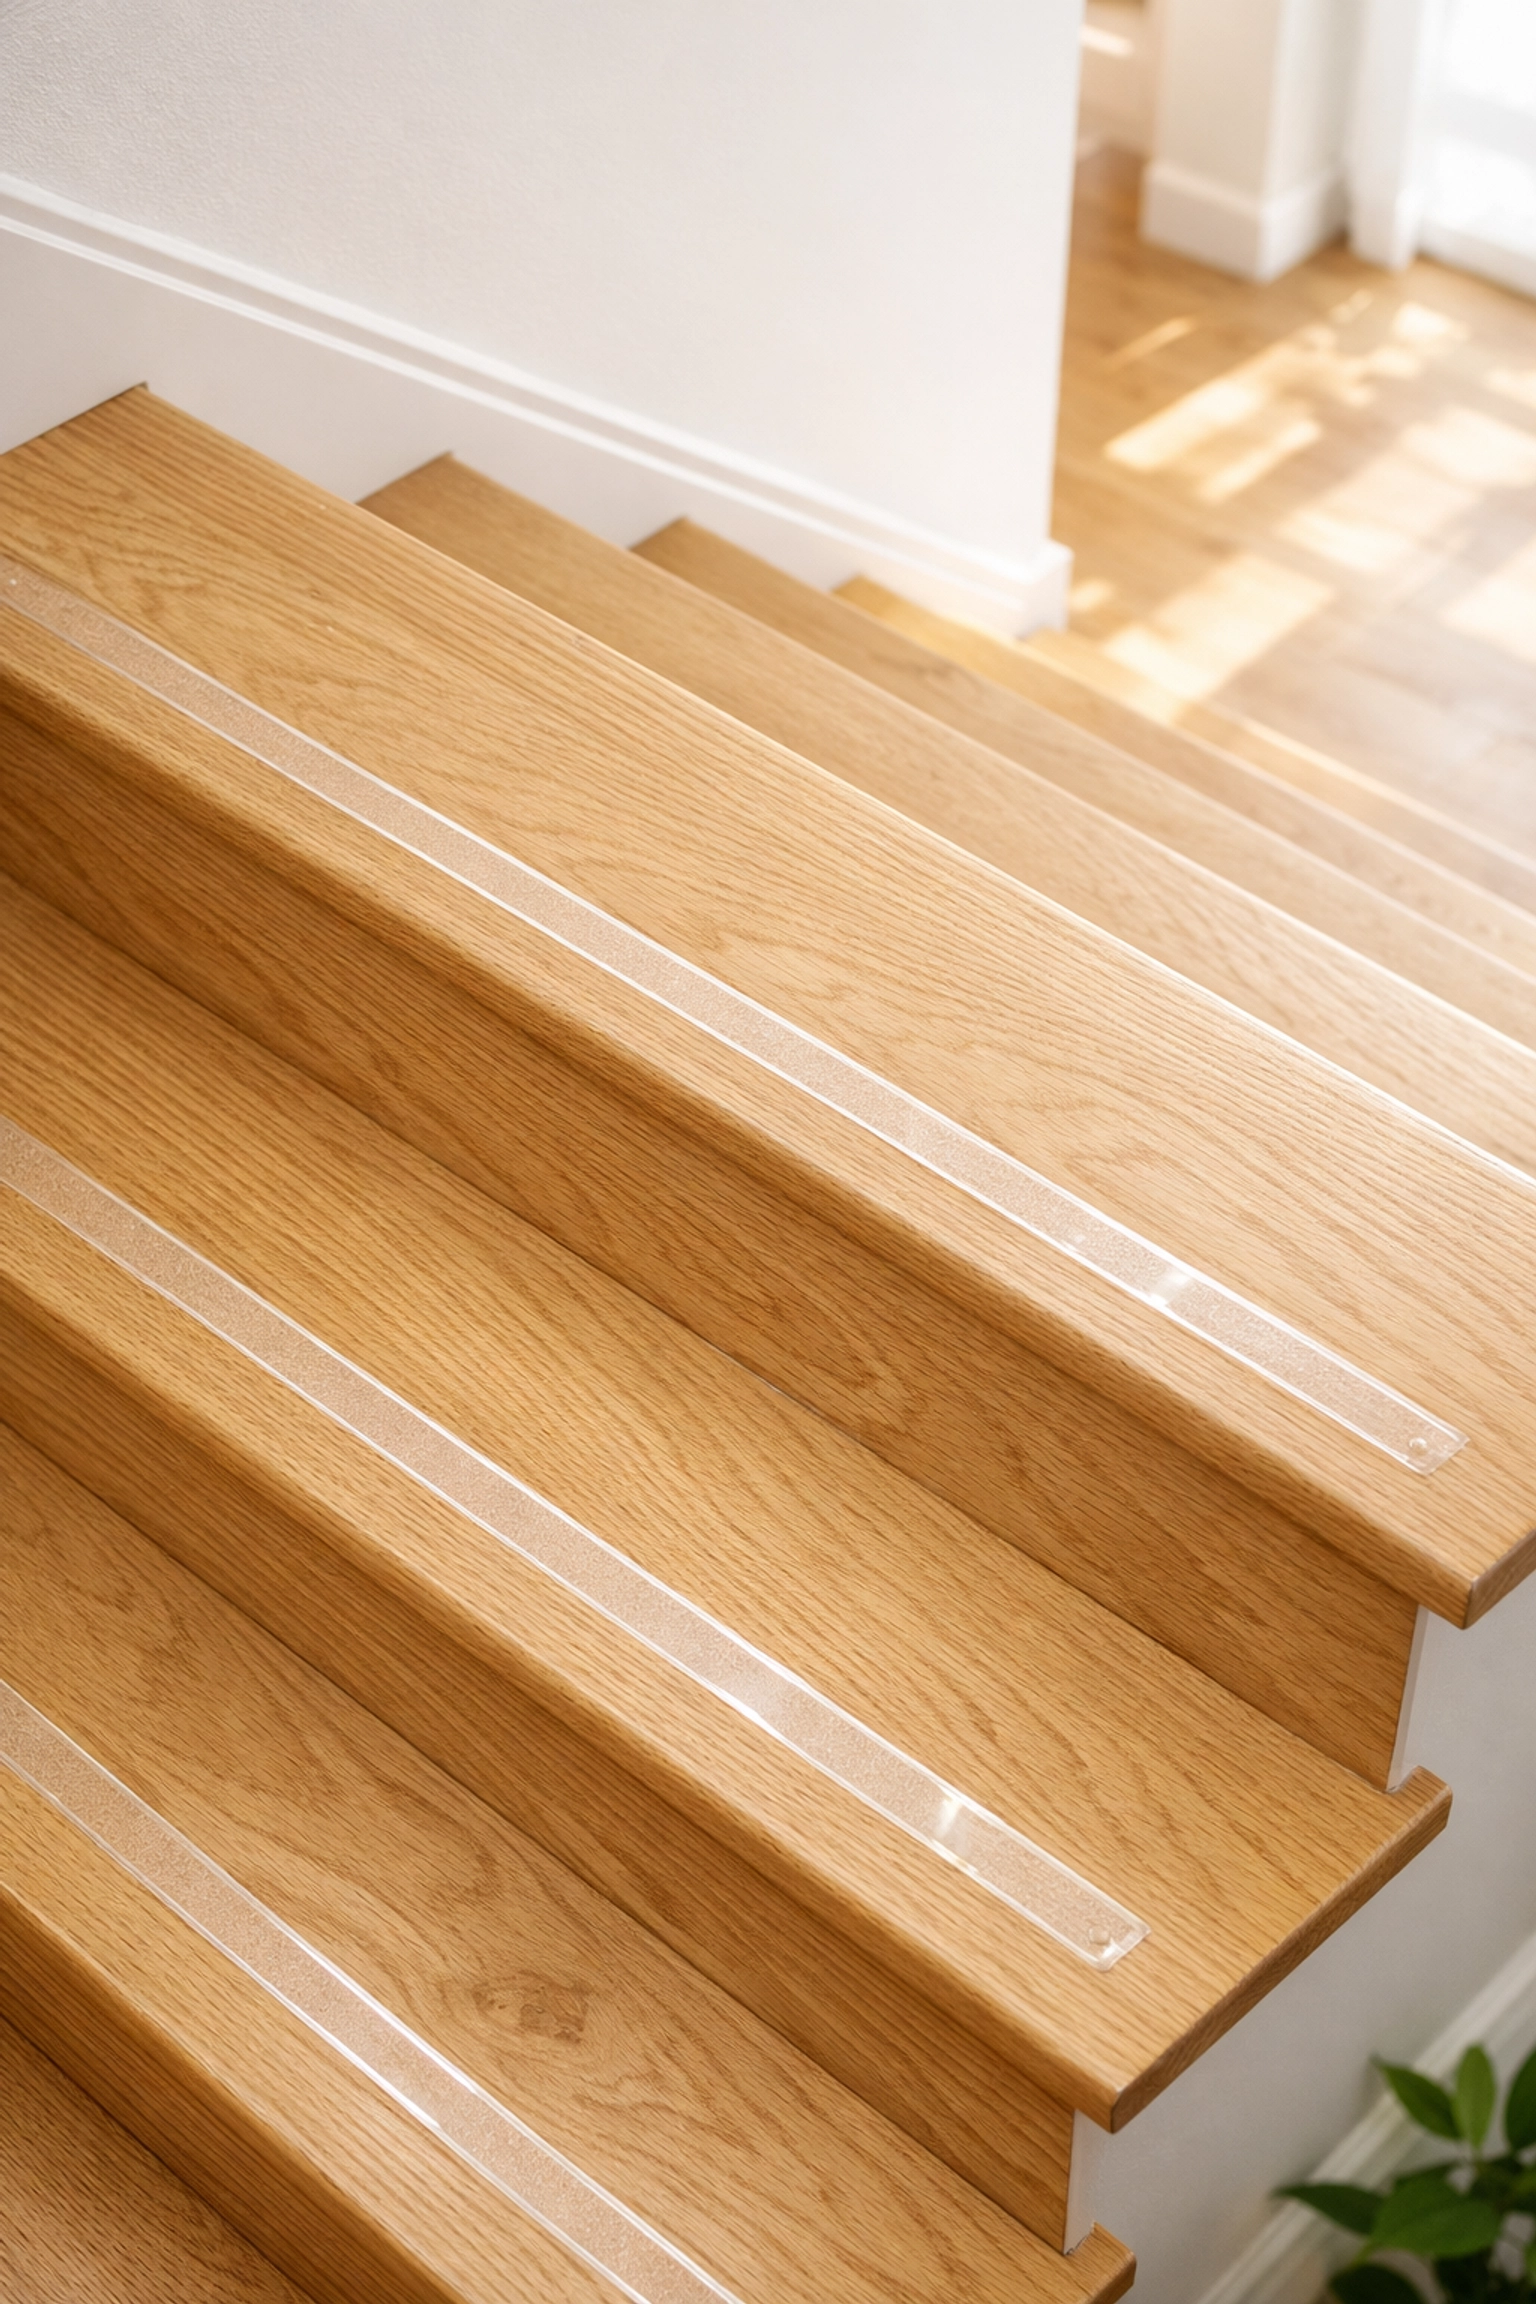
4. Prioritizing Aesthetics Over Traction
We all love the look of polished hardwood or glossy tile. However, these materials are incredibly slippery, especially when wearing socks or smooth-soled slippers. Even carpet can be a risk if it is deep-pile or has become loose over time, as it can hide the edge of the step and cause your foot to slide.
How to Fix It:
- Non-Slip Treads: You don't have to ruin your home's aesthetic. There are transparent anti-slip adhesive strips that provide grit and traction without hiding the wood grain.
- Low-Pile Carpet: If you prefer carpet, ensure it is low-pile and tightly woven. This provides a firmer surface for your foot and makes it easier to feel the edge of the stair.
- Footwear Habits: Avoid walking on stairs in just socks or loose-fitting slippers. Supportive shoes with rubber soles are the gold standard for stair safety. If you prefer to be barefoot, that is generally safer than socks, as your toes can "grip" the surface.
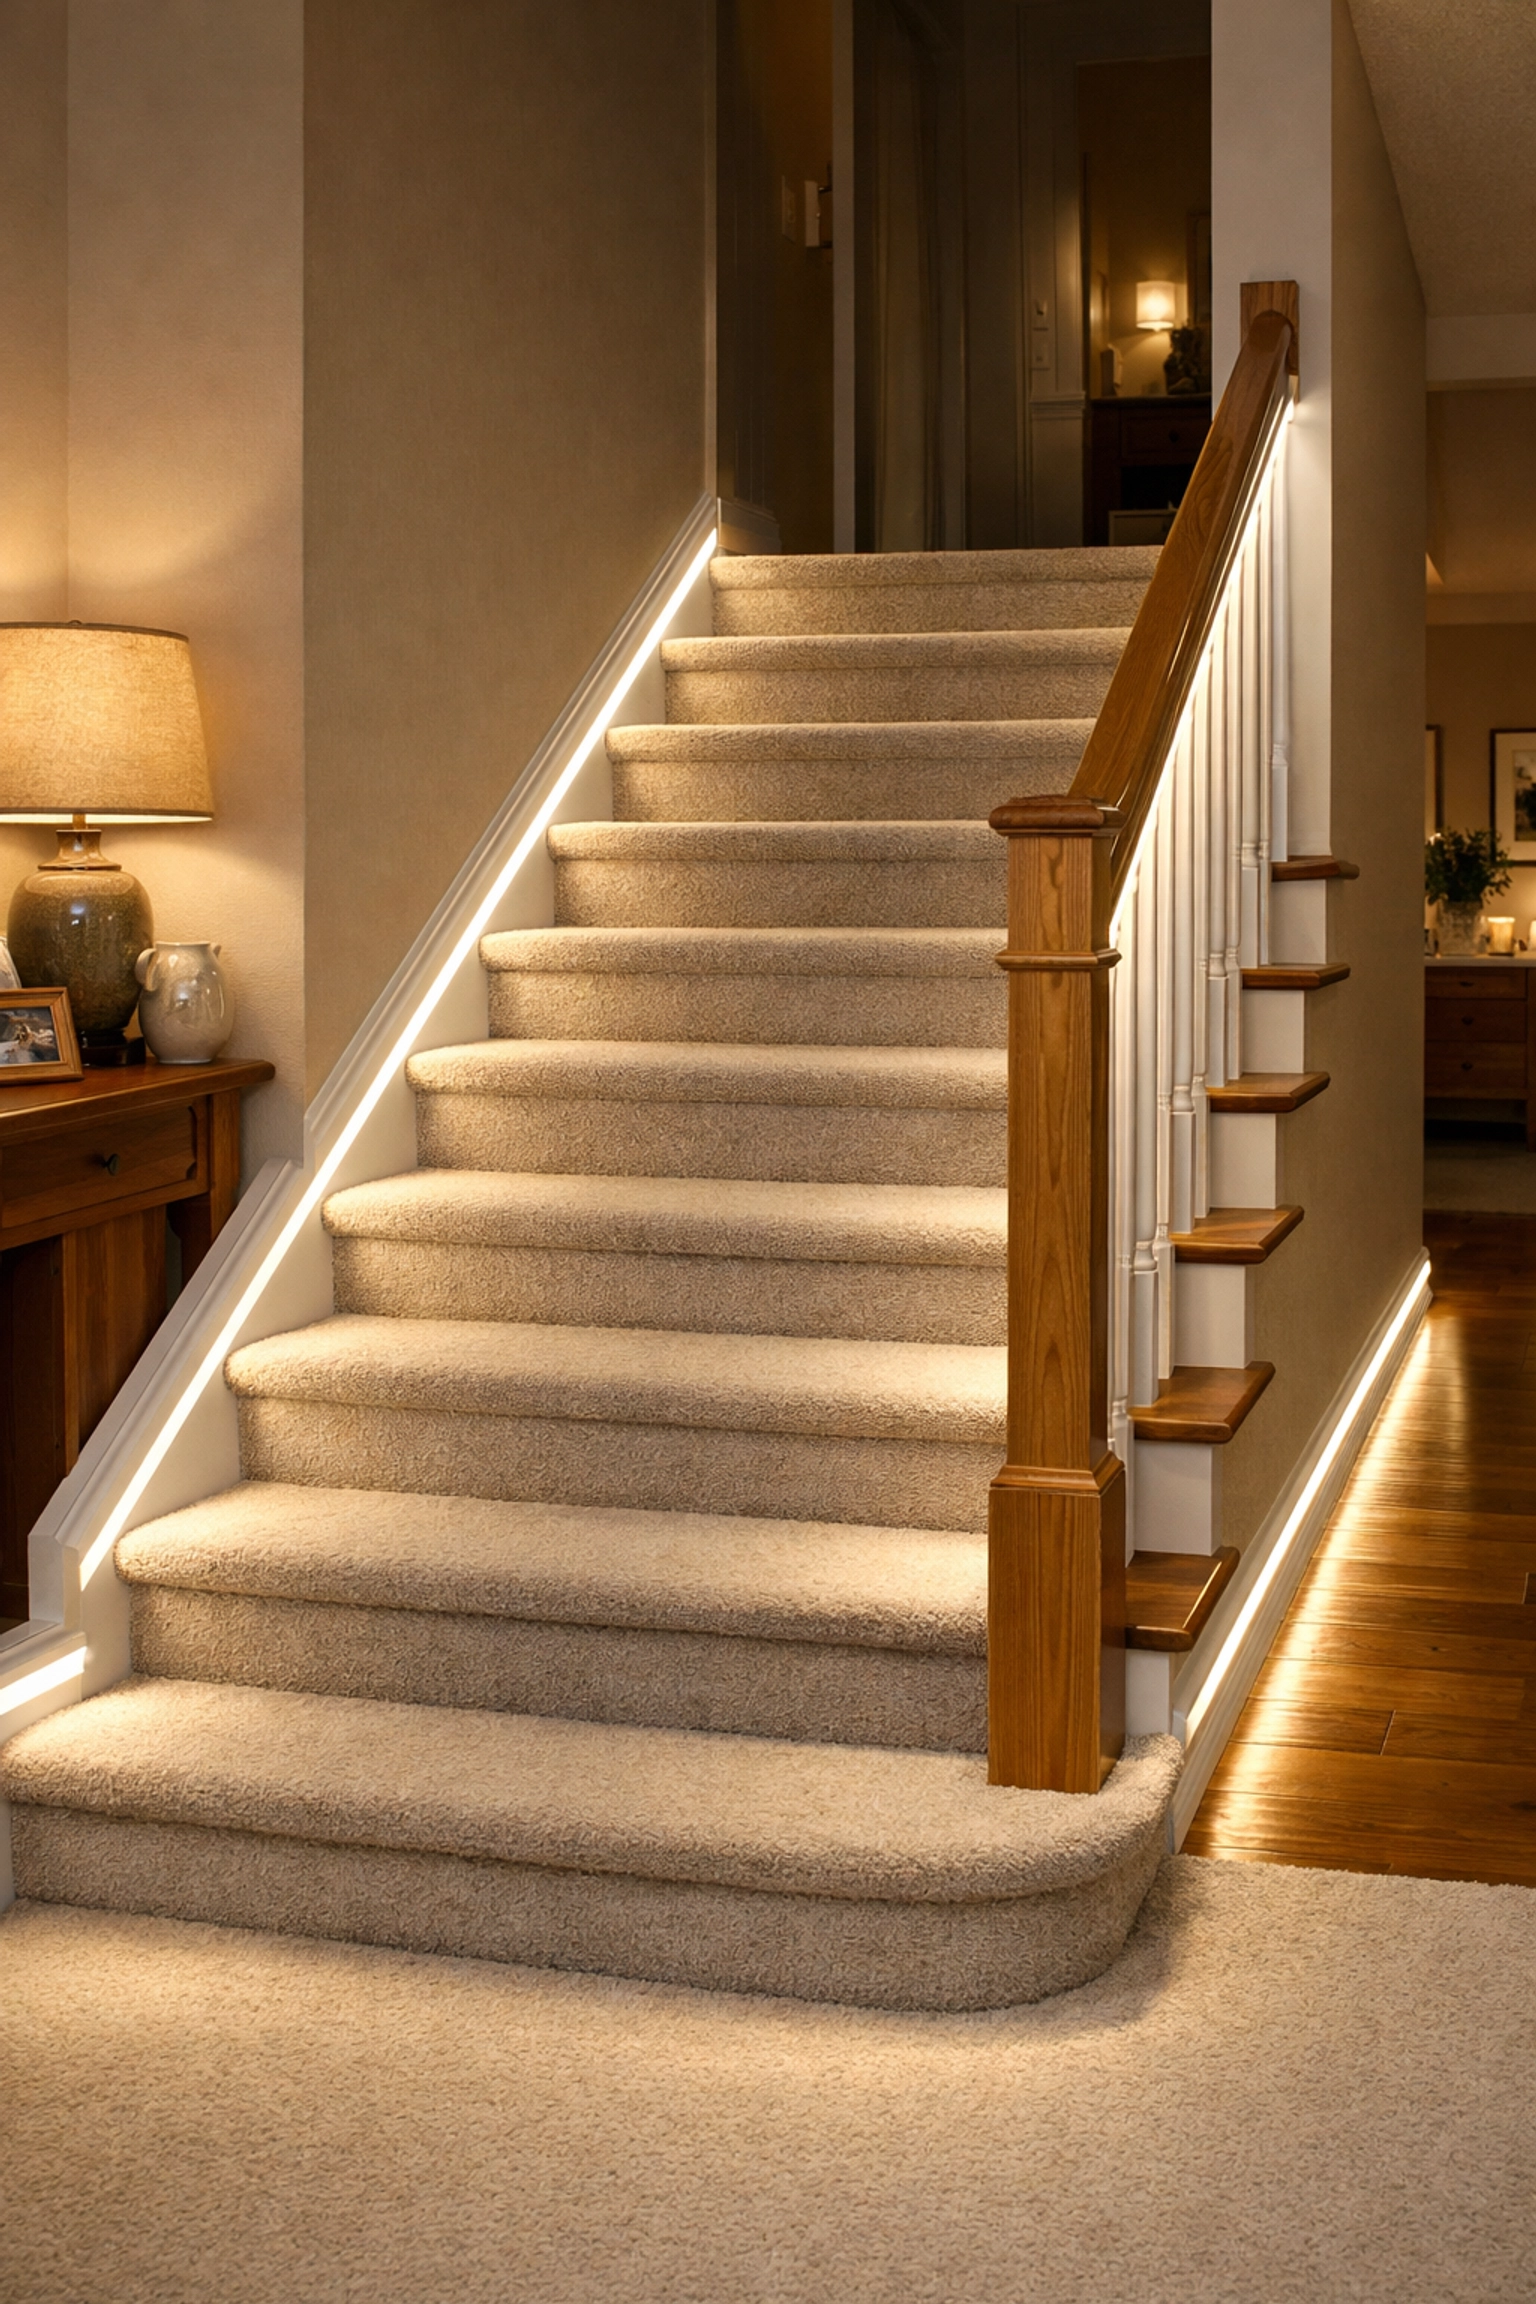
5. Living with "Soft" Lighting
Many staircases are lit by a single overhead bulb at the top or bottom of the flight. This creates "soft" lighting or, worse, harsh shadows. If the light source is behind you as you go down, your own body casts a shadow over the steps you are trying to navigate.
Inadequate lighting makes it difficult to judge depth and distance. As we age, our eyes require more light to distinguish between different surfaces and elevations.
How to Fix It:
- Increase the Lumens: Swap out old bulbs for brighter, high-lumen LED bulbs. Look for "cool white" or "daylight" tones, which provide better contrast than "warm" yellow tones.
- Motion-Activated Lights: Install small, battery-operated motion-sensor lights along the baseboard of the stairs. These will illuminate the path automatically the moment you approach, which is vital for middle-of-the-night trips.
- Two-Way Switches: Ensure you can turn the stair lights on and off from both the top and the bottom of the flight. Never attempt to navigate dark stairs because you didn't want to walk back up to flip a switch.
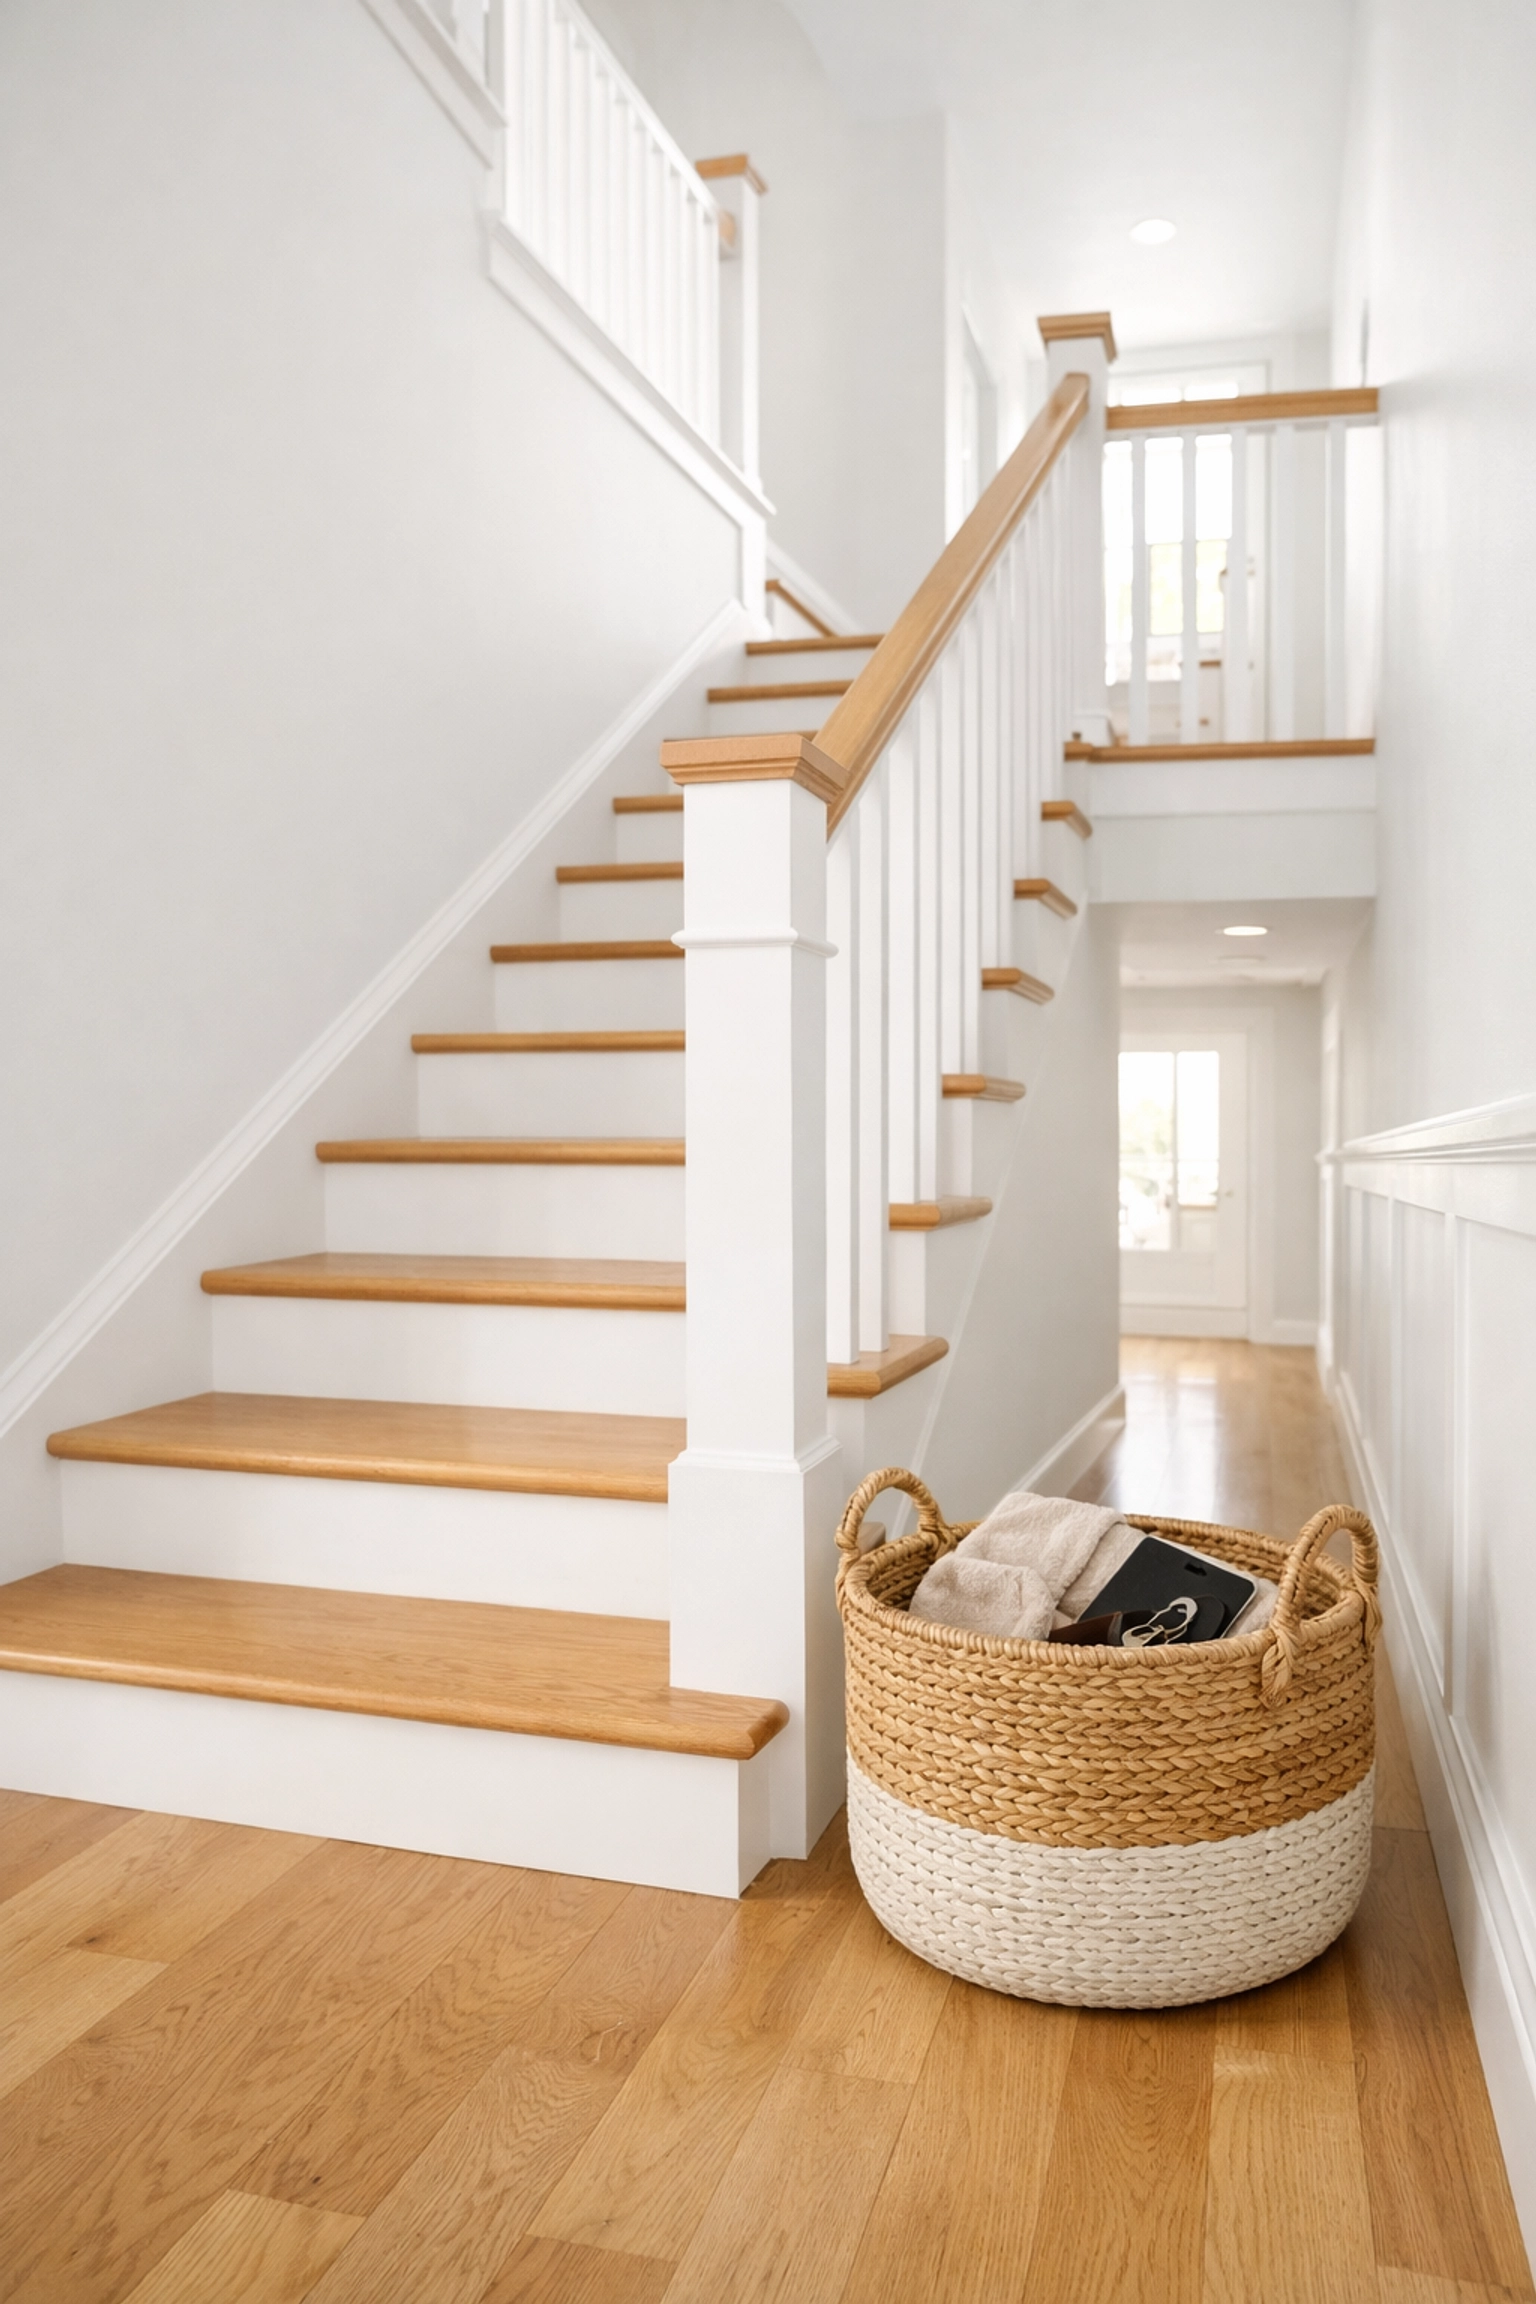
6. Using the Stairs as Temporary Storage
We’ve all done it: we place a stack of books, a pair of shoes, or a bag of laundry on the bottom steps, intending to take them up on the next trip. This "stair pile" is one of the most dangerous tripping hazards in the home.
The stairs should be a "zero-tolerance" zone for clutter. Even a small object can catch a heel or cause a momentary distraction that leads to a loss of balance.
How to Fix It:
- The "Landing Basket" Rule: Instead of putting items on the actual steps, place a decorative basket at the very top or very bottom of the stairs (away from the walking path). Only carry items up when the basket is full, and ensure you have at least one hand free for the railing while doing so.
- Clear the Path: Make it a daily habit to check the staircase for stray items. This is especially important if you have grandchildren or pets who might leave toys behind.
- One Hand Free: Never carry so much that you need both hands to hold it. If you have a large load, make two trips. Your safety is worth the extra few minutes.
7. The "I’ll Fix It Later" Maintenance Trap
Stairs endure a lot of stress. Over time, wood can warp, carpet can stretch and bunch, and handrail brackets can wiggle loose. We often get used to these small defects and "learn" to walk around them. However, a loose tread or a wobbly rail is a mechanical failure waiting to happen.
How to Fix It:
- The Monthly Shake Test: Once a month, give your handrail a firm shake. It should feel like it's part of the wall. If there’s any movement, tighten the bracket screws immediately.
- Listen to the Creaks: A squeaky or creaky stair is often a sign that the tread is becoming loose from the riser. Use wood screws (not nails) to secure loose treads to the underlying structure.
- Check the "Nosing": Ensure the front edge of the step (the nosing) isn't rounded off or worn down. If it is, it becomes much easier for a foot to slip off. You can add "stair nosing" protectors to refresh the edge and provide better grip.
The Role of Physical Readiness
While fixing the environment is crucial, stair safety also involves personal physical readiness. Negotiating stairs requires significant leg strength: specifically in the quadriceps and calves: and good ankle flexibility.
If you find that your legs feel heavy or your knees ache while using the stairs, it may be beneficial to speak with a physical therapist. They can suggest simple, seated or standing exercises that strengthen the muscles used for climbing. Improving your balance through gentle movements like Tai Chi or basic calf raises can also make a world of difference in how confident you feel on the stairs.
A Reassuring Final Thought
It’s easy to feel overwhelmed by the "rules" of home safety. But remember: the goal isn't to make your home look like a hospital; it’s to ensure your home remains the place where you feel most comfortable and secure.
Most of these fixes: better lighting, clearing clutter, and slowing down: don't cost a dime. They are simply shifts in perspective. By treating your staircase with respect and taking the time to address these seven common mistakes, you are investing in your own independence for years to come.
Safety isn't about restriction; it's about the freedom to move through your own home with confidence. Take it one step at a time, and you’ll find that the stairs are just another part of the house you call home.

