When we talk about aging in place or maintaining independence at home, the conversation almost always leads to the bathroom. It is a room of utility and privacy, but it is also, statistically, the most hazardous area in a household. The combination of hard surfaces, soapy water, and the physical transitions required for bathing or using the toilet creates a "perfect storm" for slips and falls.
As the founder of Fall Guys Products, I’ve spent a lot of time thinking about how to make these spaces feel less like a hazard zone and more like the sanctuary they should be. The single most effective way to do that is through the strategic use of bathroom safety rails. If you are new to the world of home modifications, the options can feel overwhelming. This guide is designed to break down everything you need to know about bathroom safety rails, from types and placement to installation and materials, in a way that is easy to understand.
Why the Bathroom is the Focus of Fall Prevention
Before we dive into the "how," it is important to understand the "why." Most falls don’t happen when you are walking down a straight, dry hallway. They happen during transitions, moving from sitting to standing, or stepping over an obstacle like a bathtub rim.
In a bathroom, your center of gravity is constantly shifting. When you combine that shift with a floor that might be wet or a surface that is slippery, your muscles have to work twice as hard to maintain balance. For someone with diminished strength or balance issues, that extra effort can lead to a fall. Safety rails act as a "third leg," providing a fixed point of stability that helps manage those transitions safely.
Understanding the Options: Not All Rails Are Created Equal
When people hear "safety rail," they usually think of the standard silver bar in a hospital bathroom. While those are effective, the world of mobility aids has evolved significantly. There are now several different types of rails designed for specific tasks.
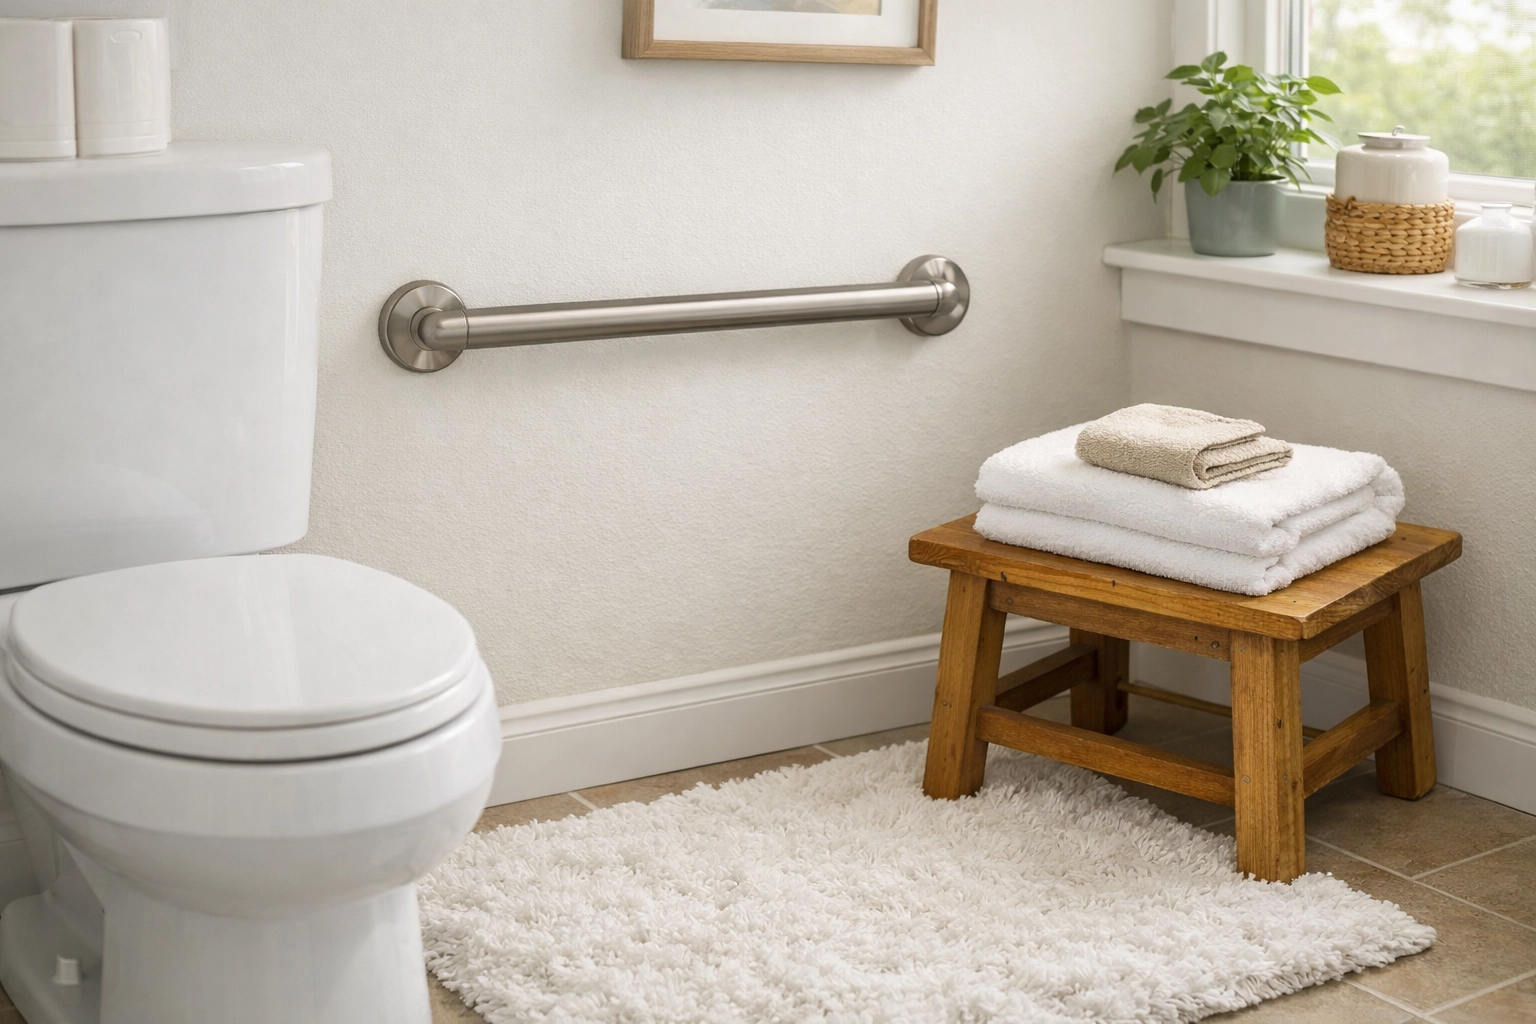
1. Straight Grab Bars
These are the most common. They come in various lengths (usually 12 to 48 inches) and can be installed horizontally, vertically, or diagonally.
- Vertical bars are excellent for pulling yourself up from a seated position or providing a handhold while stepping over a tub edge.
- Horizontal bars offer stability while walking or standing in the shower.
- Diagonal bars are often used near the toilet or in the shower to accommodate the natural angle of the wrist during a transition.
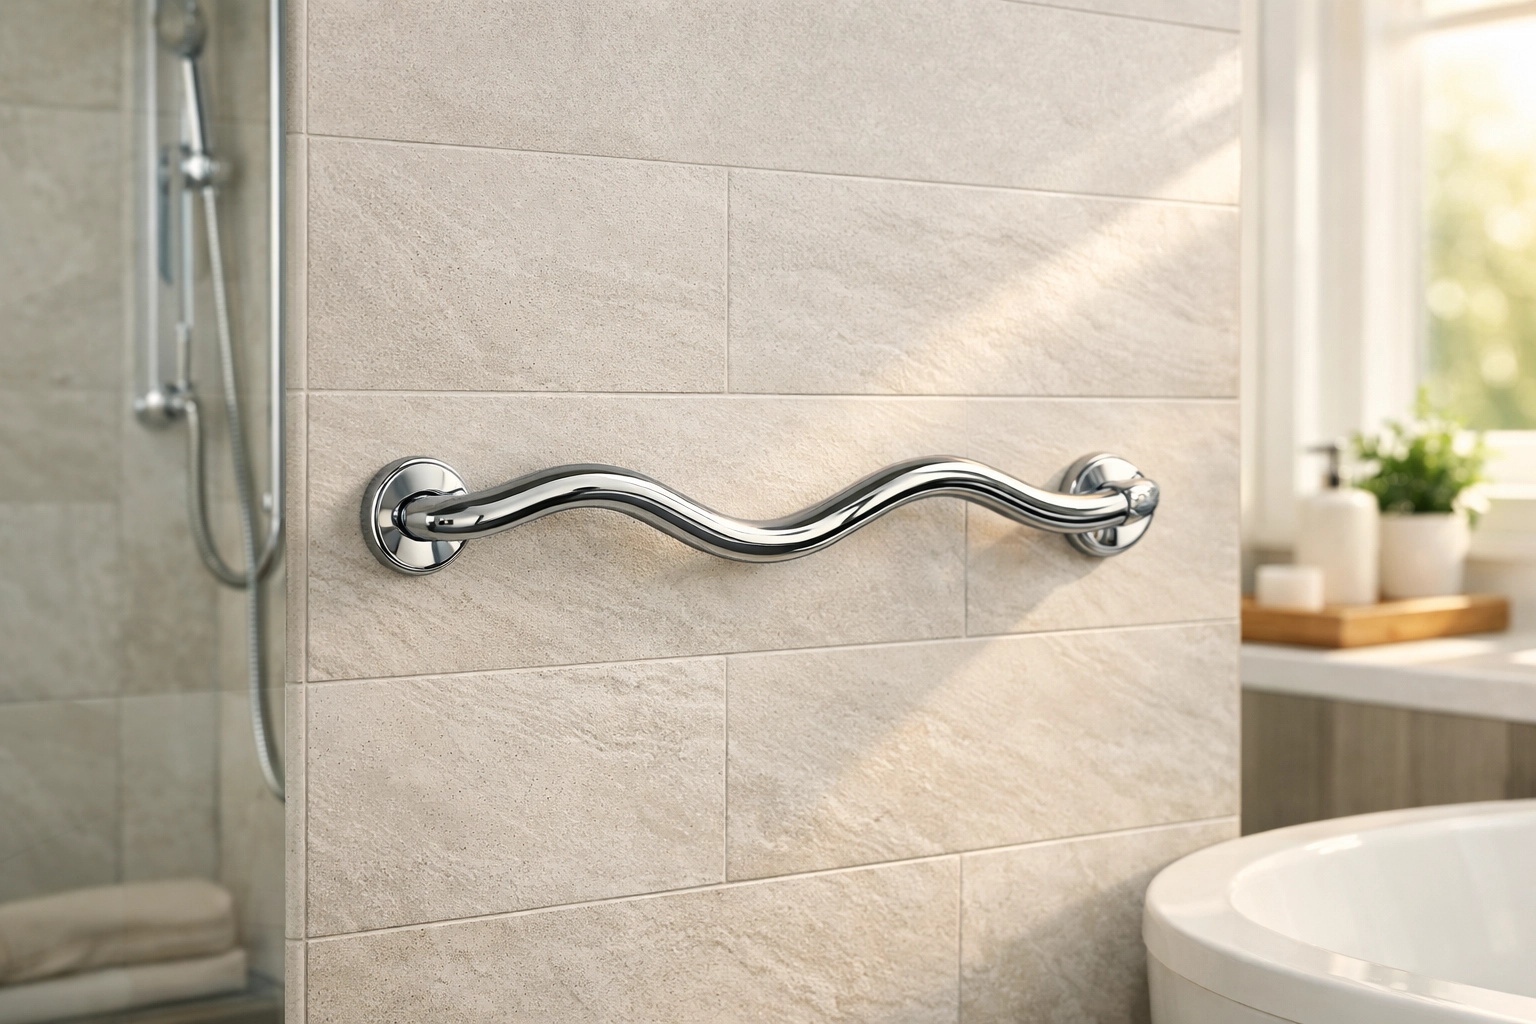
2. Angled or "Wave" Bars
These bars have a slight "S" or "V" shape. They are designed to provide support at multiple heights, which is particularly helpful if multiple people with different heights or mobility levels use the same bathroom. They also offer a more ergonomic grip for those with arthritis.
3. Floor-to-Ceiling Poles (Transfer Poles)
Sometimes, there isn't a wall exactly where you need one. A transfer pole is a vertical bar that uses tension to stay secure between the floor and the ceiling. These are incredible for placing right next to a bathtub or a toilet where wall space is limited. Some models even feature a horizontal "crossbar" that can pivot and lock into different positions.
4. Toilet Safety Rails
These are specialized frames that either bolt directly to the toilet or stand independently around it. They provide two armrests, much like a chair, making it significantly easier to lower yourself onto the seat and push back up to a standing position.
5. Clamp-On Tub Rails
If you aren't ready to drill holes into your wall or tile, a clamp-on rail attaches to the side of the bathtub. It provides a sturdy handle to hold onto as you step in and out of the tub. However, these are only for use on the tub edge and do not replace the need for support inside the shower.
Mapping the Journey: Where Do You Need Support?
To master fall prevention, you have to look at the bathroom through a lens of movement. I often suggest that people do a "dry run" (pun intended). Walk through your routine and notice where you feel the need to reach out and touch a wall or a counter for balance.
The Entry and Exit Zone
The most dangerous moment in a bathroom is often stepping over the side of the tub. This requires standing on one leg on a potentially wet surface while lifting the other leg 12 to 15 inches into the air. A vertical grab bar on the entry wall or a sturdy clamp-on tub rail is essential here.
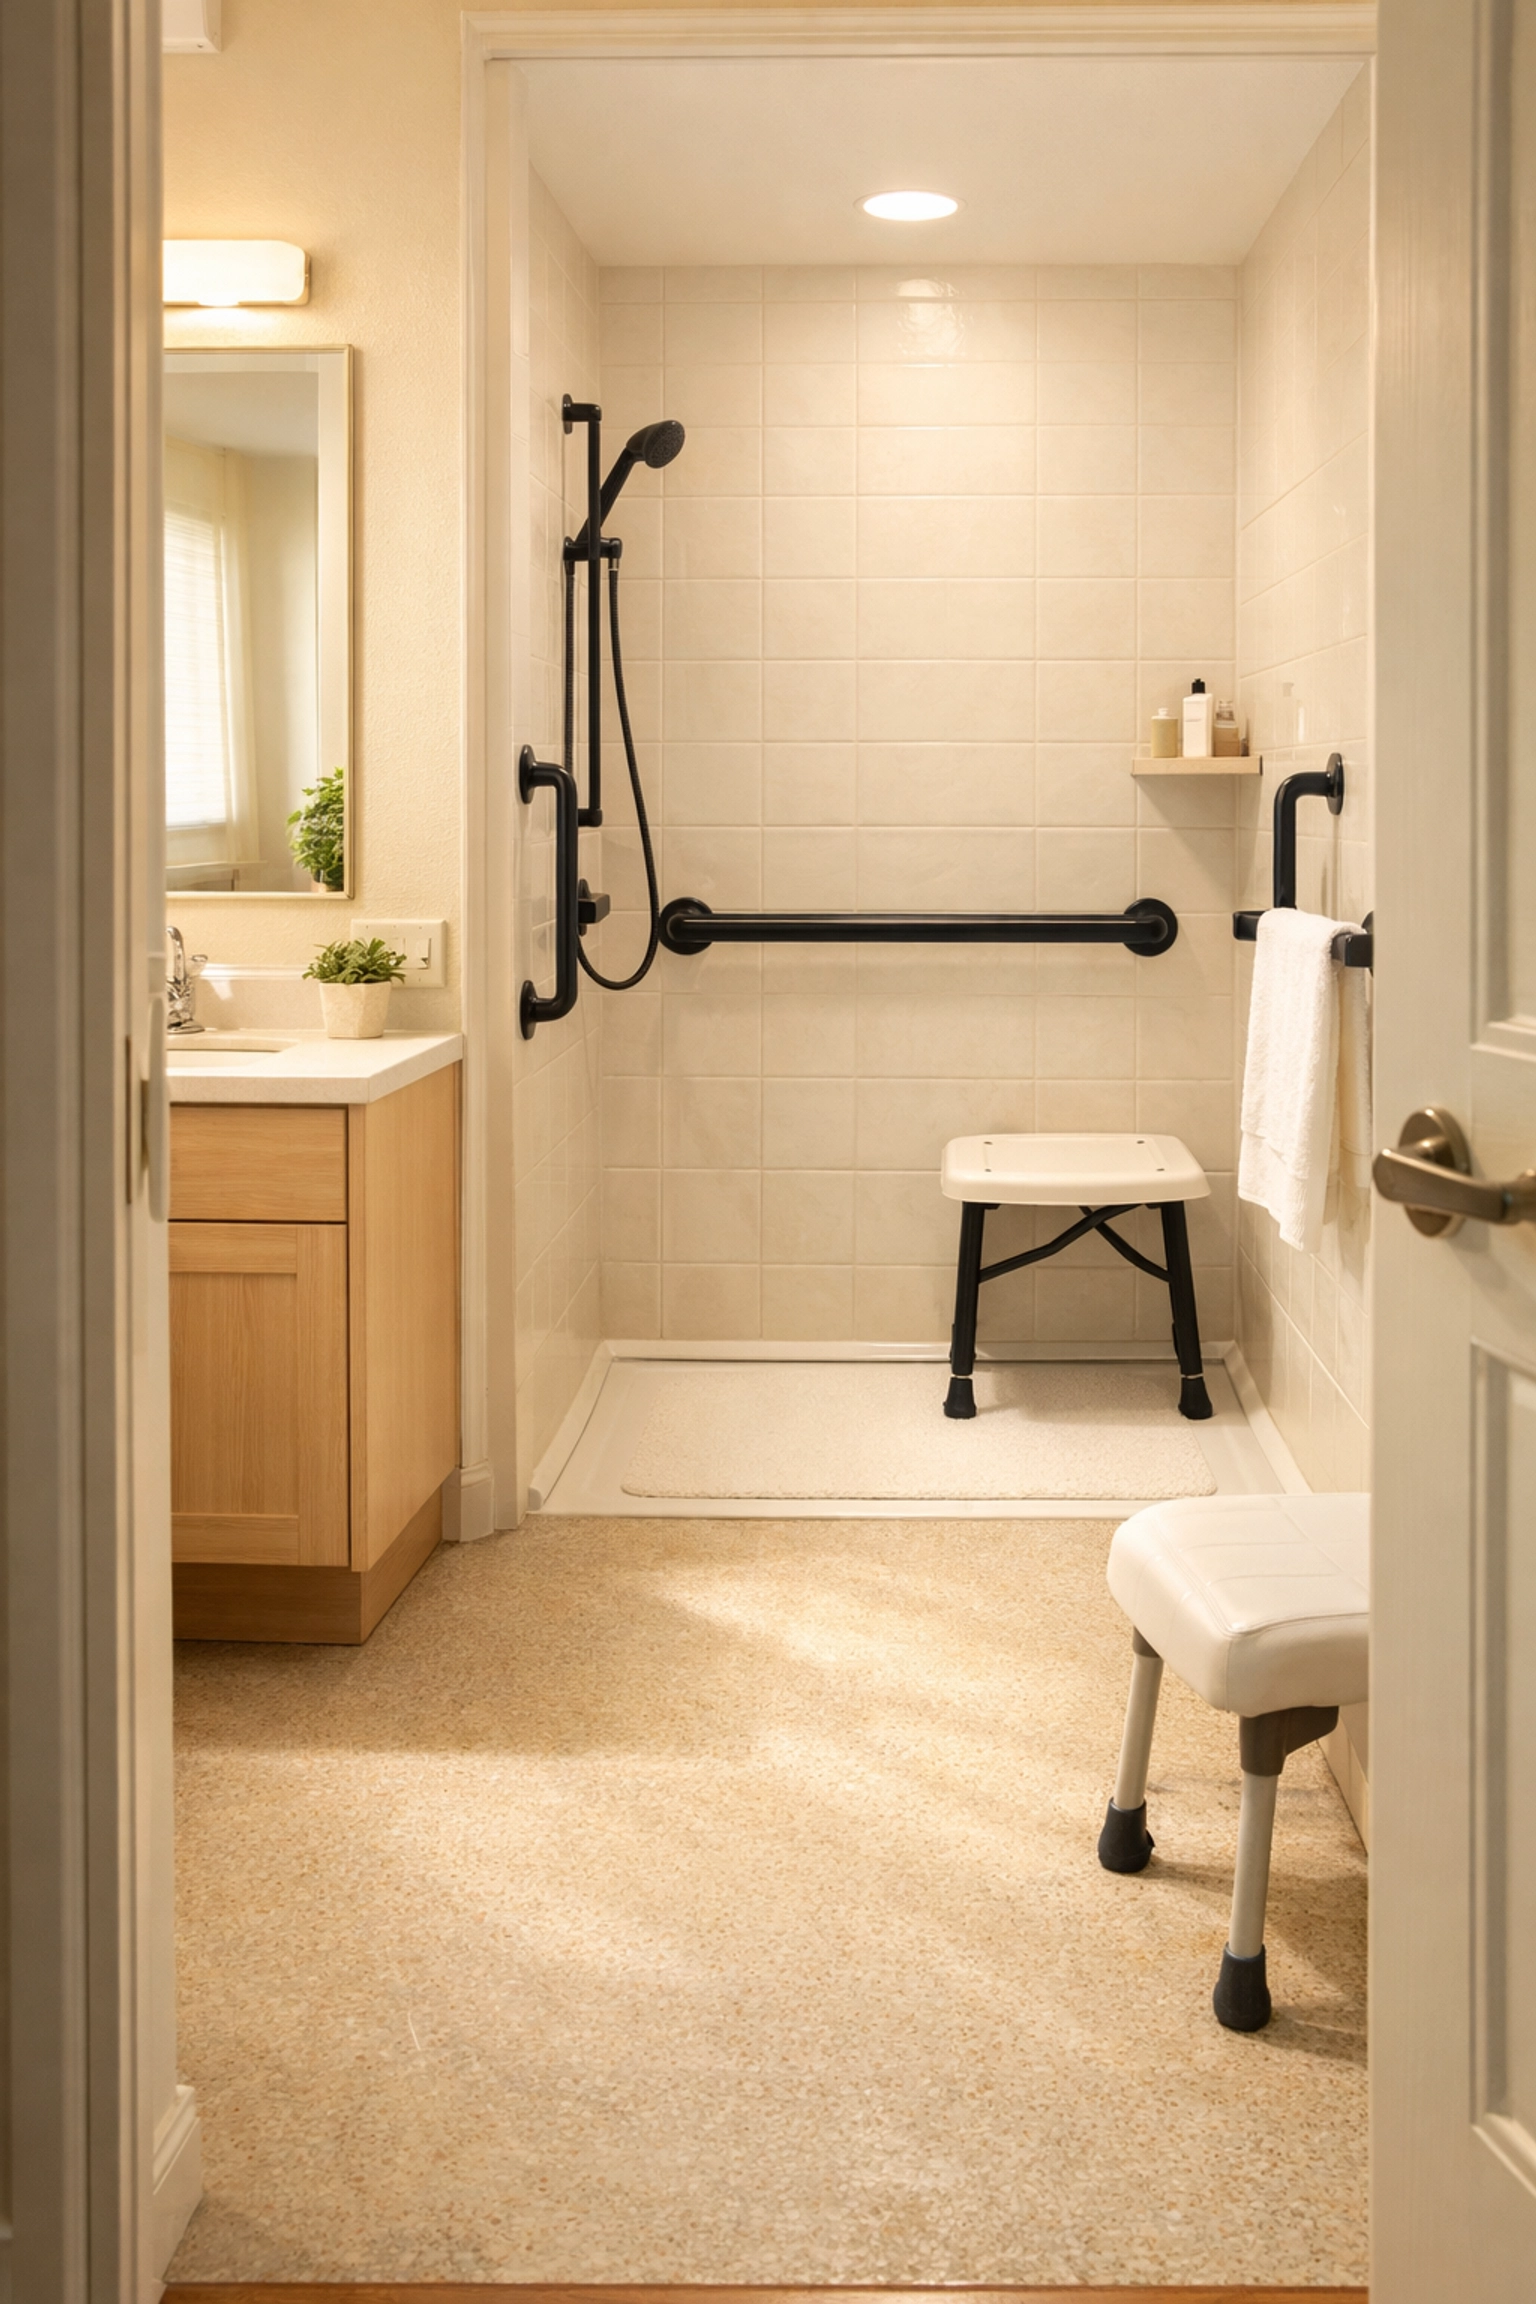
The Bathing Zone
Once inside the tub or shower, you need a way to maintain balance while washing. A long horizontal bar along the back wall is standard. If you use a shower chair, you should also have a bar positioned at a height that is easy to reach while seated, helping you pull yourself back up to a stand.
The Toileting Zone
The transition from sitting to standing at the toilet is a common point of exhaustion or dizziness (orthostatic hypotension). Support here can come from a horizontal bar on the side wall or a toilet safety frame. If the toilet is located in a "nook" with walls on both sides, installing bars on both walls provides the most balanced support.
Proper Placement: The Numbers You Need to Know
While every individual has different needs based on their height and reach, there are some standard guidelines used by professionals to ensure rails are effective.
- Height: Horizontal grab bars are typically installed 33 to 36 inches from the floor. This is roughly hip-height for most adults, allowing for a comfortable reach without leaning too far forward or backward.
- Sidewall Toilet Bars: These should be at least 42 inches long, extending about 24 inches past the front of the toilet. This ensures you have a grip as you begin to sit and as you finish standing.
- Backwall Toilet Bars: A bar behind the toilet should be at least 36 inches long to provide a secondary grip point.
- Vertical Entry Bars: These should be placed near the "control" end of the tub, where you turn the water on, to provide stability while you adjust the temperature.
Materials and Grips: What Feels Right for You?
The material of the rail matters more than you might think. A rail is only helpful if you can maintain a firm grip on it, especially when your hands are wet or soapy.
- Stainless Steel: The gold standard for durability. It won't rust and can hold significant weight. However, polished stainless steel can be very slippery when wet.
- Peened or Textured Finishes: Many stainless steel rails come with a "peened" finish, which is a slightly roughened texture on the metal. This provides much better traction for your hand.
- Knurled Grips: This is a cross-hatch pattern etched into the metal. It offers the best grip but can feel "scratchy" to those with very sensitive skin.
- Plastic or Nylon-Coated: These feel warmer to the touch than metal and often come in high-contrast colors (like white or blue), which is helpful for those with low vision. Ensure they have a reinforced metal core for safety.
The Installation Process: Getting it Right the First Time
I cannot stress this enough: A safety rail is only as strong as the wall it is attached to. If you screw a grab bar into just the drywall, it will pull right out the moment you put your weight on it, likely causing a worse injury than if the bar hadn't been there at all.
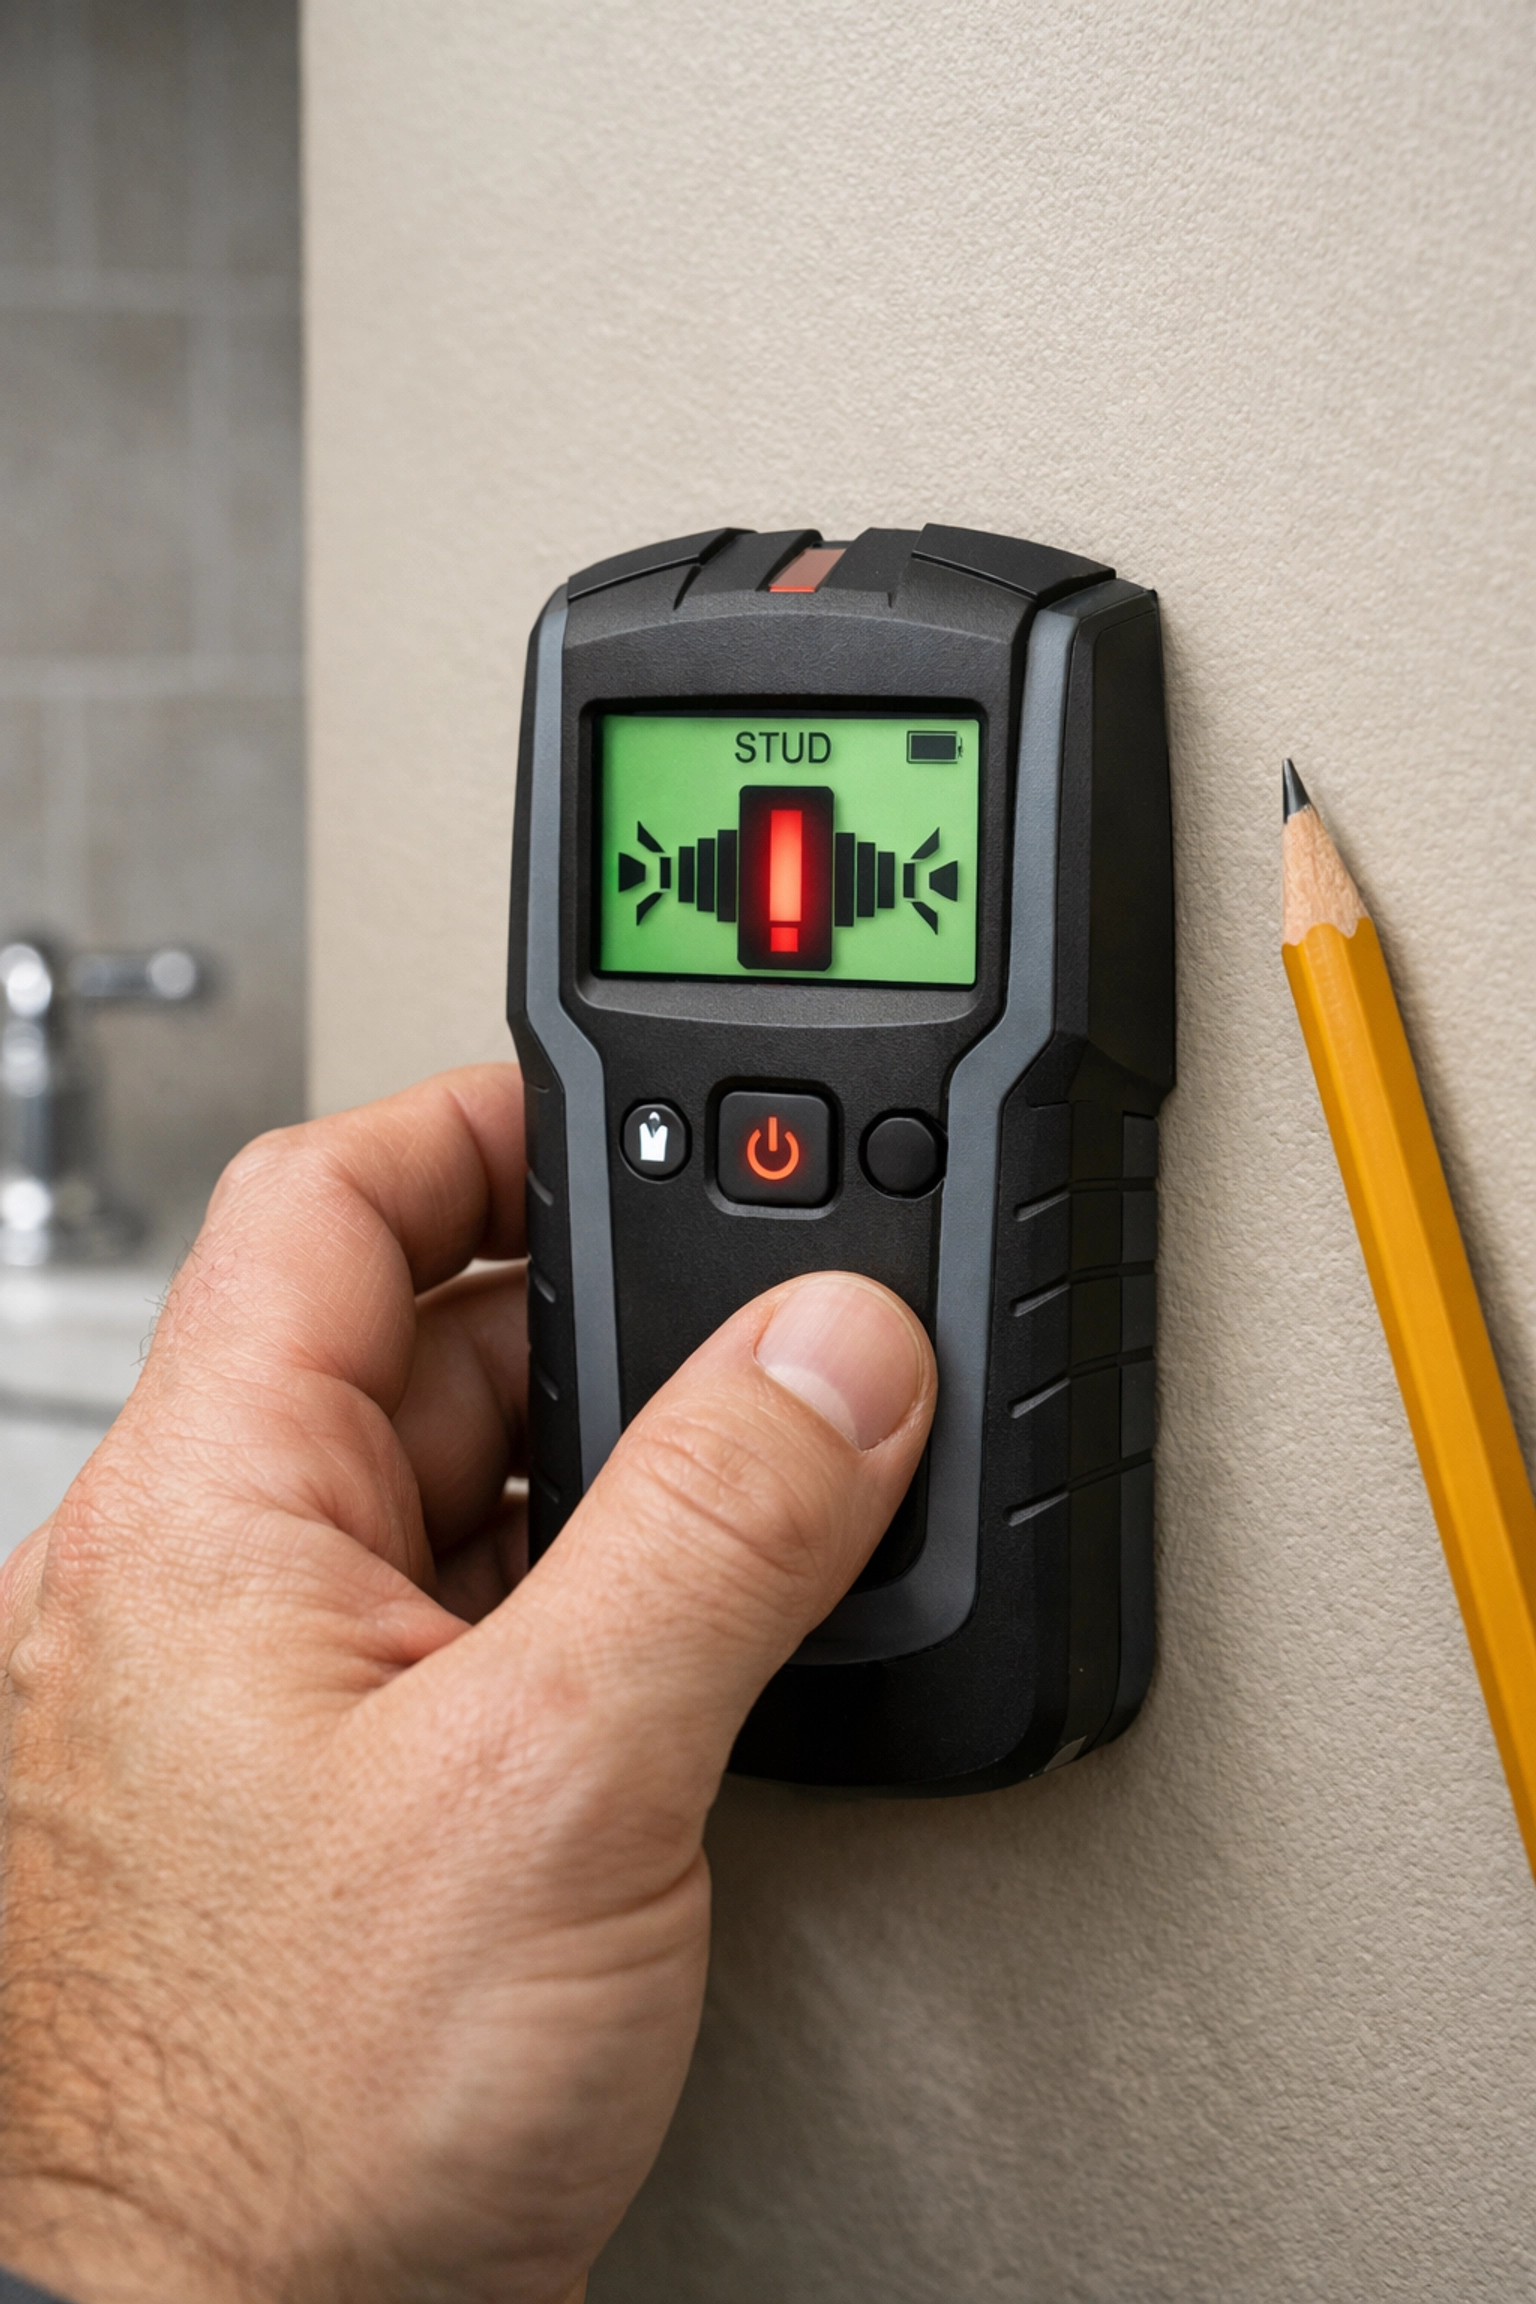
Finding the Studs
The safest way to install a rail is to screw it directly into the wooden studs behind the wall. Most studs are spaced 16 inches apart. Using a high-quality stud finder is the first step in any installation.
Dealing with Tile
Installing on tile requires a special diamond-tipped drill bit to prevent cracking. It is a delicate process. If you are uncomfortable drilling into your bathroom tile, this is the time to call a professional.
Using Anchors
If you absolutely cannot find a stud where you need a bar, there are specialized "hollow wall anchors" (like the WingIt system) designed specifically for grab bars. These spread the load across a larger area of the wall. However, these should be used with caution and only if they are rated for the weight they will be supporting.
Non-Permanent Solutions for Renters or Temporary Needs
If you are renting your home or recovering from a temporary injury (like a hip replacement) and don't want to make permanent changes, you have options.
- Tension Poles: As mentioned before, these require no drilling and can be moved from room to room.
- Suction Cup Bars: These are popular because they are cheap and easy, but please be careful. Suction cup bars are intended for balance assistance only, not for supporting your full body weight. They can and do lose suction over time. If you use them, you must check the seal every single time you use the bathroom.
A Caregiver's Checklist: How to Assess the Room
If you are setting up a bathroom for a loved one, take a moment to evaluate the space through their eyes.
- Is there a clear path? Ensure there are no rugs or clutter between the door and the rails.
- Is the lighting adequate? If they can't see the rail, they can't use it. Consider motion-activated night lights.
- Is the rail easy to see? For someone with vision impairment, a chrome rail on white tile can disappear. A rail in a contrasting color is much safer.
- Are the towel racks being used as grab bars? This is a major red flag. Towel racks are designed to hold the weight of a wet towel (maybe 5 lbs), not a human (150+ lbs). If you see towels hanging near the shower, replace the rack with a "dual-purpose" grab bar that can hold both a person and a towel.
Empowerment through Preparation
The goal of installing bathroom safety rails isn't to remind yourself of what you can't do; it’s to ensure you can continue doing what you want to do. Maintaining your privacy and dignity in the bathroom is a huge part of your overall quality of life.
Taking the time to understand the different types of rails and where they should be placed is the first step in creating a home that supports you. Whether you choose a simple straight bar or a more comprehensive floor-to-ceiling system, you are making an investment in your safety and your future independence.
Remember, fall prevention is not about living in fear; it is about being prepared so you can live with confidence. Start with one area: perhaps the toilet or the shower entry: and build your safety network from there. Your future self will thank you for the foresight.

