When we think of home, we think of comfort, safety, and memories. It is the one place where we should feel most at ease. However, as we age or recover from an injury, our relationship with our living space changes. A hallway that once felt short can suddenly feel long; a bathtub that was easy to step into can start to feel like a hurdle.
Most falls don't happen because of one big, obvious mistake. They happen because of small, "hidden" risks that we walk past every single day without noticing. This is where a home mobility assessment comes in. It’s not about making your home look like a hospital or stripping away your independence. In fact, it’s quite the opposite. It’s a proactive way to ensure you can stay in the home you love for as long as possible.
In this guide, we’re going to walk through how to conduct a basic home mobility assessment yourself. We’ll look at the common trip-wires and talk about how to spot the subtle signs that a room might be becoming a hazard.
What Exactly is a Home Mobility Assessment?
At its core, a home mobility assessment is a systematic "walk-through" of your living environment. The goal is to identify areas where your physical abilities and your physical environment might be out of sync.
Think of it like a safety tune-up for your house. Just as you’d check the tires on your car before a long road trip, you check the pathways in your home to ensure they are clear and supportive. We aren't just looking for "clutter": we are looking at lighting, floor transitions, reach heights, and stability points.
Why We Often Miss the Risks
The biggest challenge in spotting fall risks is "habituation." We get used to our surroundings. If you’ve stepped over that slightly loose piece of carpet for ten years, your brain stops seeing it as a hazard. You just automatically adjust your stride.
However, as we age, our reaction times, vision, and balance can shift. That "automatic adjustment" we’ve relied on might not be as reliable as it once was. A mobility assessment forces us to look at our home with fresh eyes: as if we were seeing it for the first time.
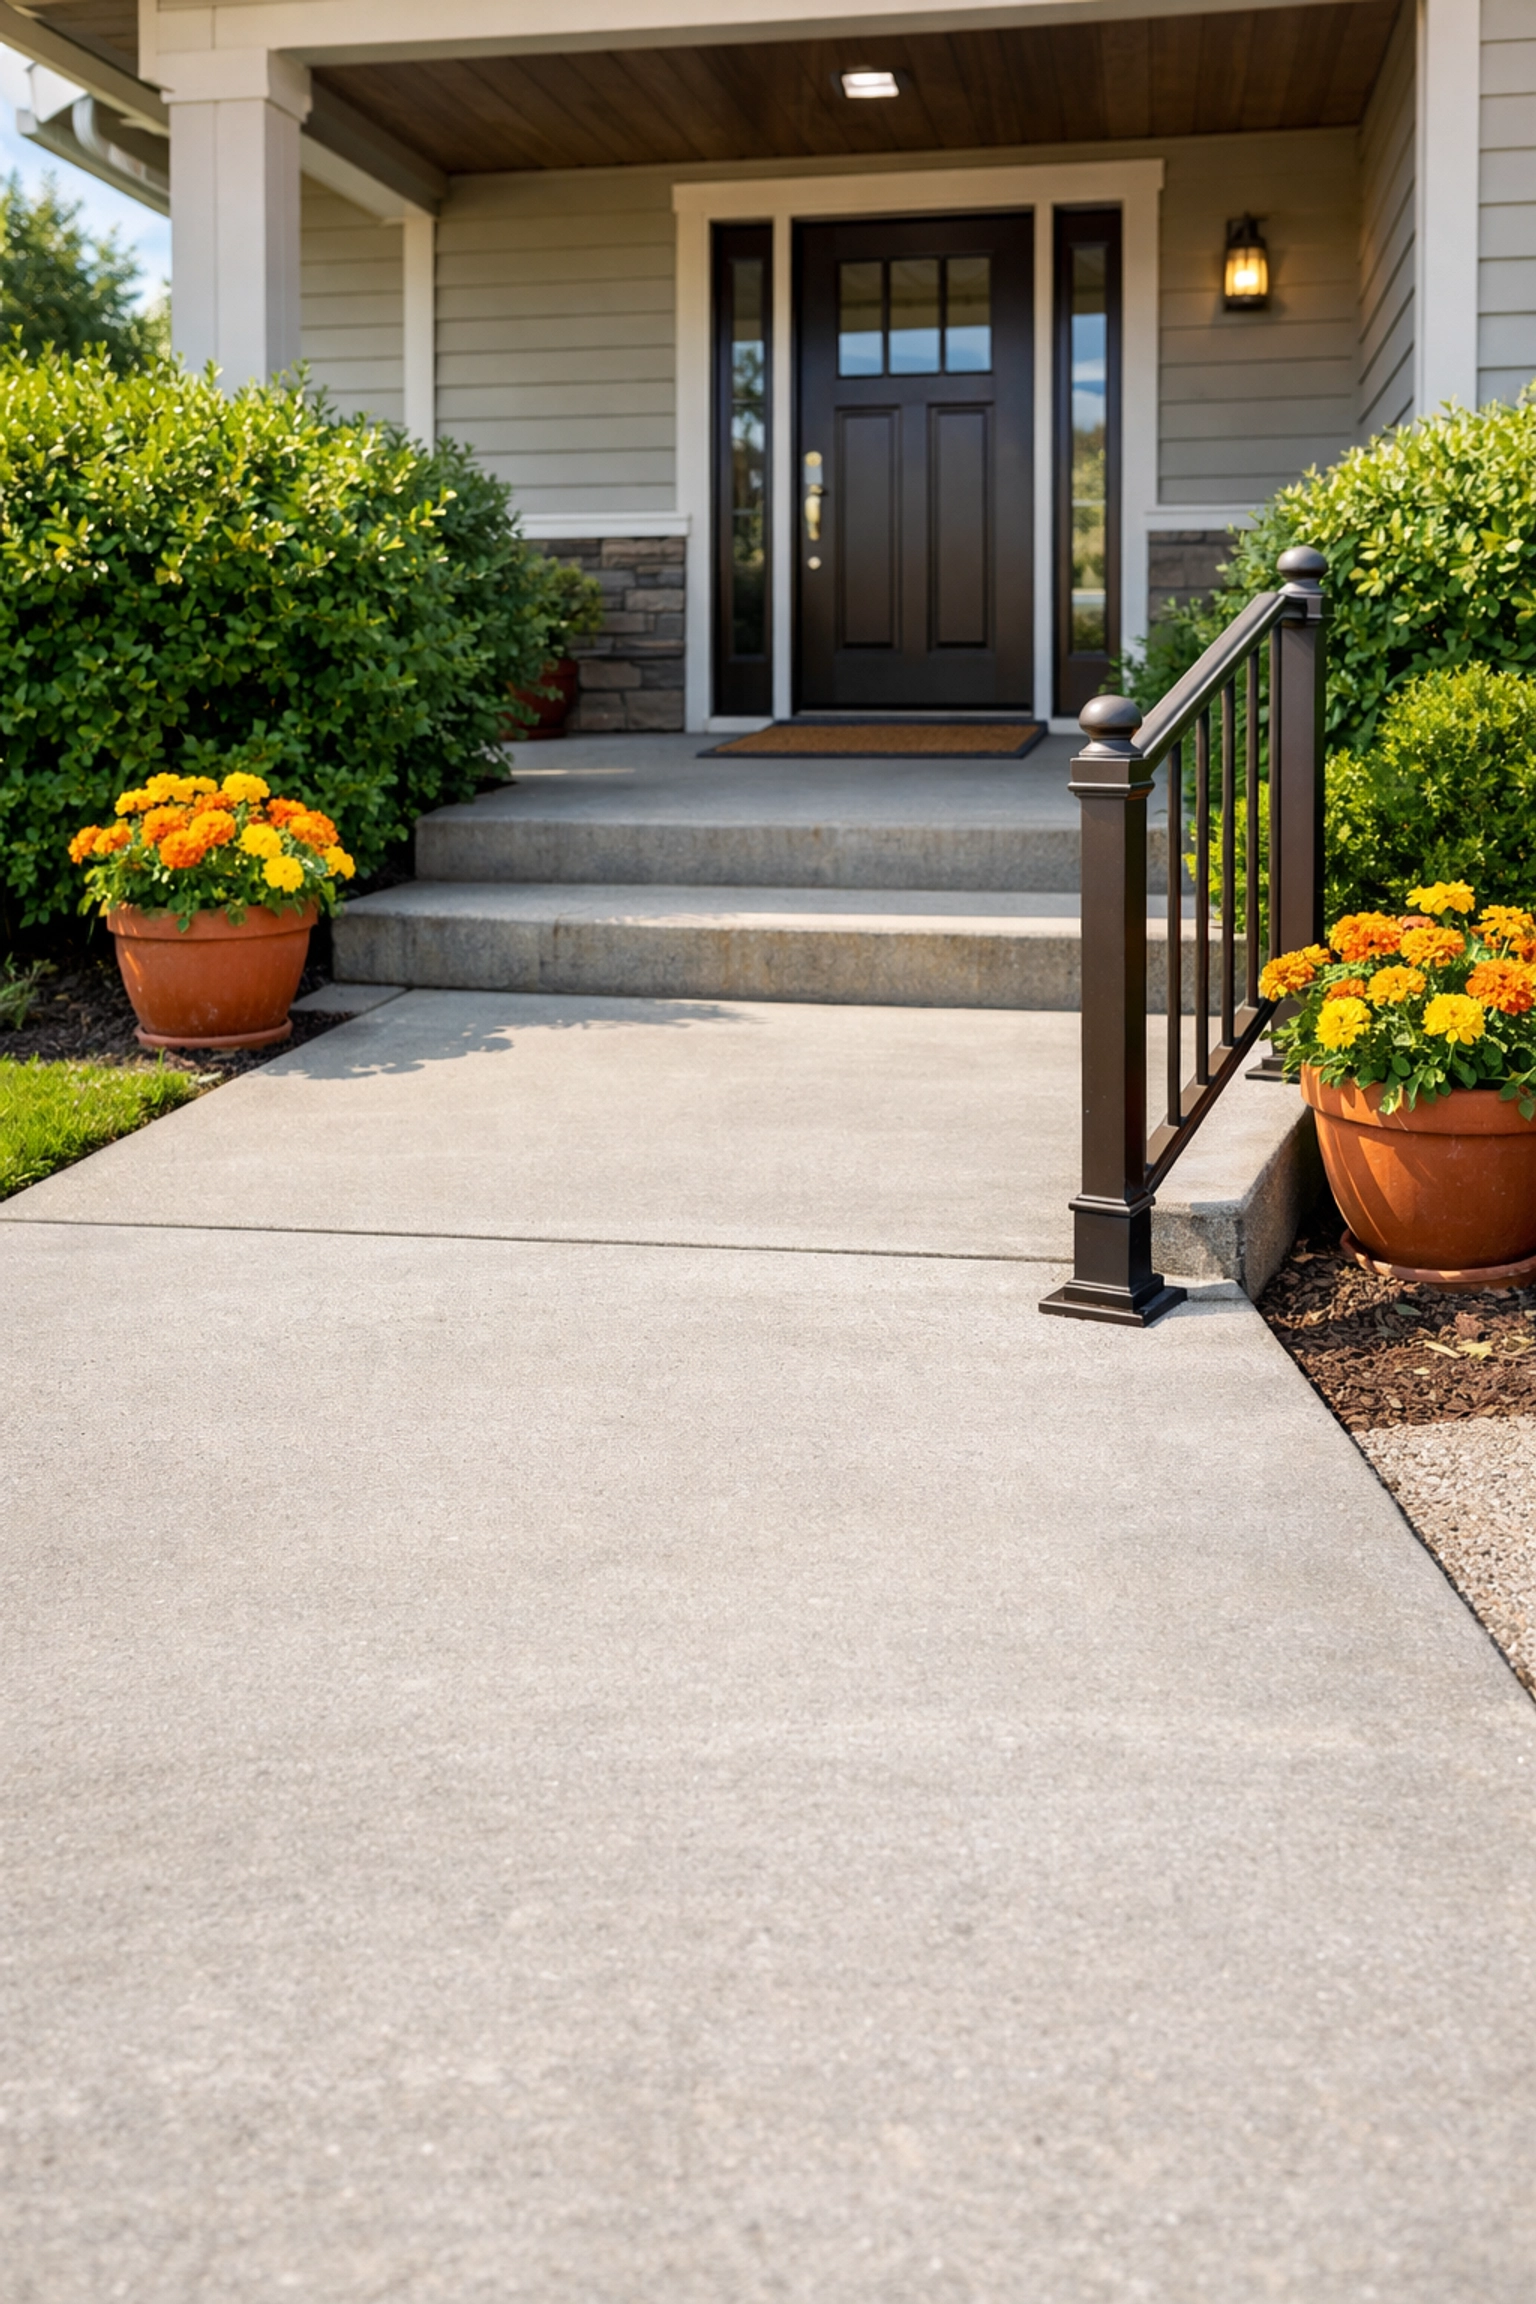
Starting Outside: The Journey to the Front Door
Safety starts before you even step inside. Many falls occur during the transition from the car to the house, especially when carrying groceries or navigating weather-related hazards.
- The Walkway: Check for cracks or uneven paving stones. Over time, tree roots or settling soil can create "lips" in the concrete that are just high enough to catch a toe.
- Thresholds: Look at the doorway itself. Is there a high metal or wood strip at the bottom of the door? These "thresholds" are classic tripping points, especially for those who use a cane or walker.
- Lighting: Is the path well-lit at night? Motion-sensor lights are a great way to ensure you never have to fumbled for a key in the dark.
- Handrails: If there are steps leading to the door, is there a sturdy handrail? It should be easy to grip and extend slightly past the top and bottom steps.
The Living Room: Clearing the Path
The living room is where we spend a lot of our time, but it’s often the room with the most "stuff."
- The "Throw Rug" Trap: Area rugs are beautiful, but they are one of the leading causes of falls. If you must have them, ensure they are secured with non-slip backing or double-sided tape. Better yet, consider removing them if they have thick edges.
- Furniture Layout: Walk through your living room. Do you have to "weave" around coffee tables or footstools? Clear, wide pathways (at least 32 to 36 inches) are essential, particularly if you ever need to use a mobility aid.
- Seating Height: Sit down on your favorite chair or sofa. Is it hard to get back up? Low, soft furniture can be difficult to exit. If you find yourself "rocking" several times to build momentum to stand, the seat may be too low or too soft.
- Cords and Cables: Look behind the TV and near lamps. Are there extension cords crossing the floor? These should be tacked down or rerouted along the walls.
The Kitchen: Reach and Resilience
Kitchens are high-activity areas where we often multi-task. Fatigue can set in while cooking, making safety even more important.
- The Golden Zone: Items you use every day: the coffee maker, your favorite skillet, frequently used spices: should be kept between waist and shoulder height. Reaching high into cabinets or bending deep into low drawers can cause a shift in balance.
- Spills and Surfaces: Kitchen floors are often tile or linoleum, which become incredibly slick when wet. Check for any leaks near the fridge or sink. Small rugs near the sink should be ultra-low profile and have heavy-duty rubber backing.
- Lighting (Again): Under-cabinet lighting can help you see what you’re doing on the counters, reducing the chance of accidents while prepping food.
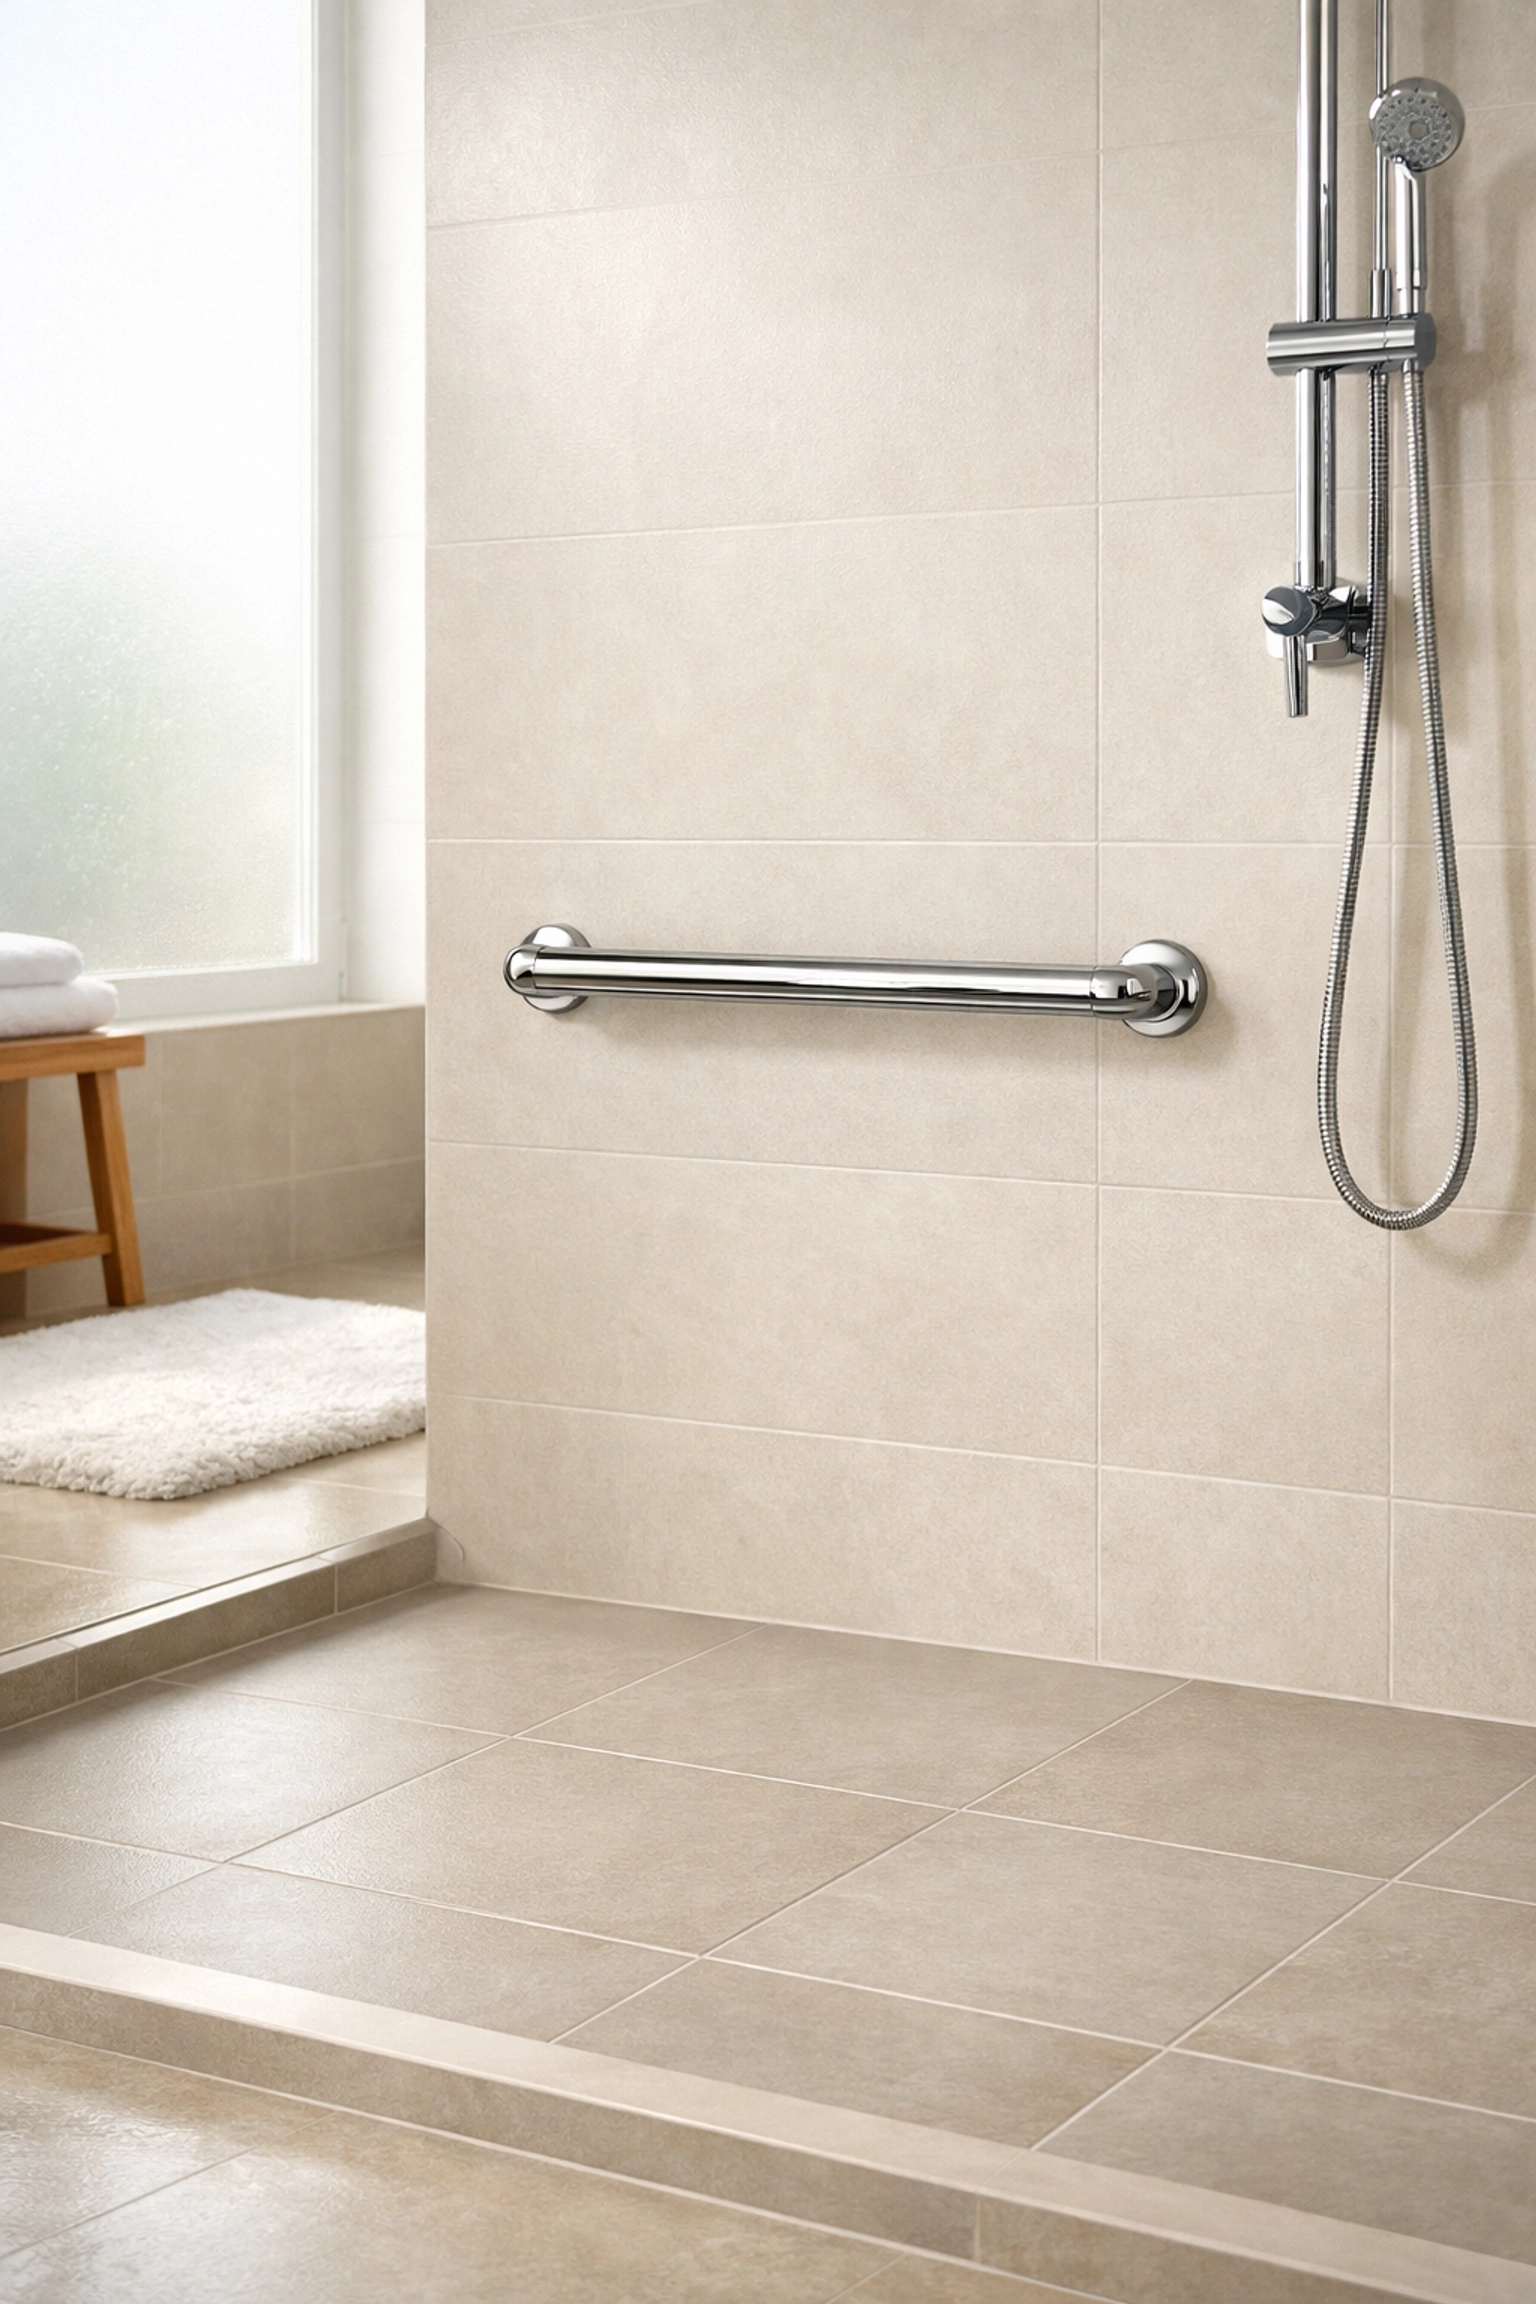
The Bathroom: The Highest Risk Area
Statistically, the bathroom is the most dangerous room in the house. The combination of water, hard surfaces, and the physical transitions required for bathing and using the toilet creates a "perfect storm" for falls.
- The Toilet Transition: Is the toilet seat low? Most standard toilets are lower than the average chair. Getting on and off can put a lot of strain on the knees and hips.
- The Shower Entry: If you have a tub-shower combo, that high side wall is a major obstacle. Stepping over it while wet and potentially off-balance is a high-risk move.
- Support Points: Where do you put your hands when you’re moving in the bathroom? If you find yourself grabbing the towel rack, the sink edge, or the toilet paper holder, you are at risk. Those items are not designed to hold human weight.
- Non-Slip Surfaces: Every inch of the bathroom floor and the inside of the tub/shower should have a non-slip texture.
The Bedroom: Midnight Navigation
Falls in the bedroom often happen in the middle of the night when we are groggy and the room is dark.
- Bed Height: When you sit on the edge of the bed, your feet should be flat on the floor and your knees should be at a 90-degree angle. If the bed is too high, you have to "slide" out, which can lead to a fall. If it’s too low, it’s hard to stand up.
- Path to the Bathroom: The route from the bed to the bathroom should be completely clear of shoes, books, or furniture.
- Nightlights: Use "always-on" or motion-sensing nightlights in the bedroom and the hallway leading to the bathroom.
- Phone Access: Ensure there is a phone or a medical alert device within reach of the bed.
Assessing Your Own Physical Mobility
A home assessment isn't just about the house; it's also about how you move within it. You can do a few simple checks (carefully!) to see where you might be struggling.
- The Chair Stand: Sit in a sturdy chair with your arms crossed over your chest. Try to stand up. If you find this difficult without using your hands to push off, it’s a sign that your lower body strength could use some attention, and your home needs more "leverage points" (like rails).
- The Floor Check: Look at your feet while you walk. Are you lifting your feet fully, or are you shuffling slightly? Shuffling makes it much more likely that you’ll catch your toe on a rug or a door threshold.
- The Reach Test: Reach for something on a high shelf. Do you feel dizzy when you look up? This is common but can lead to a fall.
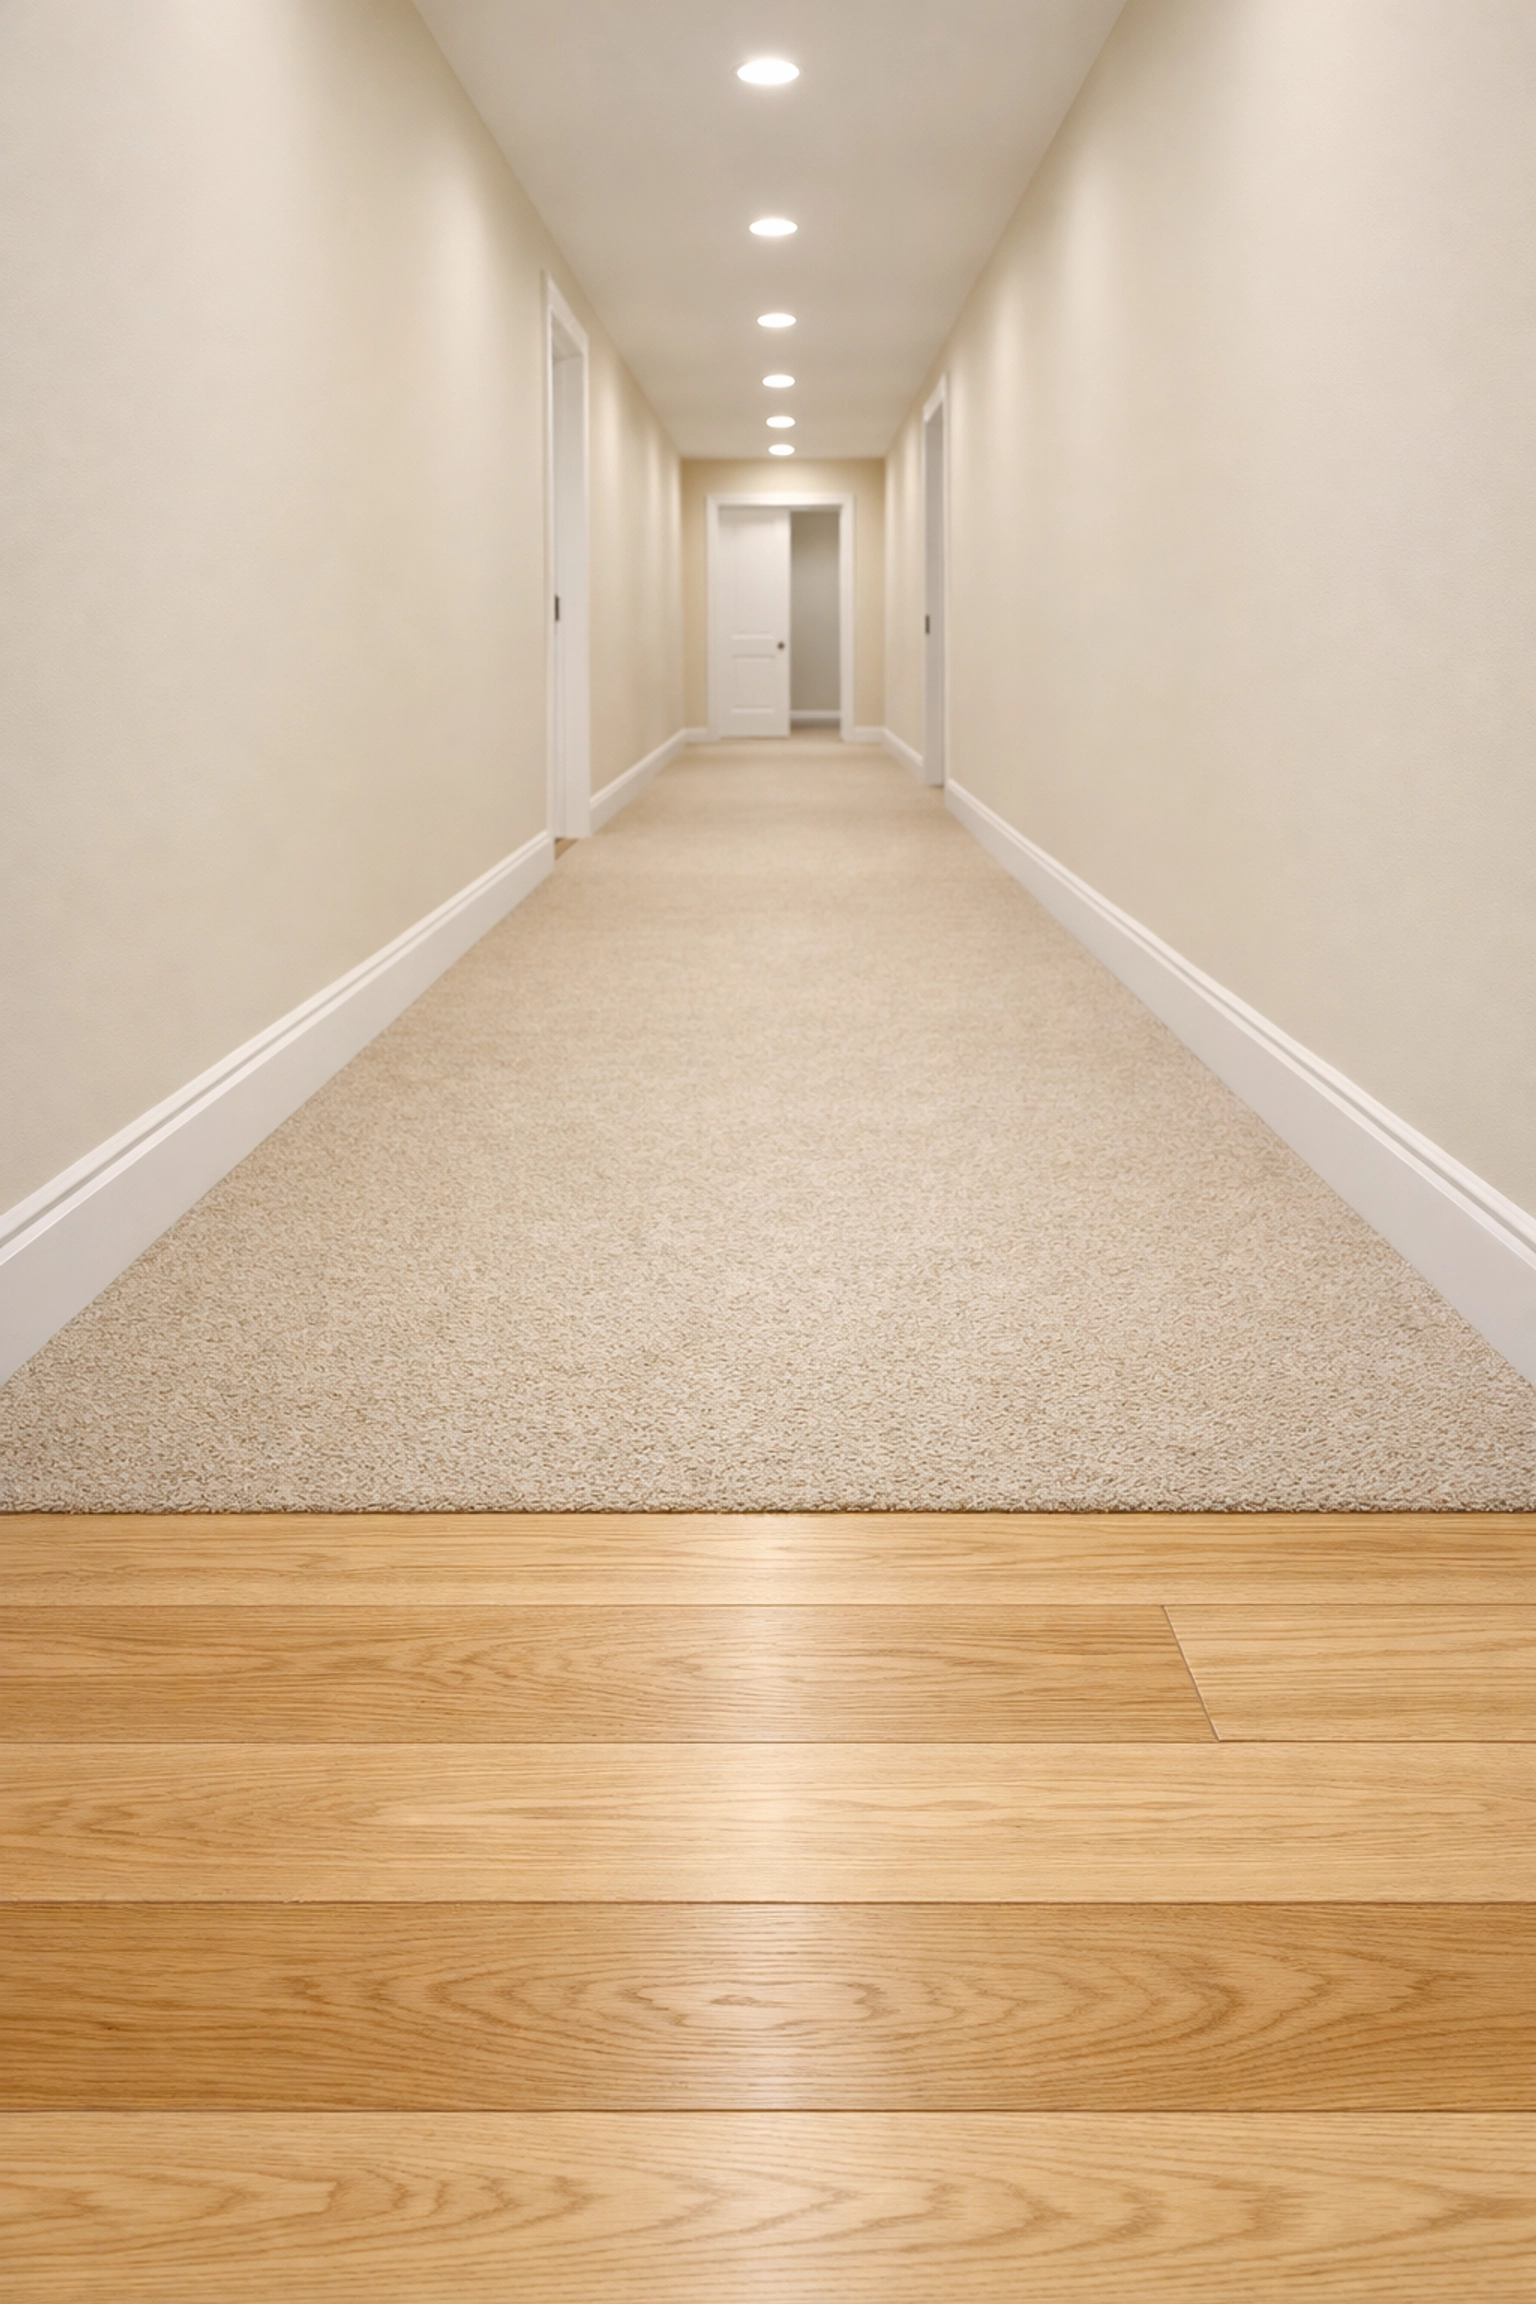
Identifying the "Silent" Hazards: Lighting and Flooring
We’ve mentioned these in specific rooms, but they deserve their own spotlight because they are the two most common factors in home falls.
Flooring Transitions:
The most dangerous part of a floor is where it changes. Going from wood to carpet, or from tile to a rug, creates a change in friction. Your foot expects one thing and gets another. Ensure all transitions are flush. If there is a "lip" between rooms, consider a small transition ramp to smooth it out.
The "Glare" Factor:
Bright, polished floors might look clean, but they can create a glare that masks puddles or objects on the floor. Use matte finishes whenever possible. Also, ensure there aren't "pools of shadow" in your hallways. Uniform, bright lighting is the goal.
Creating Your Action Plan
Once you’ve walked through your home, you’ll likely have a list of things to fix. It can feel overwhelming, so it’s best to prioritize.
- Level 1: Immediate Fixes (Low Cost). Remove the throw rugs, clear the clutter from the stairs, change the lightbulbs to higher wattage (LEDs are great), and move frequently used kitchen items to the counter.
- Level 2: Minor Modifications. Install non-slip strips in the tub, add a raised toilet seat, and put in motion-sensor nightlights.
- Level 3: Significant Improvements. This includes things like installing professional grab bars in the bathroom, adding a second handrail to the stairs, or installing a modular ramp at the front door.
When to Call in the Professionals
While a DIY assessment is a fantastic start, it’s often helpful to get an expert opinion. Occupational Therapists (OTs) and Physical Therapists (PTs) are trained specifically to look at the relationship between a person’s body and their environment.
An OT can come to your home and provide a "clinical" home assessment. They don't just look at the rugs; they watch how you move and suggest specific equipment or modifications that fit your unique needs. If you’ve had a recent fall or have a condition like Parkinson’s or arthritis, a professional assessment is highly recommended.
A Note for Caregivers
If you are doing this assessment for a loved one, remember that "home" is a sensitive subject. Suggesting changes can sometimes feel like you are suggesting they can’t take care of themselves.
Approach the conversation with reassurance. Instead of saying, "This rug is dangerous," try saying, "I want to make sure this hallway is as easy to walk through as possible so you can keep getting around comfortably." Frame the assessment as a way to preserve independence, not take it away.
Moving Forward with Confidence
A home mobility assessment isn’t a one-time event. Our needs change, and our homes change. It’s a good idea to do a "mini-walk-through" every six months.
By taking the time to spot these hidden risks now, you are making an investment in your future. You are choosing to stay active, stay independent, and stay safe in the place you call home. Prevention is always quieter and less stressful than recovery; and it starts with a simple walk through the front door.

