Stairs are often the most intimidating part of a home for seniors and their caregivers. We use them dozens of times a day, usually without a second thought. However, statistics consistently show that stairways are one of the most common sites for falls in the household.
When we talk about stair safety, it’s not just about installing a lift or avoiding the stairs entirely. Often, the risks come from small, overlooked habits or design choices that have been part of the home for decades. Improving safety is about identifying these subtle "mistakes" and making incremental changes that build confidence and security.
As we look at these seven common mistakes, the goal isn't to cause worry. Instead, it’s to provide a clear, actionable roadmap to making your home a safer place to navigate.
Mistake 1: Prioritizing Aesthetics Over Grip
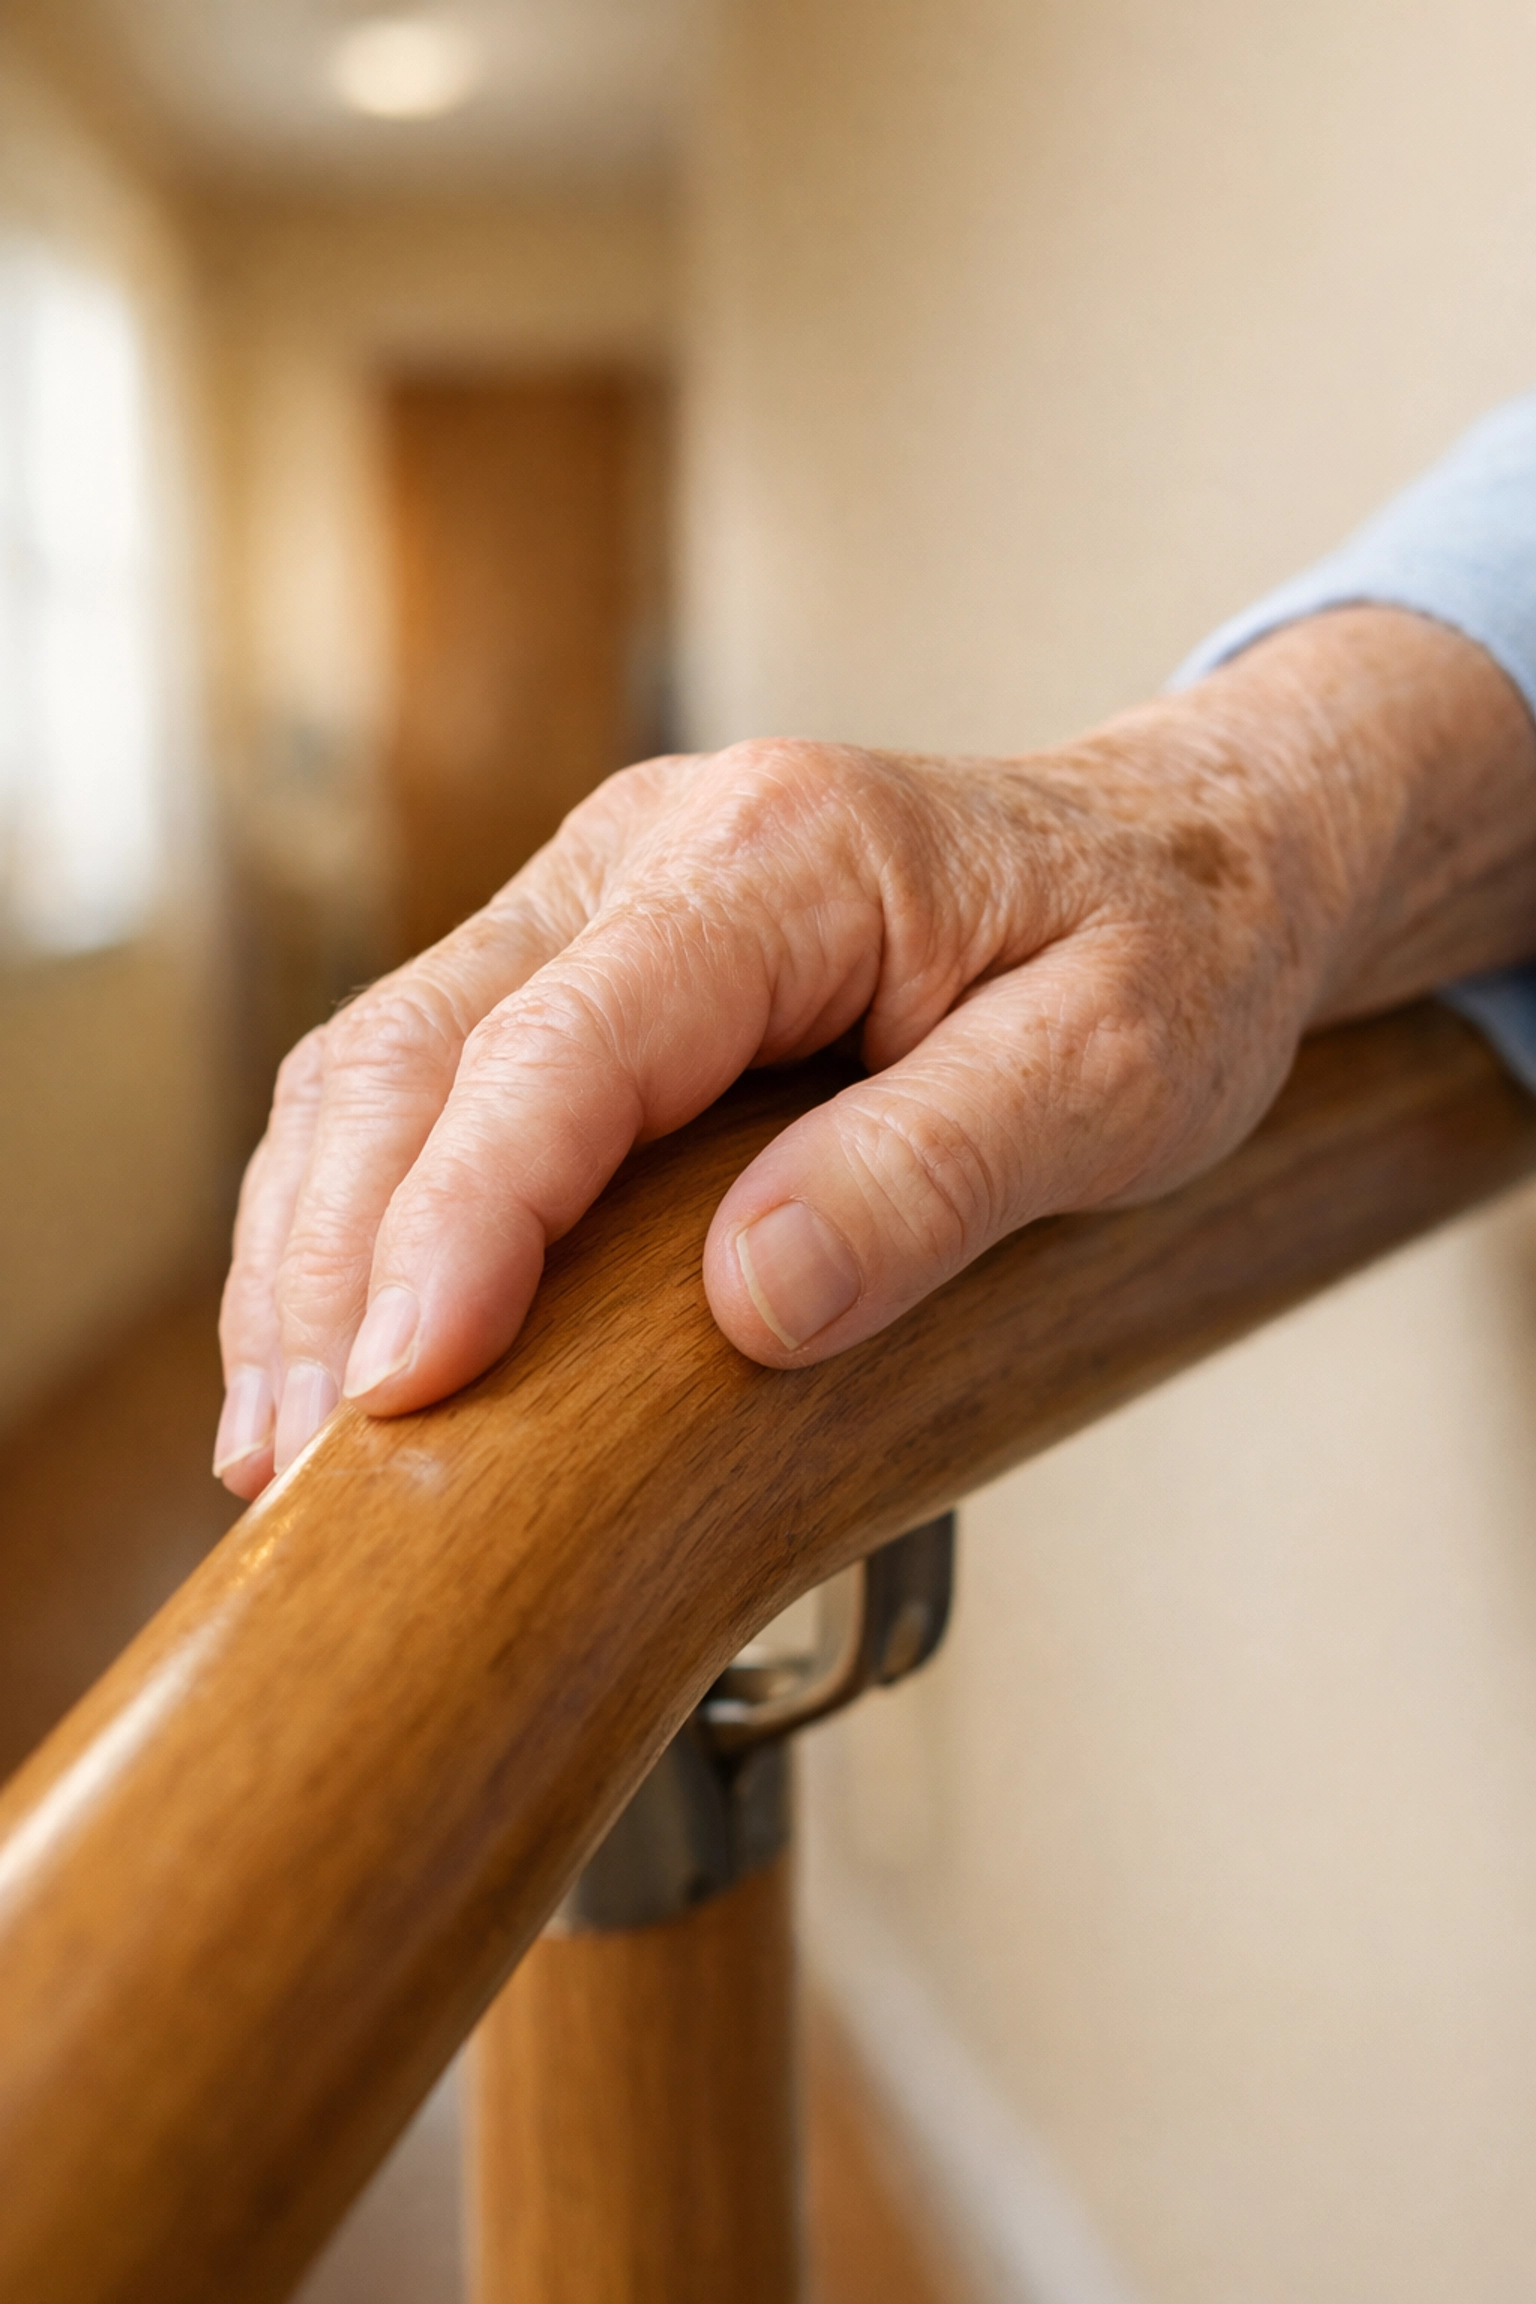
One of the most frequent issues we see in older homes or newly renovated spaces is the "decorative" handrail. Many homeowners choose handrails that match the crown molding or the architectural style of the house. These are often thick, rectangular, or heavily carved.
The mistake here is choosing a rail that looks good but cannot be properly grasped. In safety terms, we distinguish between a "pinch grip" and a "power grip." A power grip is when your fingers can wrap all the way around the rail and meet your thumb. This provides the maximum amount of leverage if you happen to lose your balance. A thick, rectangular rail only allows for a pinch grip, which is much easier to lose if you stumble.
The Fix: Circular Handrails
To fix this, you don't necessarily need to rip out your beautiful banister. You can often install a secondary "mopstick" or round handrail on the opposite wall. Ideally, a handrail should be circular or oval with a diameter between 1.25 and 2 inches. This size allows almost anyone, including those with arthritis, to maintain a firm, secure hold. Additionally, ensure the rail is mounted about 1.5 inches away from the wall so there is plenty of room for your hand to slide smoothly without hitting the drywall or brackets.
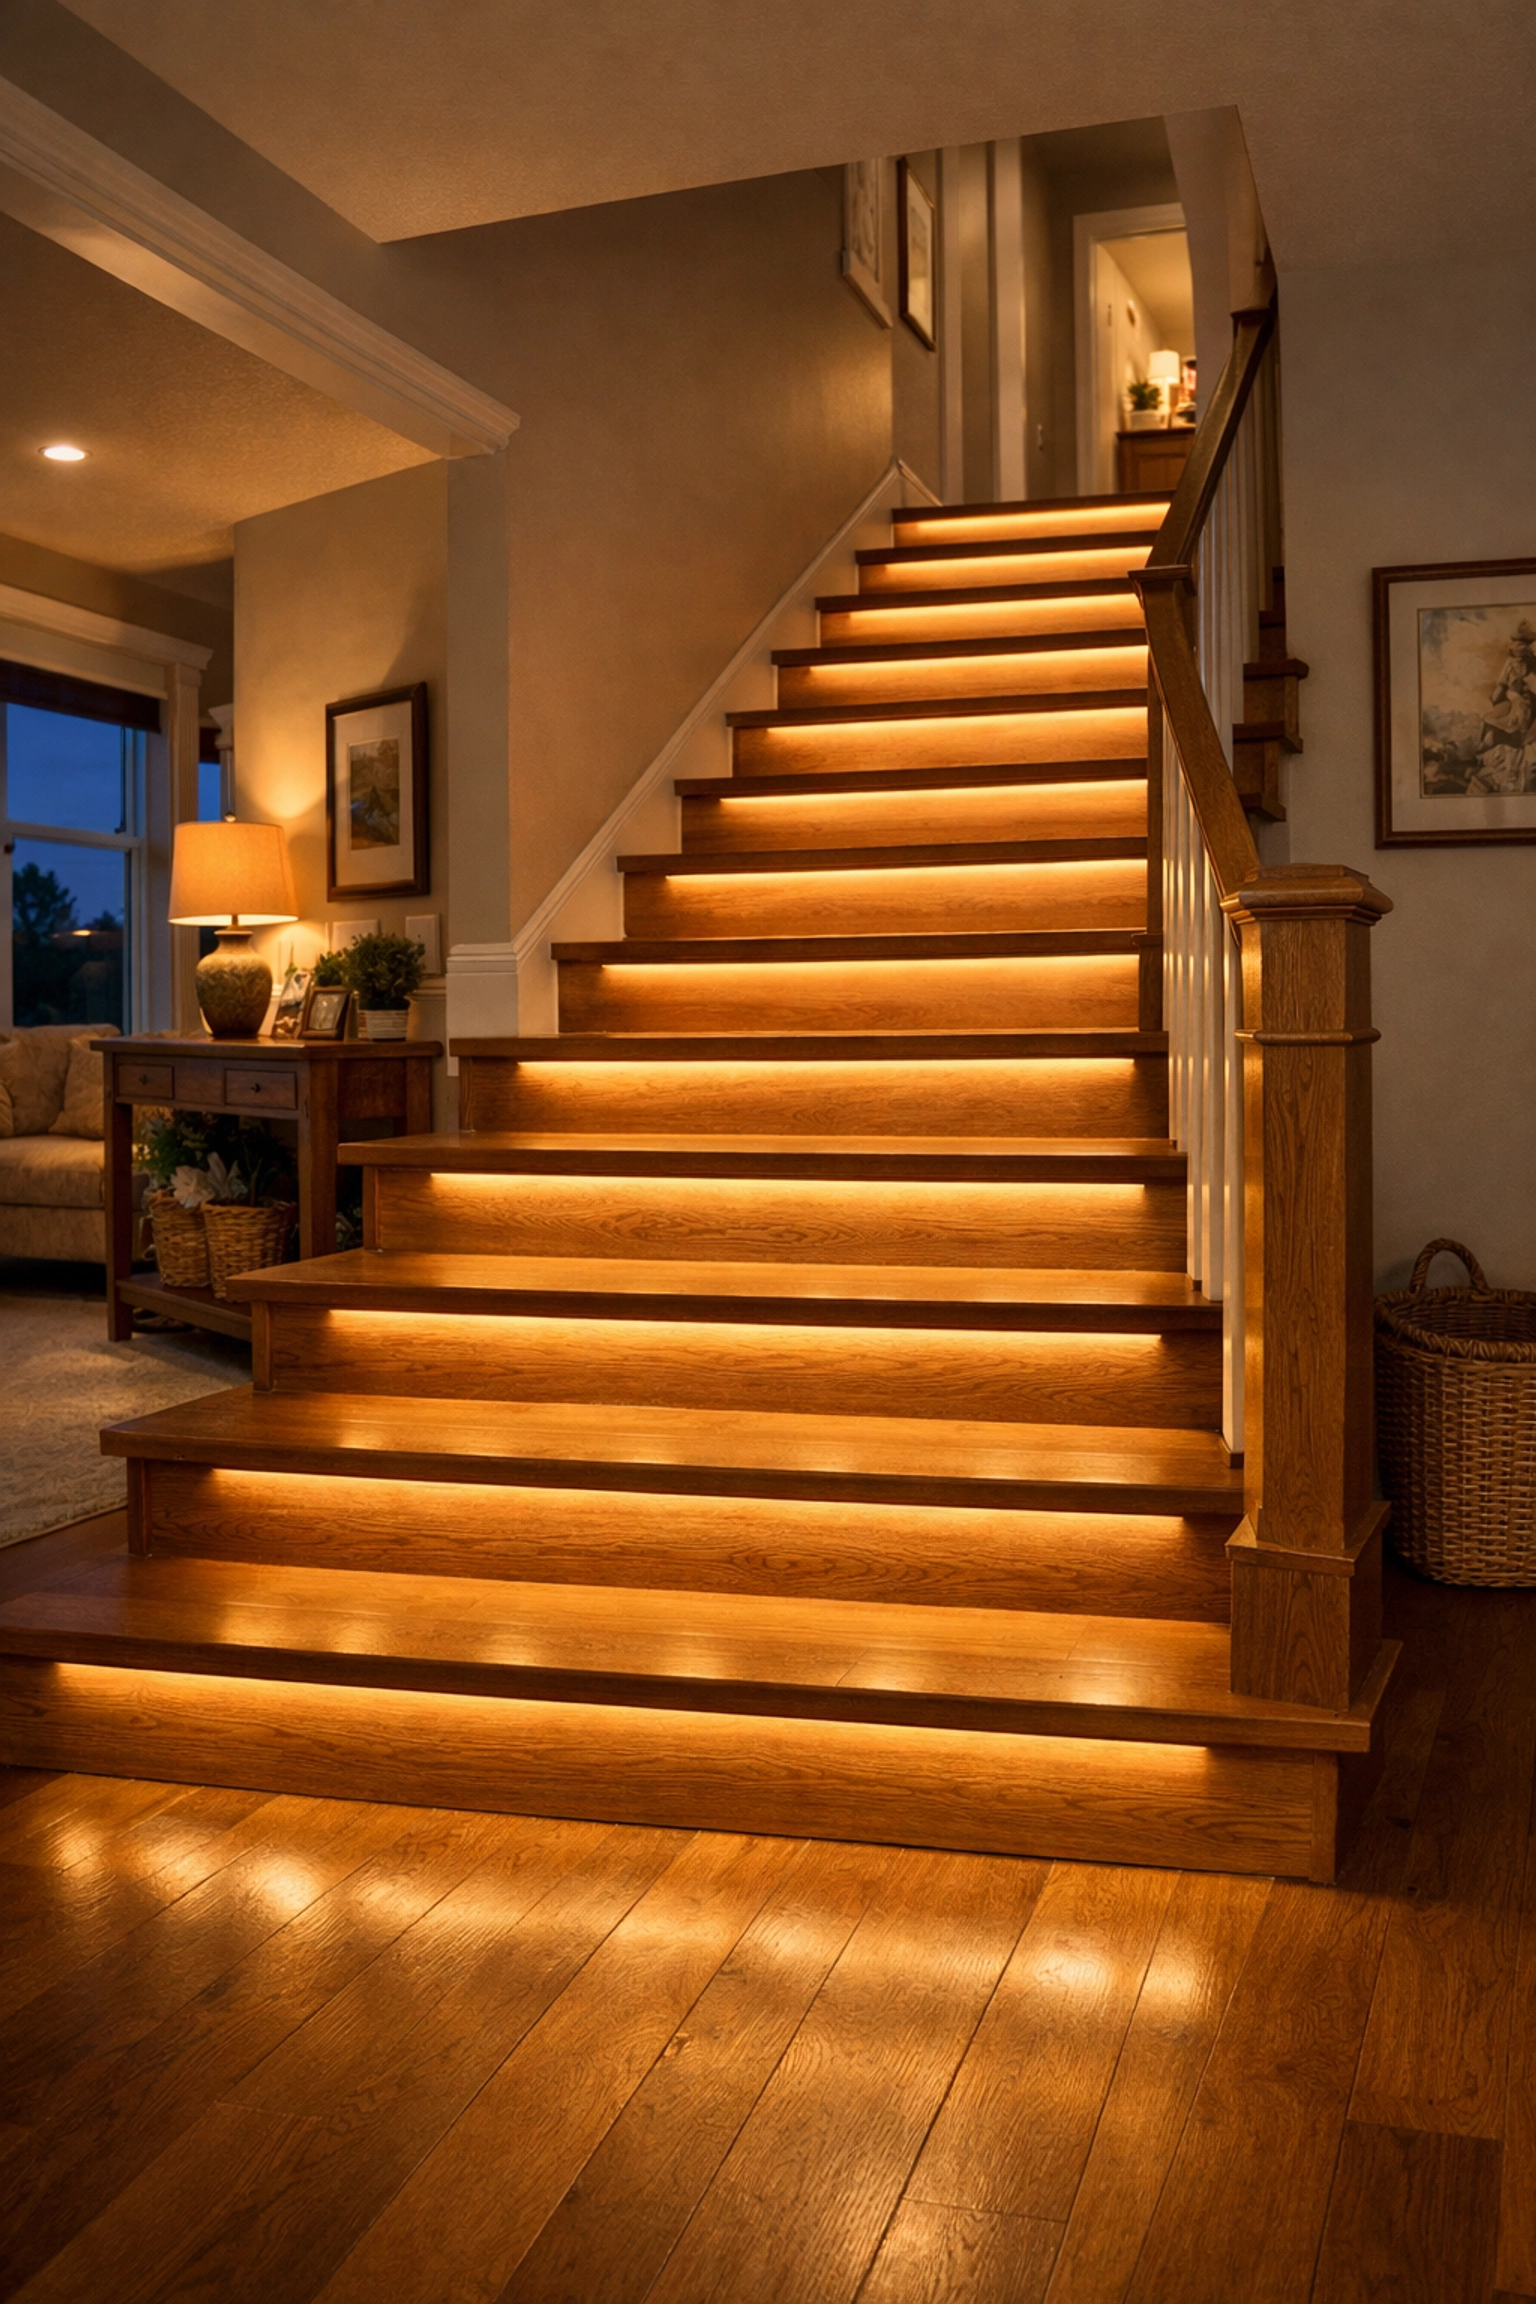
Mistake 2: Relying on Natural Light or Dim Bulbs
We often assume that because we know our stairs "by heart," we don't need bright light to navigate them. However, as we age, our eyes require significantly more light to distinguish depth and contrast. Dim lighting or shadows can hide the edge of a step, making it look like the floor is further away or closer than it actually is.
Another common lighting mistake is having a switch at only one end of the stairs. If you’re at the top and the light is off at the bottom, you might be tempted to "just go for it" rather than walking back to find a switch.
The Fix: High-Contrast Lighting and Motion Sensors
The solution is to ensure the entire flight of stairs is bathed in even, glare-free light.
- Install "Two-Way" Switches: Ensure there is a light switch at both the top and the bottom of the stairs.
- Motion-Activated LEDs: Battery-powered LED strips can be placed under the lip of each step or along the baseboard. These turn on automatically when they detect movement, providing a clear path even during a midnight trip to the kitchen.
- Increase Wattage: Replace old, dim bulbs with bright LEDs that offer a "cool white" or "daylight" spectrum, which helps improve contrast and visibility.
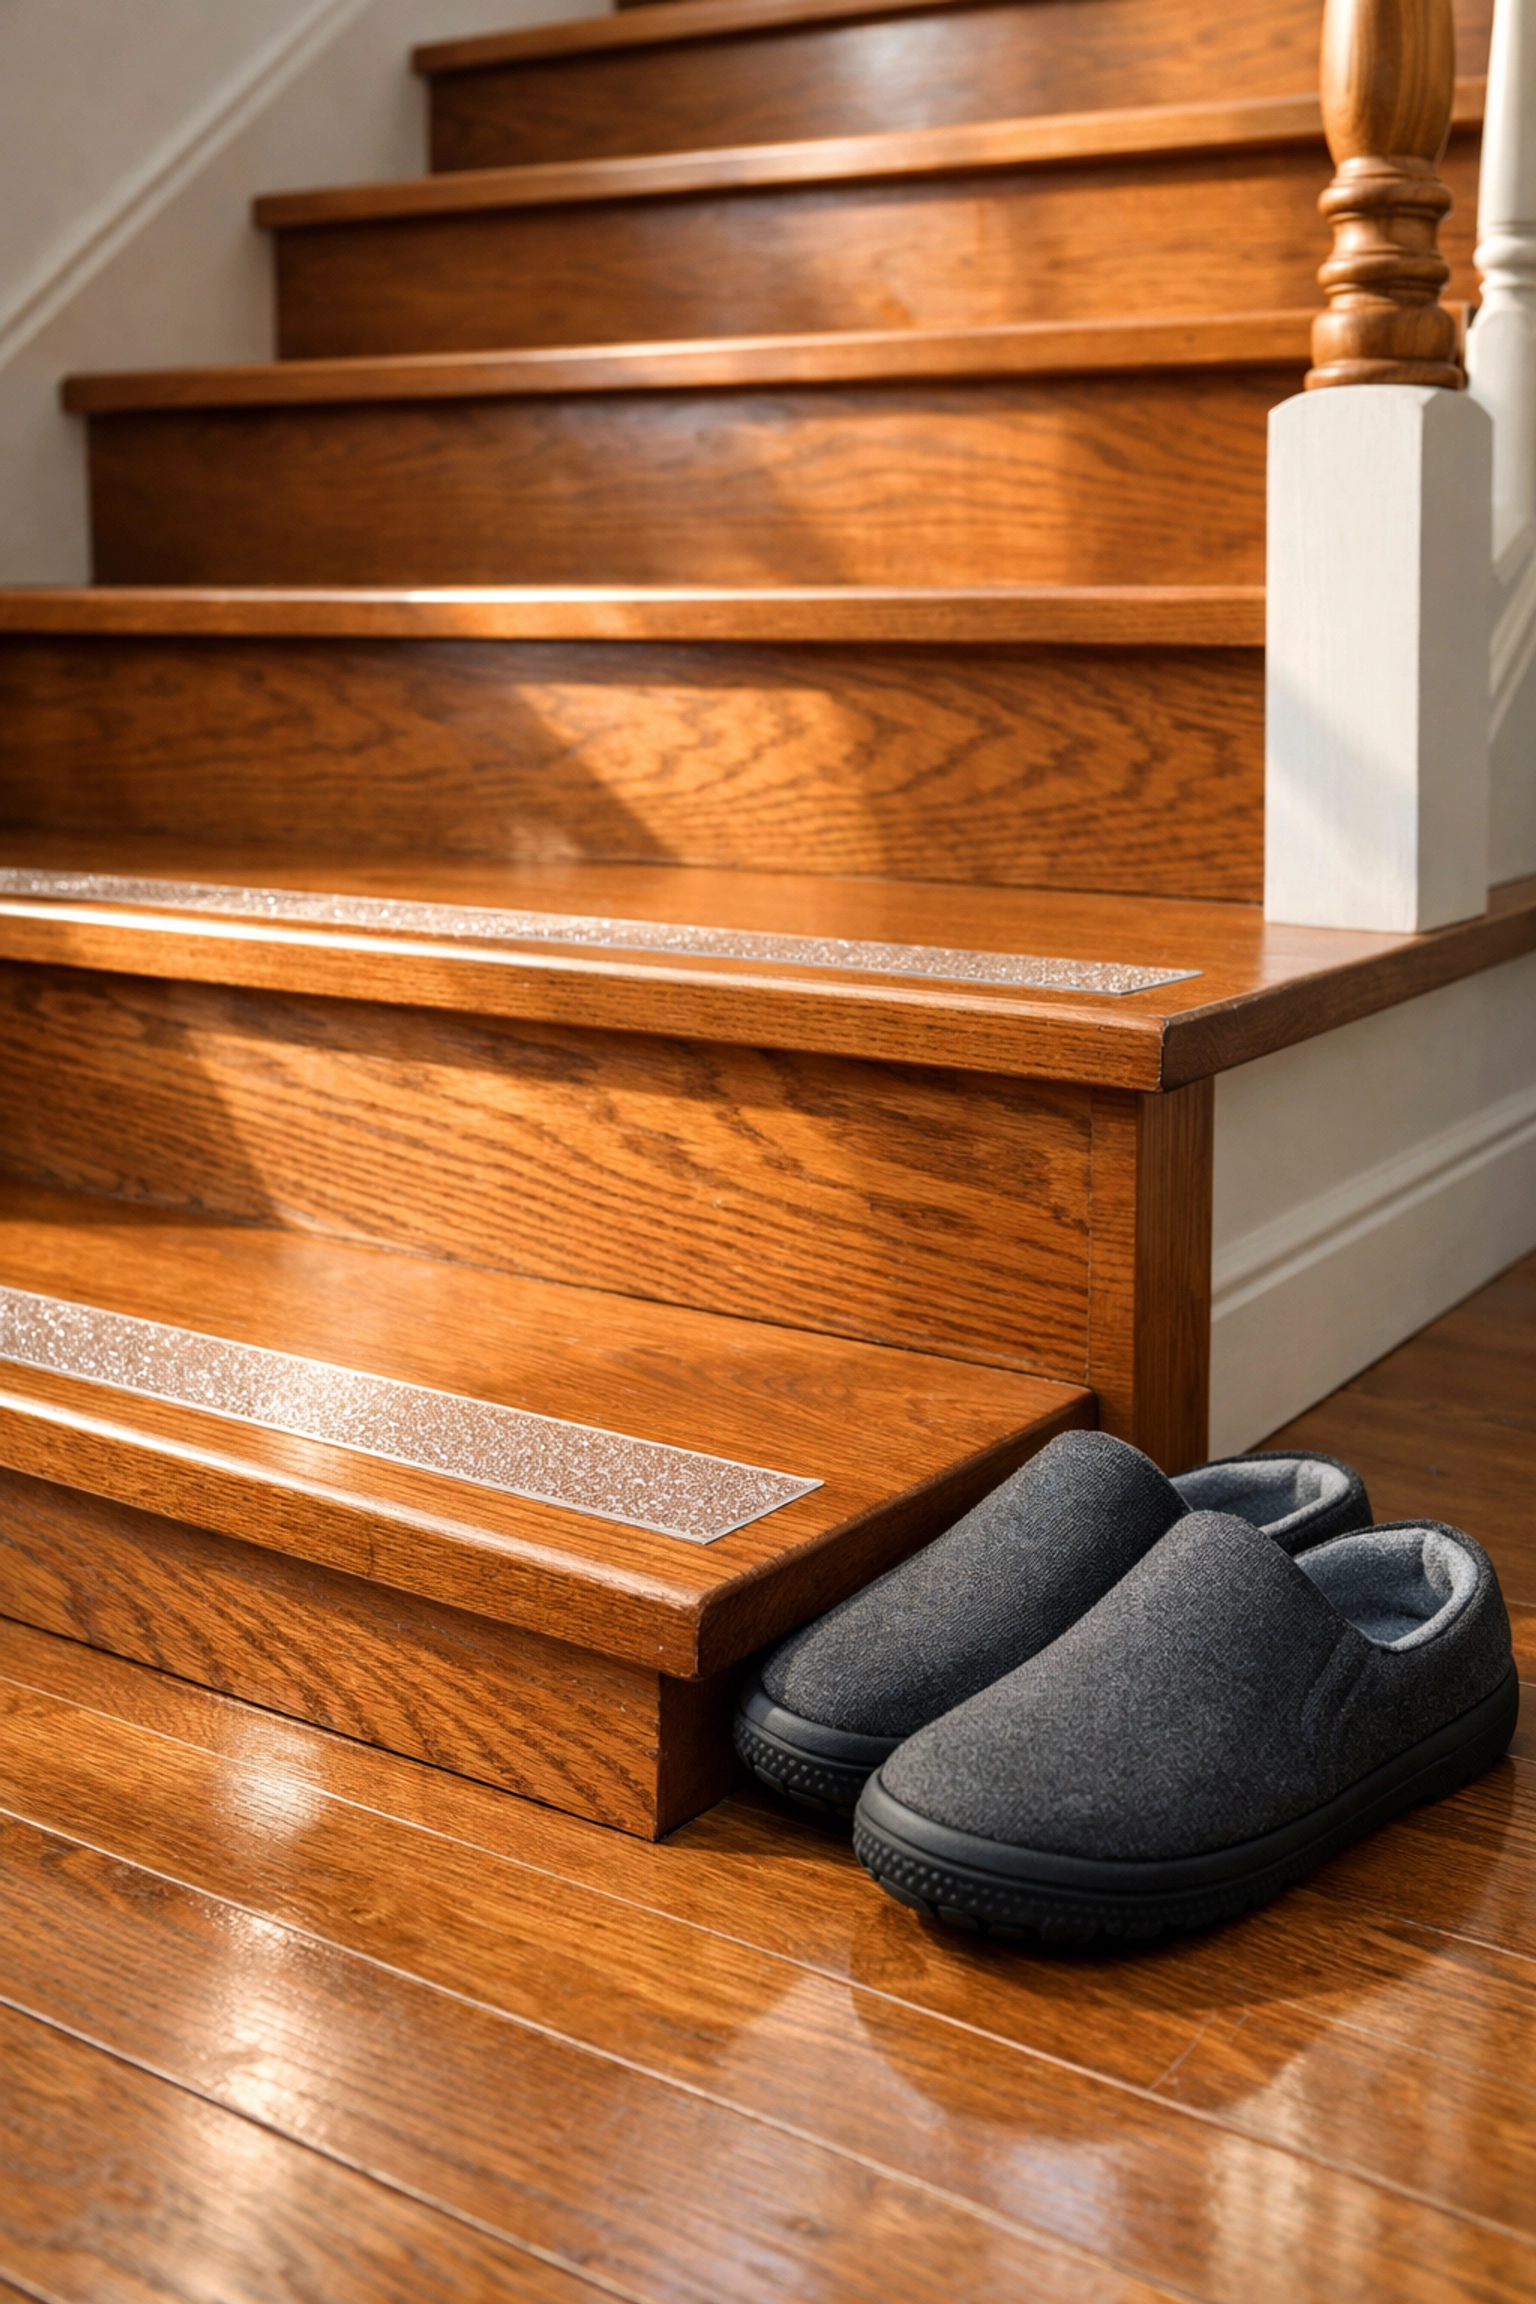
Mistake 3: Treating Stairs Like Regular Flooring
Many people love the look of polished hardwood or plush carpeting on their stairs. While beautiful, these surfaces can be incredibly treacherous. Hardwood is naturally slippery, especially if you are wearing socks or smooth-soled slippers. On the other hand, thick, high-pile carpeting can actually be a trip hazard because it rounds off the edge of the step (the nosing), making the "landing zone" for your foot smaller and less stable.
The Fix: Increase Surface Friction
You don't have to get rid of your flooring to make it safer.
- Non-Slip Treads: For wooden stairs, clear adhesive anti-slip strips are an excellent choice. They provide the necessary "bite" for your shoes or feet without hiding the wood grain.
- Low-Pile Carpet: If you prefer carpet, choose a low-pile, industrial-style weave that is tightly wrapped over the edge of the steps. This keeps the geometry of the stair sharp and predictable.
- The "No-Socks" Rule: Encourage a household habit of never walking on stairs in just socks. Bare feet or non-slip indoor shoes provide much better feedback to your brain about where your foot is in space.
Mistake 4: Ignoring Inconsistent Step Geometry
In a perfect world, every step on a staircase would be exactly the same height (rise) and depth (run). However, in older homes, or due to house settling, steps can vary. Our brains are incredibly efficient; after the first three steps, our "autopilot" takes over, and we expect every subsequent step to be identical. If one step is even a quarter-inch higher than the others, it can cause a trip.
Another common geometric mistake is the "short" top step. This happens when a landing isn't properly calculated, leaving the final step narrower than the rest.
The Fix: Visual Cues and Professional Assessment
Fixing the physical structure of a staircase is a big job, but you can mitigate the risk through visual cues.
- Highlight the Edges: Use a strip of contrasting paint or colored tape on the edge of each step. This helps the brain recognize exactly where the "drop-off" occurs for every single riser.
- Uniformity Check: Use a tape measure to check your steps. If you find a significant discrepancy (more than 3/8 of an inch), it’s important to be consciously aware of that specific "problem step" until a permanent carpentry fix can be made.
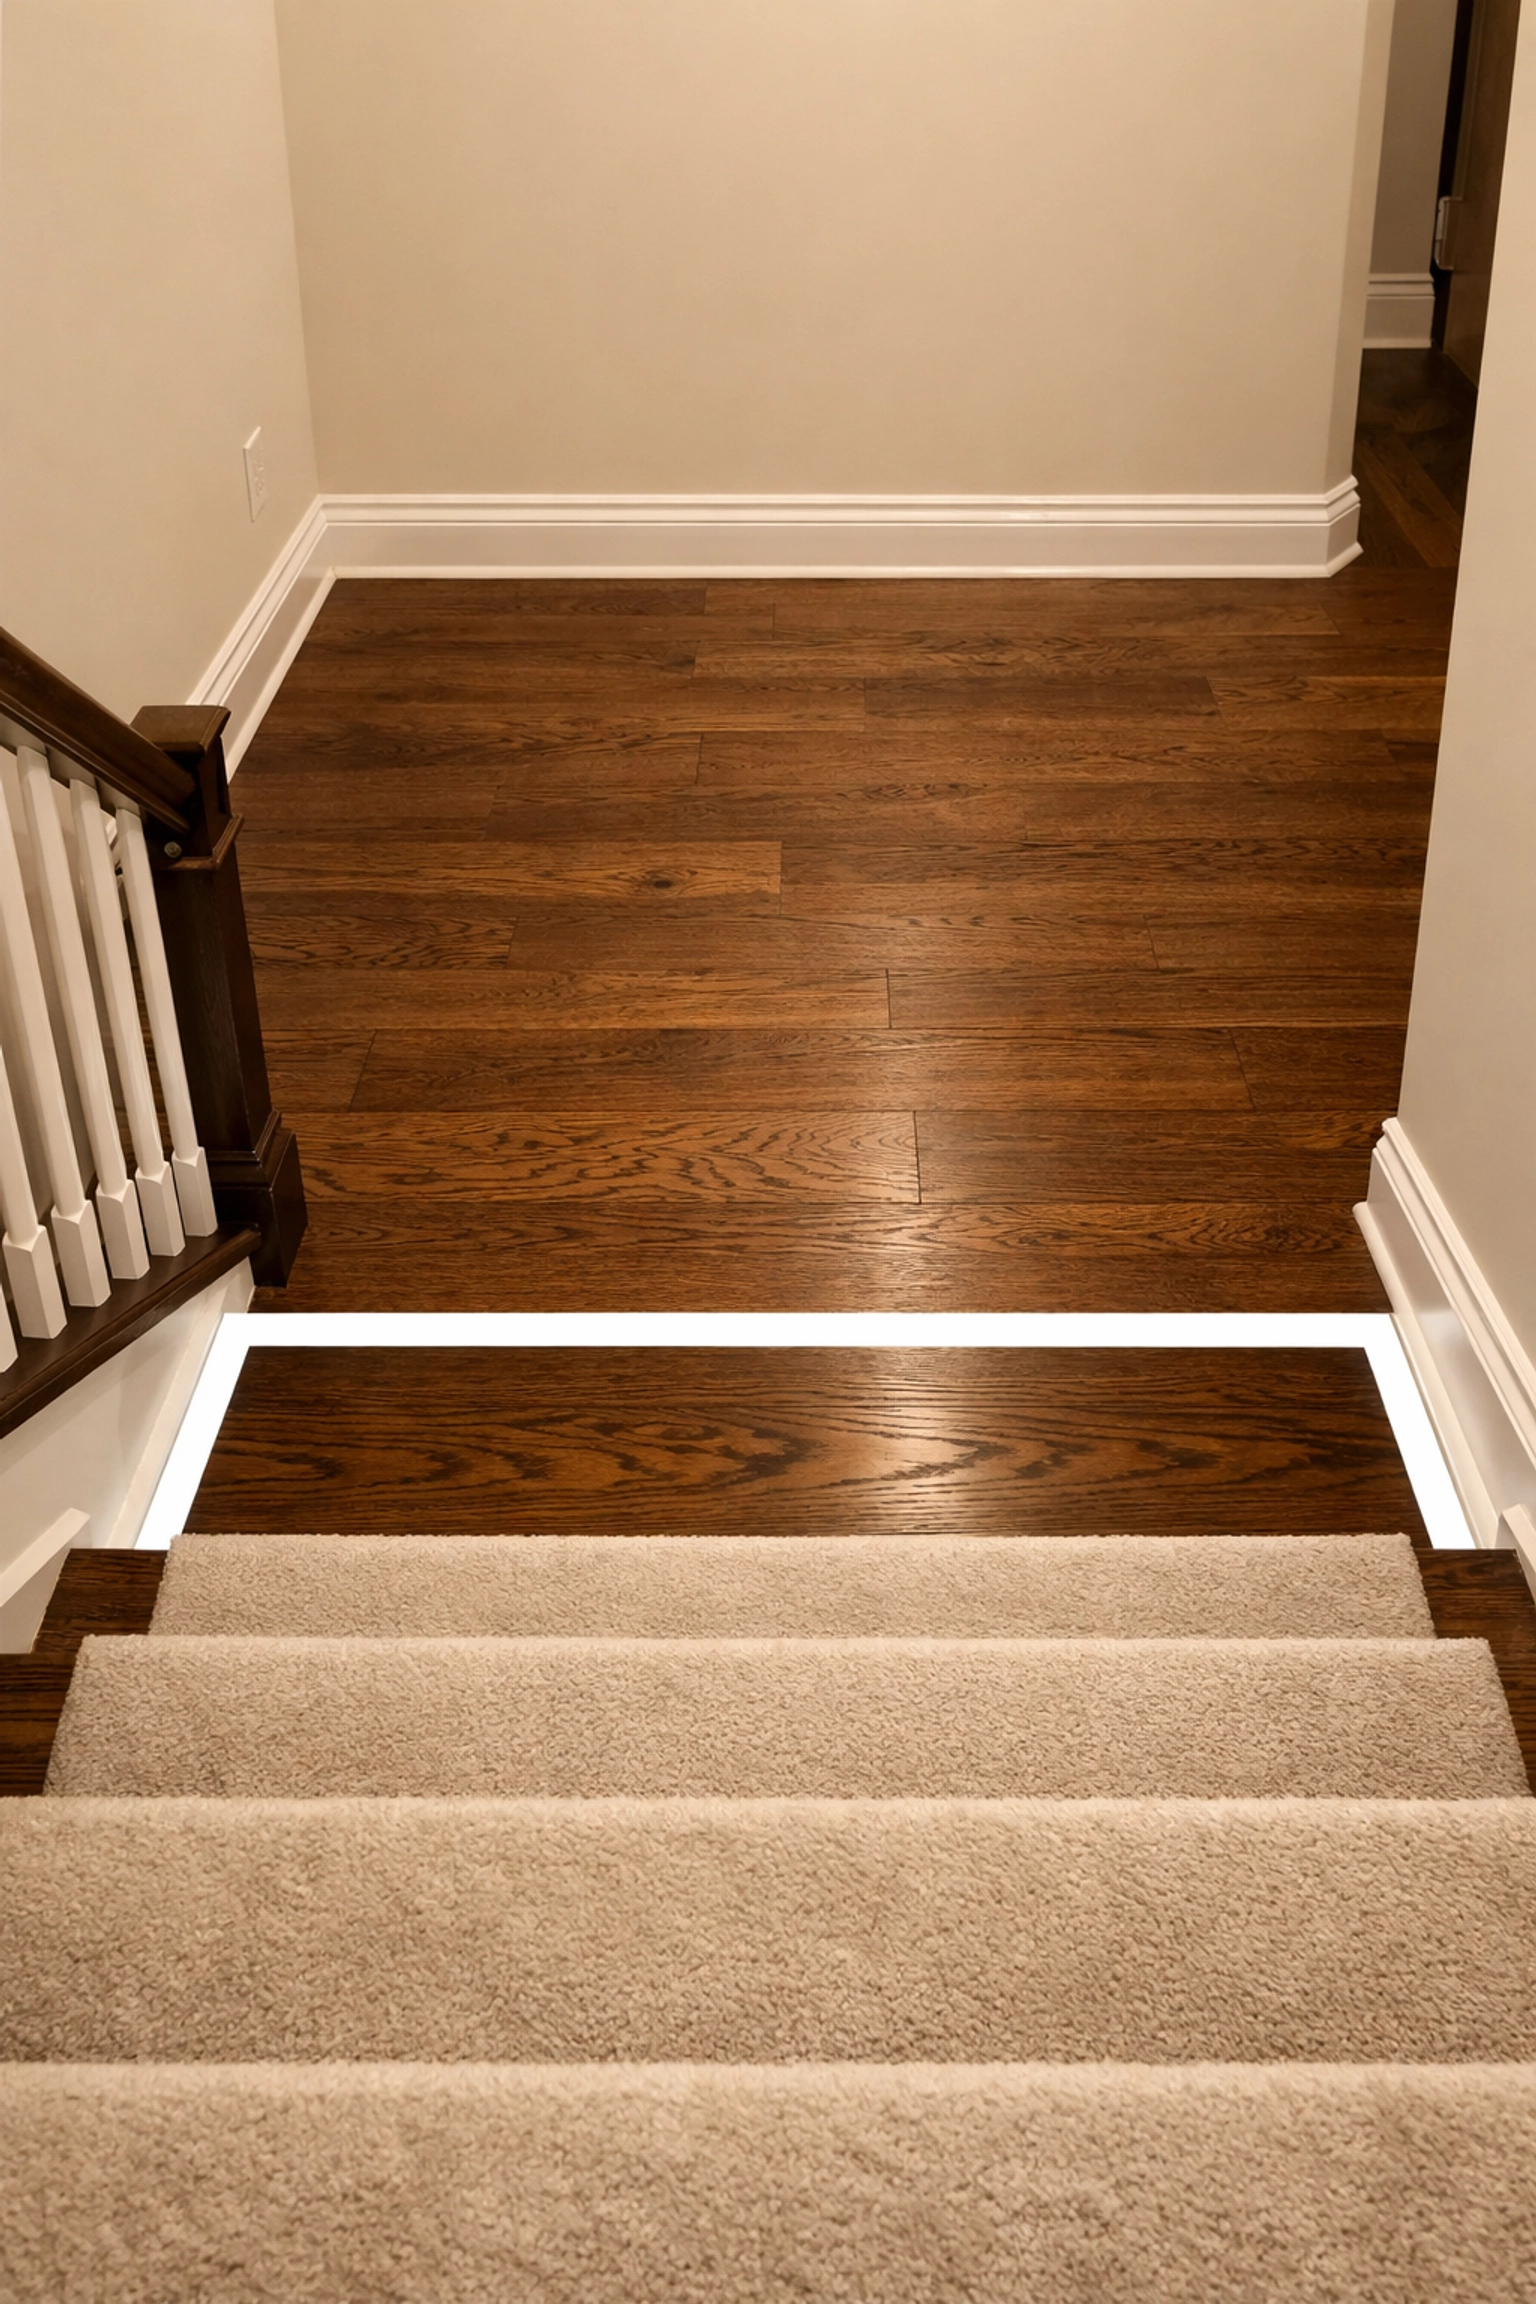
Mistake 5: Falling for the "Bottom-of-Flight Illusion"
Experts in home safety often talk about the "bottom-of-flight illusion." This happens when the flooring of the hallway or landing matches the stairs perfectly. When looking down from above, the last step can blend visually into the floor. People often think they have reached the bottom when they actually have one more step to go, leading to a jarring "missed step" that can cause a fall.
The Fix: Create a Visual Break
The simplest fix is to make the last step look different from the landing.
- Color Contrast: Use a different colored tread or a piece of high-contrast tape on the very last step.
- Lighting Focus: Aim a specific light fixture at the bottom landing to clearly define where the stairs end and the flat floor begins.
Mistake 6: The "Stair Basket" and Temporary Storage
We've all done it: we have a pile of mail, a pair of shoes, or a book that needs to go upstairs, so we set it on the bottom step to take up "next time." While it seems like a great organizational tool, it is one of the leading causes of avoidable falls. Clutter on the stairs reduces the usable width of the step and provides a major tripping hazard, especially if you are carrying something else and can’t see your feet.
The Fix: The "Clear Path" Policy
The fix here is purely behavioral.
- The Absolute Zero Rule: Adopt a strict policy that nothing: ever: is allowed to sit on the stairs.
- Side Tables: Instead of putting items on the step, place a small table at the top and bottom of the staircase. Put the items there. If the table gets full, it’s a sign that it’s time to make a dedicated trip to clear it.
- Two-Hand Rule: Try to avoid carrying large, bulky items that require both hands while on the stairs. If you can't hold the handrail, you shouldn't be carrying the item.
Mistake 7: Rushing and Improper Footwear
The final mistake is one of movement. Many falls happen because we are in a hurry: the phone is ringing, someone is at the door, or we simply want to get a chore finished. When we rush, we take shallower breaths, our center of gravity shifts forward, and we are less likely to use the handrail properly.
Footwear plays a massive role here, too. Walking downstairs in loose slippers or "floppy" footwear can lead to the heel catching on the edge of a step.
The Fix: Mindful Transitions
- Three Points of Contact: Ideally, you should always have at least one hand on the rail and both feet (or one foot firmly planted) at all times. Think of the stairs as a "slow zone" in your house.
- Pause at the Top: Before starting your descent, take one intentional breath and make sure you have a firm grip on the rail.
- Secure Shoes: Wear footwear with a back (not "slides") and a rubberized sole. If you prefer to be shoeless, non-slip socks with "grippers" on the bottom are a much safer alternative to standard hosiery.
Creating a Culture of Safety at Home
Stair safety isn't about being afraid of your own home; it’s about respect for the environment and being proactive. By fixing these seven common mistakes, you aren't just preventing a fall; you’re preserving your independence and your ability to move freely through every level of your house.
Start with the easiest fixes: clear the clutter today, swap out a dim lightbulb tomorrow, and perhaps look into adding that second handrail over the weekend. These small, thoughtful adjustments provide a massive return on investment in the form of peace of mind for both you and your loved ones.

