When we talk about home safety, the bathroom is usually the first room that comes to mind: and for good reason. It is the one place in the house where hard surfaces, soap, and water meet in a way that can make even the most agile person feel a bit unsteady. For seniors, or those caring for them, the bathroom can transition from a place of relaxation to a place of significant anxiety.
The good news is that most bathroom accidents are preventable. One of the most effective, reliable, and straightforward tools at our disposal is the humble grab bar. However, there is a lot more to "mastering" grab bars than simply screwing a metal rod into the wall. To create a truly safe environment, you need to understand the types of bars available, where they should be placed, and how to ensure they are installed with the strength to hold a person’s weight during a moment of crisis.
In this guide, we’re going to break down everything you need to know about bathroom safety rails. No jargon, no high-pressure sales talk: just clear, educational information to help you or your loved one stay safe and independent at home.
Why the Bathroom is a High-Risk Zone
Before we dive into the hardware, it is important to understand the "why." As we age, our bodies undergo subtle changes in balance, muscle strength, and bone density. Our reaction times might slow down just a fraction of a second. In a dry living room, these changes might not be noticeable. In a wet bathroom, they are amplified.
The physics of a bathroom are often working against us. We are frequently transitioning from sitting to standing (on the toilet) or stepping over high thresholds (the bathtub edge). These movements require a shift in our center of gravity. When you add a slippery floor to that equation, the risk of a fall increases. Grab bars act as a "third point of contact," providing a stable anchor that doesn't move, even when the floor feels like it might.
Understanding the Different Types of Grab Bars
Not all grab bars are created equal. Depending on the specific layout of your bathroom and the physical needs of the person using it, you might need a combination of different styles.
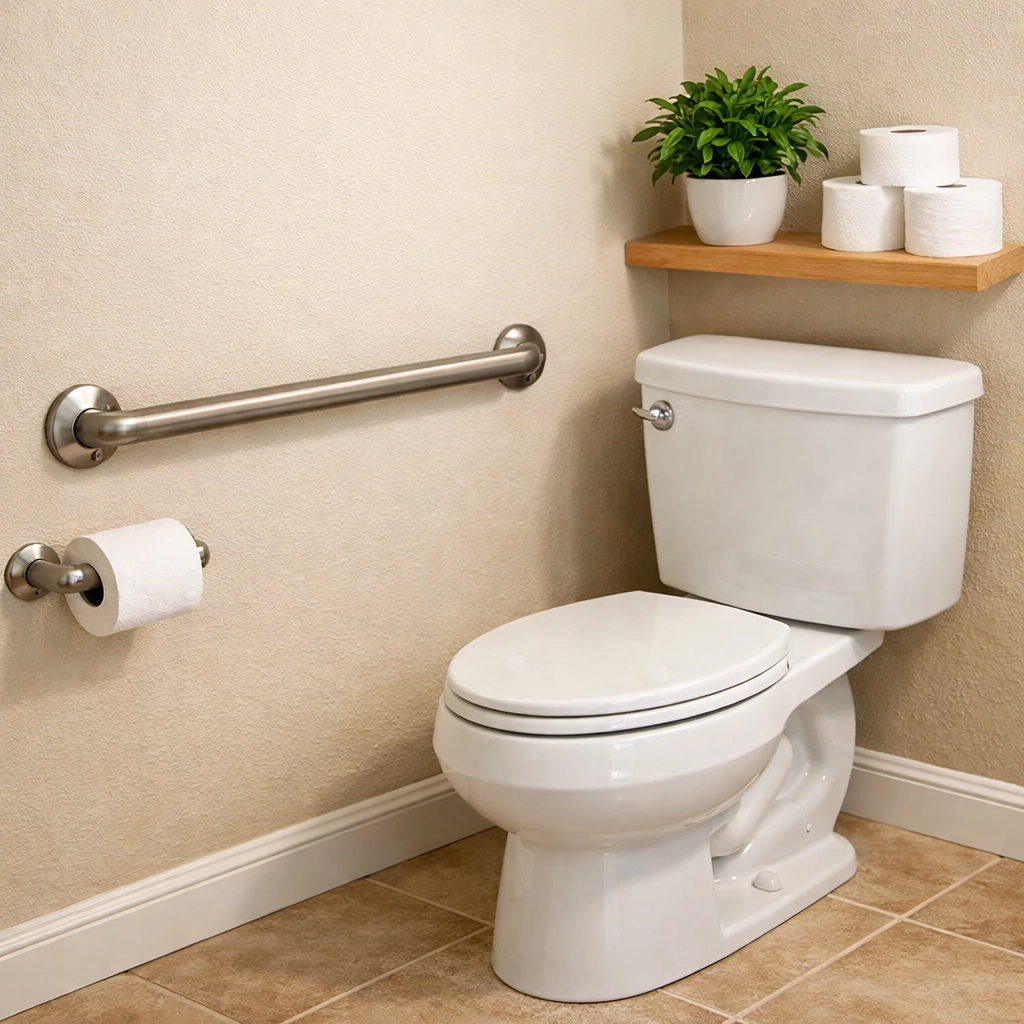
Horizontal Grab Bars
These are the most common type. They are typically installed along the back wall of a bathtub or shower. Their primary purpose is to provide a steady handhold while someone is moving along the length of the tub or standing to wash. They are also excellent for helping someone lower themselves into a tub or push themselves back up to a standing position.
Vertical Grab Bars
Vertical bars are often overlooked but are incredibly important. These are usually installed at the "entry point" of the shower or tub. When you are stepping over a tub ledge, you are momentarily on one foot. Having a vertical bar to grip at chest height provides the stability needed to make that transition safely.
Angled or Diagonal Grab Bars
Sometimes, a diagonal placement is more natural for the wrist and arm. These are often used near the toilet or in the shower where a user might need to pull themselves up from a seated position. The angle allows for a variety of hand heights, making it accessible for different people.
Floor-to-Ceiling Poles (Transfer Poles)
While not technically a "bar" screwed into the wall, these tension-mounted poles provide 360-degree support. They are excellent for bathrooms where wall space is limited or where the wall isn't strong enough to support a traditional bar.

Materials and Texture: What to Look For
When you start looking at safety rails, you'll see a variety of materials. While aesthetic appeal is nice, safety should always be the priority.
- Stainless Steel: This is the gold standard. It is rust-resistant, incredibly strong, and easy to clean.
- Chrome or Polished Finishes: These look sleek, but they can be very slippery when wet. If you choose a polished finish, make sure the bar has a textured grip area.
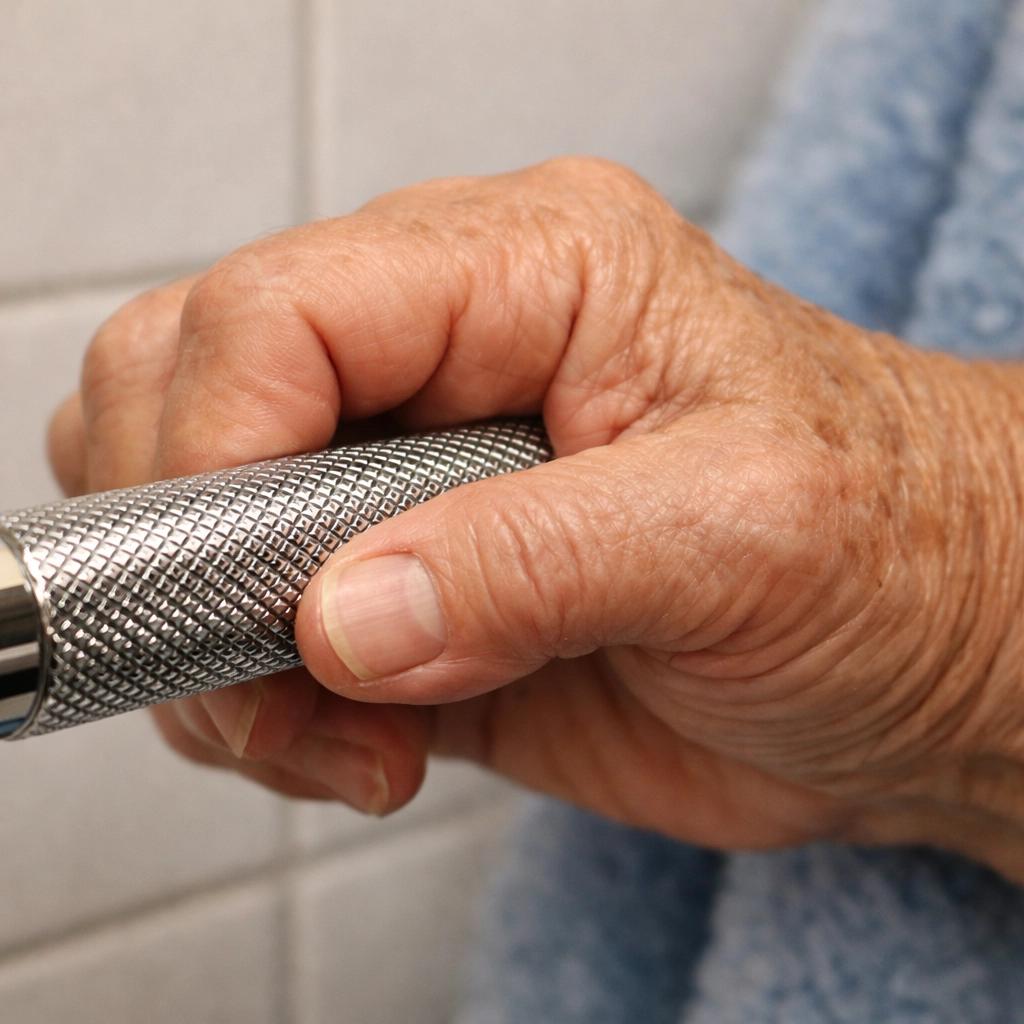
- Knurled or Textured Grips: This refers to a cross-hatch pattern etched into the metal. It provides extra friction, ensuring that even a soapy hand won't slide off the bar.
- Peened Finishes: This is a sandblasted-like texture that offers a more subtle grip than knurling but is much safer than a smooth surface.
Weight Capacity and Standards
In the United States, the Americans with Disabilities Act (ADA) sets standards for grab bars in public spaces. While your home doesn't "have" to follow ADA rules, they provide a fantastic safety benchmark.
An ADA-compliant grab bar must be able to support at least 250 pounds of force. However, many high-quality residential bars are rated for 350, 500, or even 800 pounds. It is always better to over-prepare. Even if a person weighs 150 pounds, the "impact force" of a fall can exert much more weight than that on the bar. Always check the manufacturer's weight rating before purchasing.
Strategic Placement: Where Do They Go?
Placement is the most critical part of the process. A grab bar in the wrong place is almost as dangerous as no grab bar at all, as it might encourage someone to reach in a way that throws them off balance.
The Shower and Bathtub
You want to create a "path of safety." This usually involves three bars:
- The Entrance: A vertical bar on the wall where you enter the tub.
- The Back Wall: A long horizontal bar (at least 24–36 inches) placed roughly 33–36 inches from the floor.
- The Control Wall: A smaller horizontal or vertical bar near the faucets, so you have support while adjusting the water temperature.
The Toilet Area
Sitting down and standing up from a toilet requires significant leg strength and balance.
- Side Wall: If there is a wall next to the toilet, a horizontal or diagonal bar can help the user "push off" to stand.
- Fold-Down Bars: If there is no wall nearby, bars that mount to the back wall and fold down on either side of the toilet (similar to armrests on a chair) are an excellent alternative.
The Installation Debate: DIY vs. Professional
This is where things get serious. A grab bar is only as strong as the wall it is attached to.
The Importance of Studs
In a perfect world, every grab bar would be screwed directly into the wooden or metal "studs" behind your drywall or tile. Studs provide the structural integrity needed to hold a person's weight. If you simply screw a bar into the drywall using standard plastic anchors, the bar will likely pull right out of the wall the moment someone puts real weight on it.
Specialized Anchors
If a stud isn't located exactly where you need the bar, there are heavy-duty "toggle" anchors specifically designed for grab bar installation. These expand behind the wall to distribute the weight across a larger area. However, these should only be used if the wall itself is in good condition.
The Problem with Suction Cup Bars
You may have seen "no-drill" grab bars that attach via large suction cups. While these can be tempting because they don't damage the tile, most safety experts and physical therapists advise against using them as a permanent safety solution. Suction can fail without warning, especially on porous tile or over grout lines. They are generally only suitable for light balance assistance on perfectly smooth surfaces, not for supporting a person's full body weight.
Height and Reach: Tailoring to the User
While the "standard" height for a horizontal bar is 33 to 36 inches from the floor, the best height is the one that works for the person using it. If the user is particularly petite or very tall, those standards might need to be adjusted.
Before installing, have the user "mock up" the movement. Have them sit on the toilet and see where their hand naturally reaches for support. Have them stand in the shower and see where they would instinctively grab if they felt a slip. Marking these spots with a piece of painter's tape can ensure the installation is customized for maximum comfort.
Maintenance and Safety Checks
Once your grab bars are installed, they aren't "set it and forget it." Like any safety equipment, they require occasional checks.
- The Tug Test: Once a month, give the bar a firm tug. It should not wiggle, creak, or feel loose.
- Check the Finish: Look for signs of rust or wear that could make the surface rough or compromise the metal.
- Clean Regularly: Soap scum and mineral deposits can make even a textured bar slippery. Clean them with non-abrasive cleaners to maintain the grip.
Beyond the Bars: A Holistic Approach
Grab bars are a massive step toward safety, but they are part of a larger picture. To truly master bathroom safety, consider these complementary steps:
- Non-Slip Mats: Use high-quality rubber mats inside the tub and non-slip rugs on the floor outside.
- Improved Lighting: Make sure the path to the bathroom and the shower area itself are well-lit.
- Shower Chairs: For those who fatigue easily, combining a grab bar with a sturdy shower chair provides the ultimate level of safety.
Finding Peace of Mind
The goal of installing bathroom safety rails isn't just to prevent a fall; it's to restore confidence. When someone feels secure in their environment, they maintain their independence longer. They can bathe with dignity and use the restroom without fear.
If you are feeling overwhelmed by the choices, don't hesitate to consult with an Occupational Therapist (OT) or a professional home contractor who specializes in aging-in-place modifications. They can provide a personalized assessment of your space and ensure that your safety "upgrades" are done correctly.
Bathroom safety doesn't have to be complicated, and it certainly shouldn't be scary. By choosing the right bars, placing them strategically, and ensuring a rock-solid installation, you are creating a home that is not just a place to live, but a safe haven for years to come.

