For many of us, the stairs in our homes are just a way to get from the living room to the bedroom. We use them dozens of times a day without a second thought. But as we get older, or as we care for aging parents, those steps can start to feel a little more daunting. It’s not just about the physical effort of climbing; it’s about the underlying safety of the structure itself and the habits we’ve formed over the decades.
According to various safety studies, the staircase is one of the most common locations for serious falls in the home. The good news is that most of these incidents are preventable. Often, it’s not a single "freak accident" that leads to a fall, but rather a series of small, overlooked mistakes that add up over time.
By identifying these common errors and applying simple, practical fixes, you can maintain your independence and keep your home a safe haven. Let's walk through the seven most common mistakes people make with stair safety and, more importantly, how to fix them.
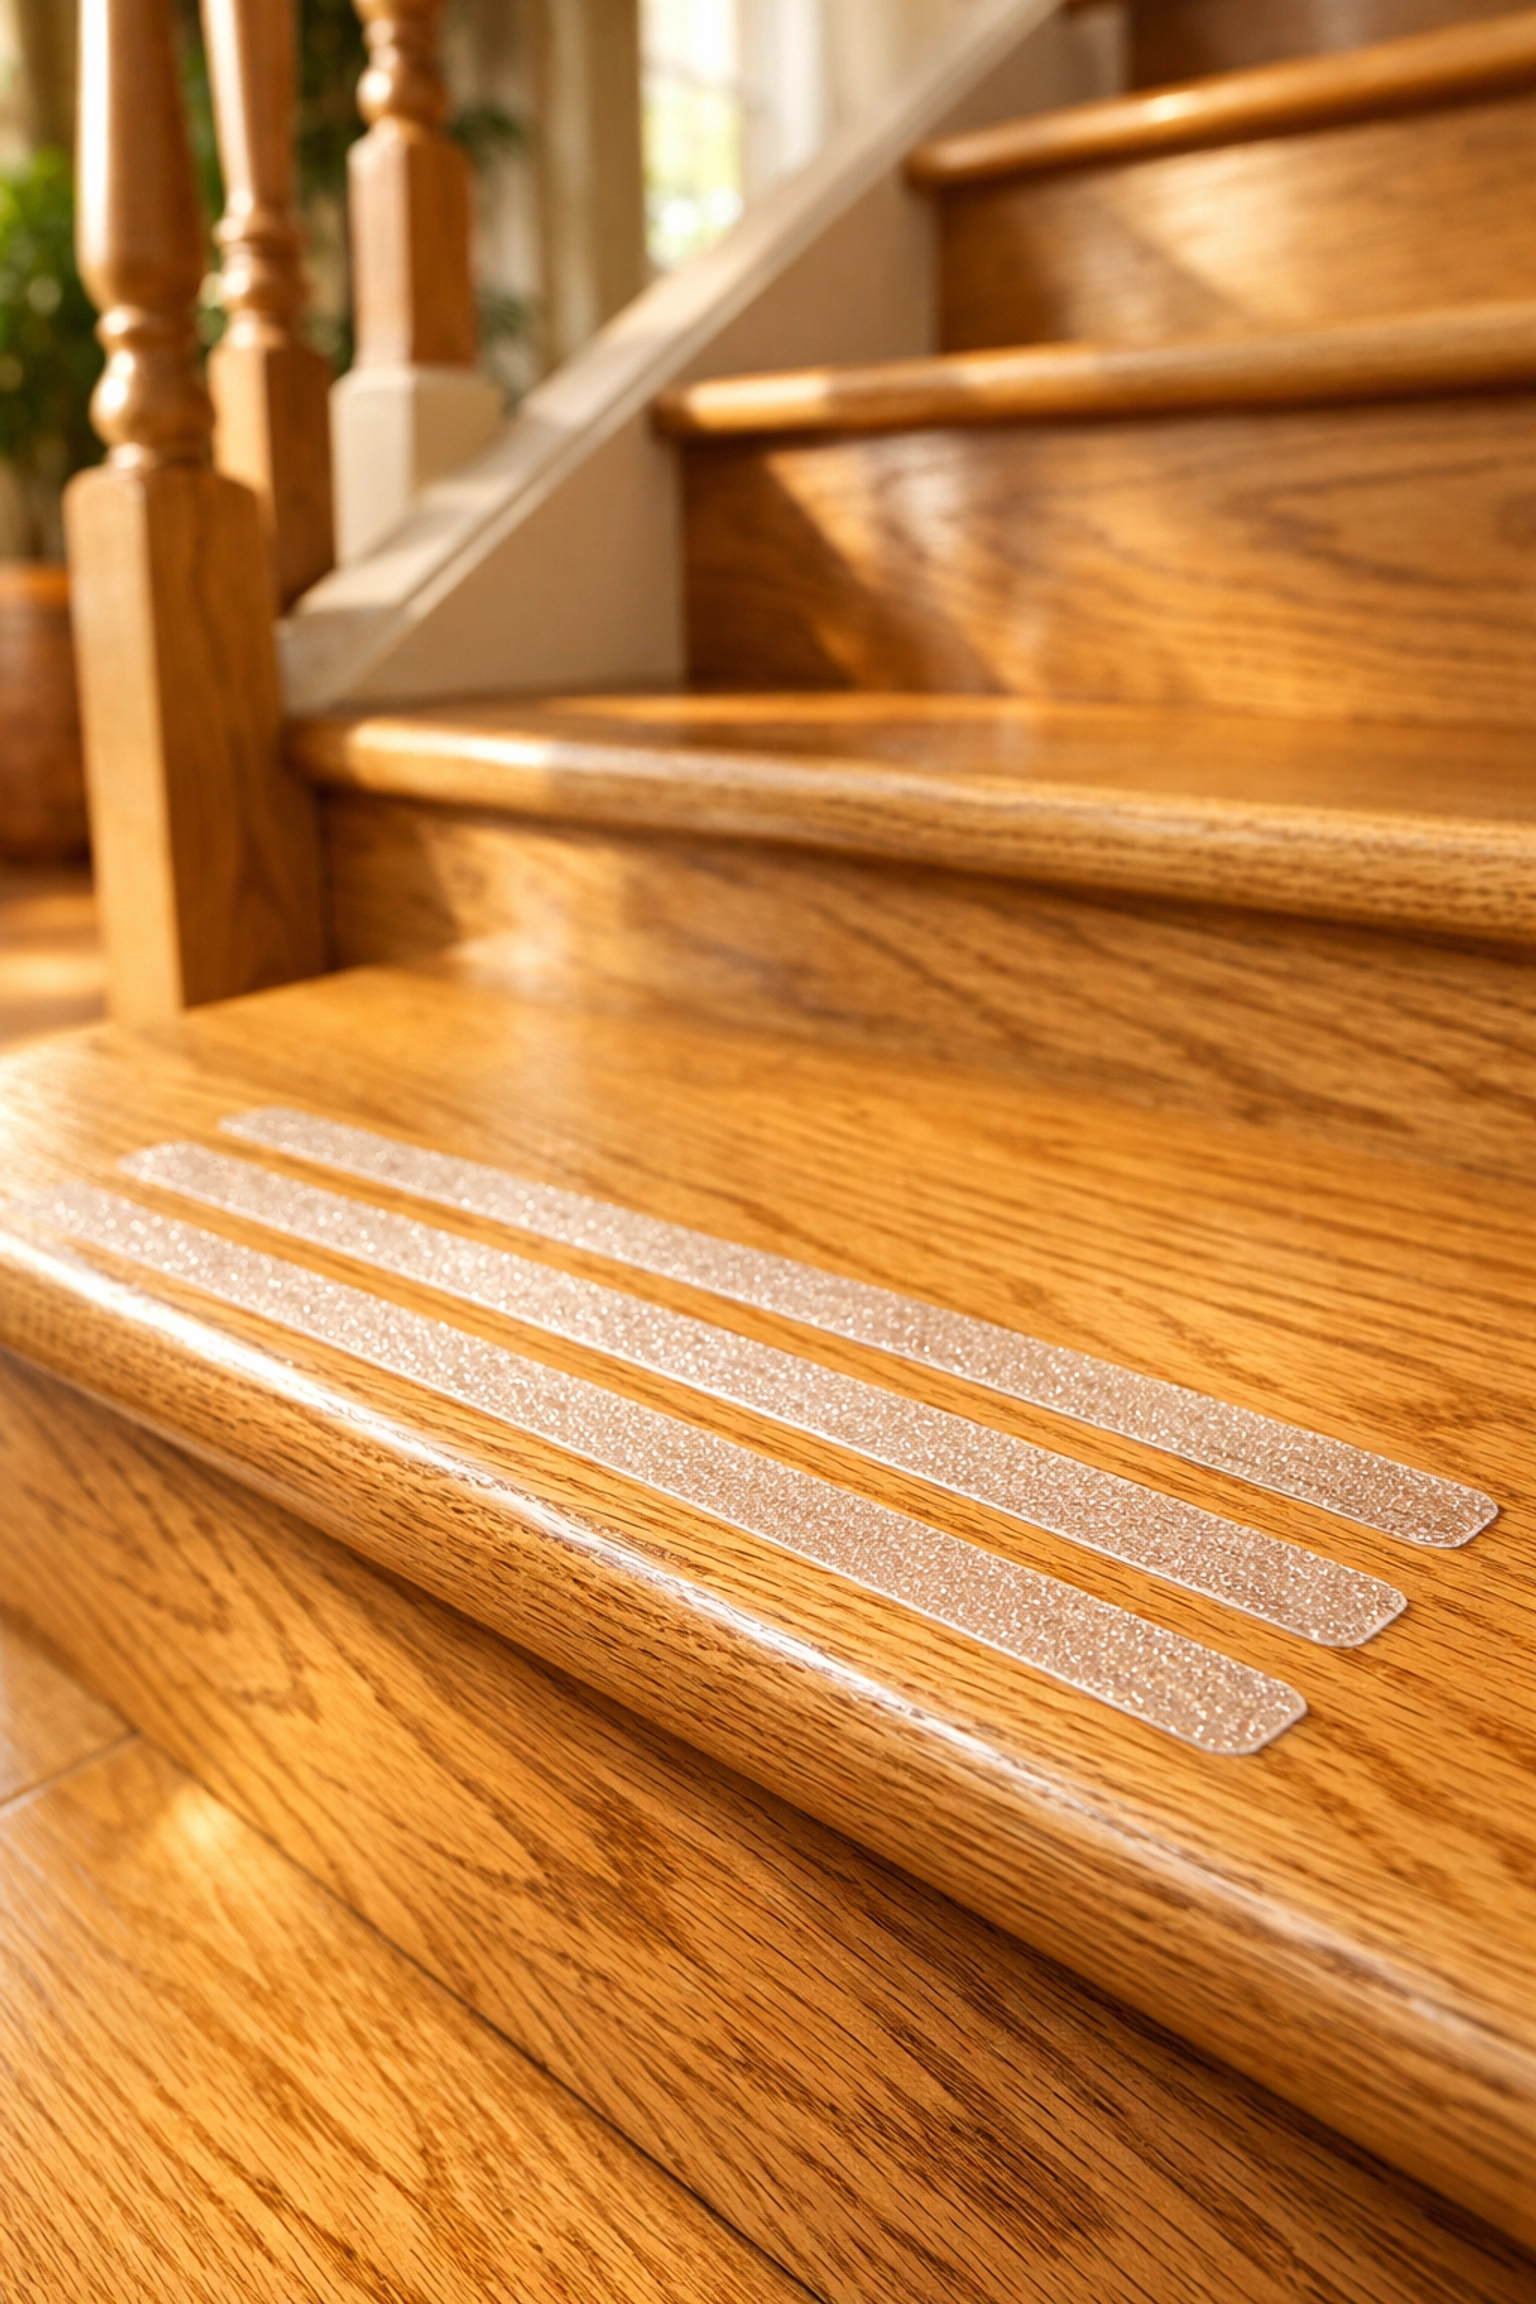
1. Choosing Aesthetics Over Traction (The Slippery Surface Trap)
We all love the look of polished hardwood or high-gloss tile. It’s elegant and easy to clean. However, when it comes to stairs, "glossy" often translates to "slippery." This is especially true if you are wearing socks, slippers with no grip, or if there is any moisture on the steps from a spilled drink or a wet umbrella.
The mistake here is prioritizing the interior design of the home over the physical grip required to navigate a vertical change in elevation safely. Polished surfaces offer very little friction, meaning your foot can easily slide forward as you descend, leading to a fall onto the back or tailbone.
How to Fix It:
You don’t have to carpet your beautiful hardwood stairs if you don’t want to, but you do need to add traction.
- Non-slip treads: Look for clear or color-matched adhesive treads. These are often made of a textured material that provides a "bite" for your shoes or feet without hiding the wood grain.
- Anti-slip coatings: There are specific transparent paints and sprays that add a grit-like texture to the surface.
- Rubber inserts: If you are doing a renovation, consider steps that have built-in rubber grooves at the edge of each tread.
2. Neglecting Worn, Cracked, or Loose Steps
Over years of use, stairs take a lot of punishment. In many older homes, the wood can dry out and crack, or the nails holding the treads (the flat part you step on) can work themselves loose. If you’ve ever felt a step "give" slightly or heard a loud creak when you walk on it, that’s a warning sign.
A loose or uneven tread can cause a momentary loss of balance. In that split second, your brain has to work overtime to compensate for the shifting surface, and if your reaction time isn't what it used to be, a trip is likely.
How to Fix It:
- The Screw Method: If a tread is loose, don’t just hammer the nails back in. Nails pull out easily over time. Instead, use high-quality wood screws to secure the tread to the stringer (the structural support on the sides).
- Adhesives: For minor gaps, a bit of wood glue or construction adhesive can stop the shifting and the noise.
- Regular Inspections: Once every six months, walk your stairs slowly and intentionally. Step on the left, right, and center of every single tread. If you feel any movement, address it immediately.
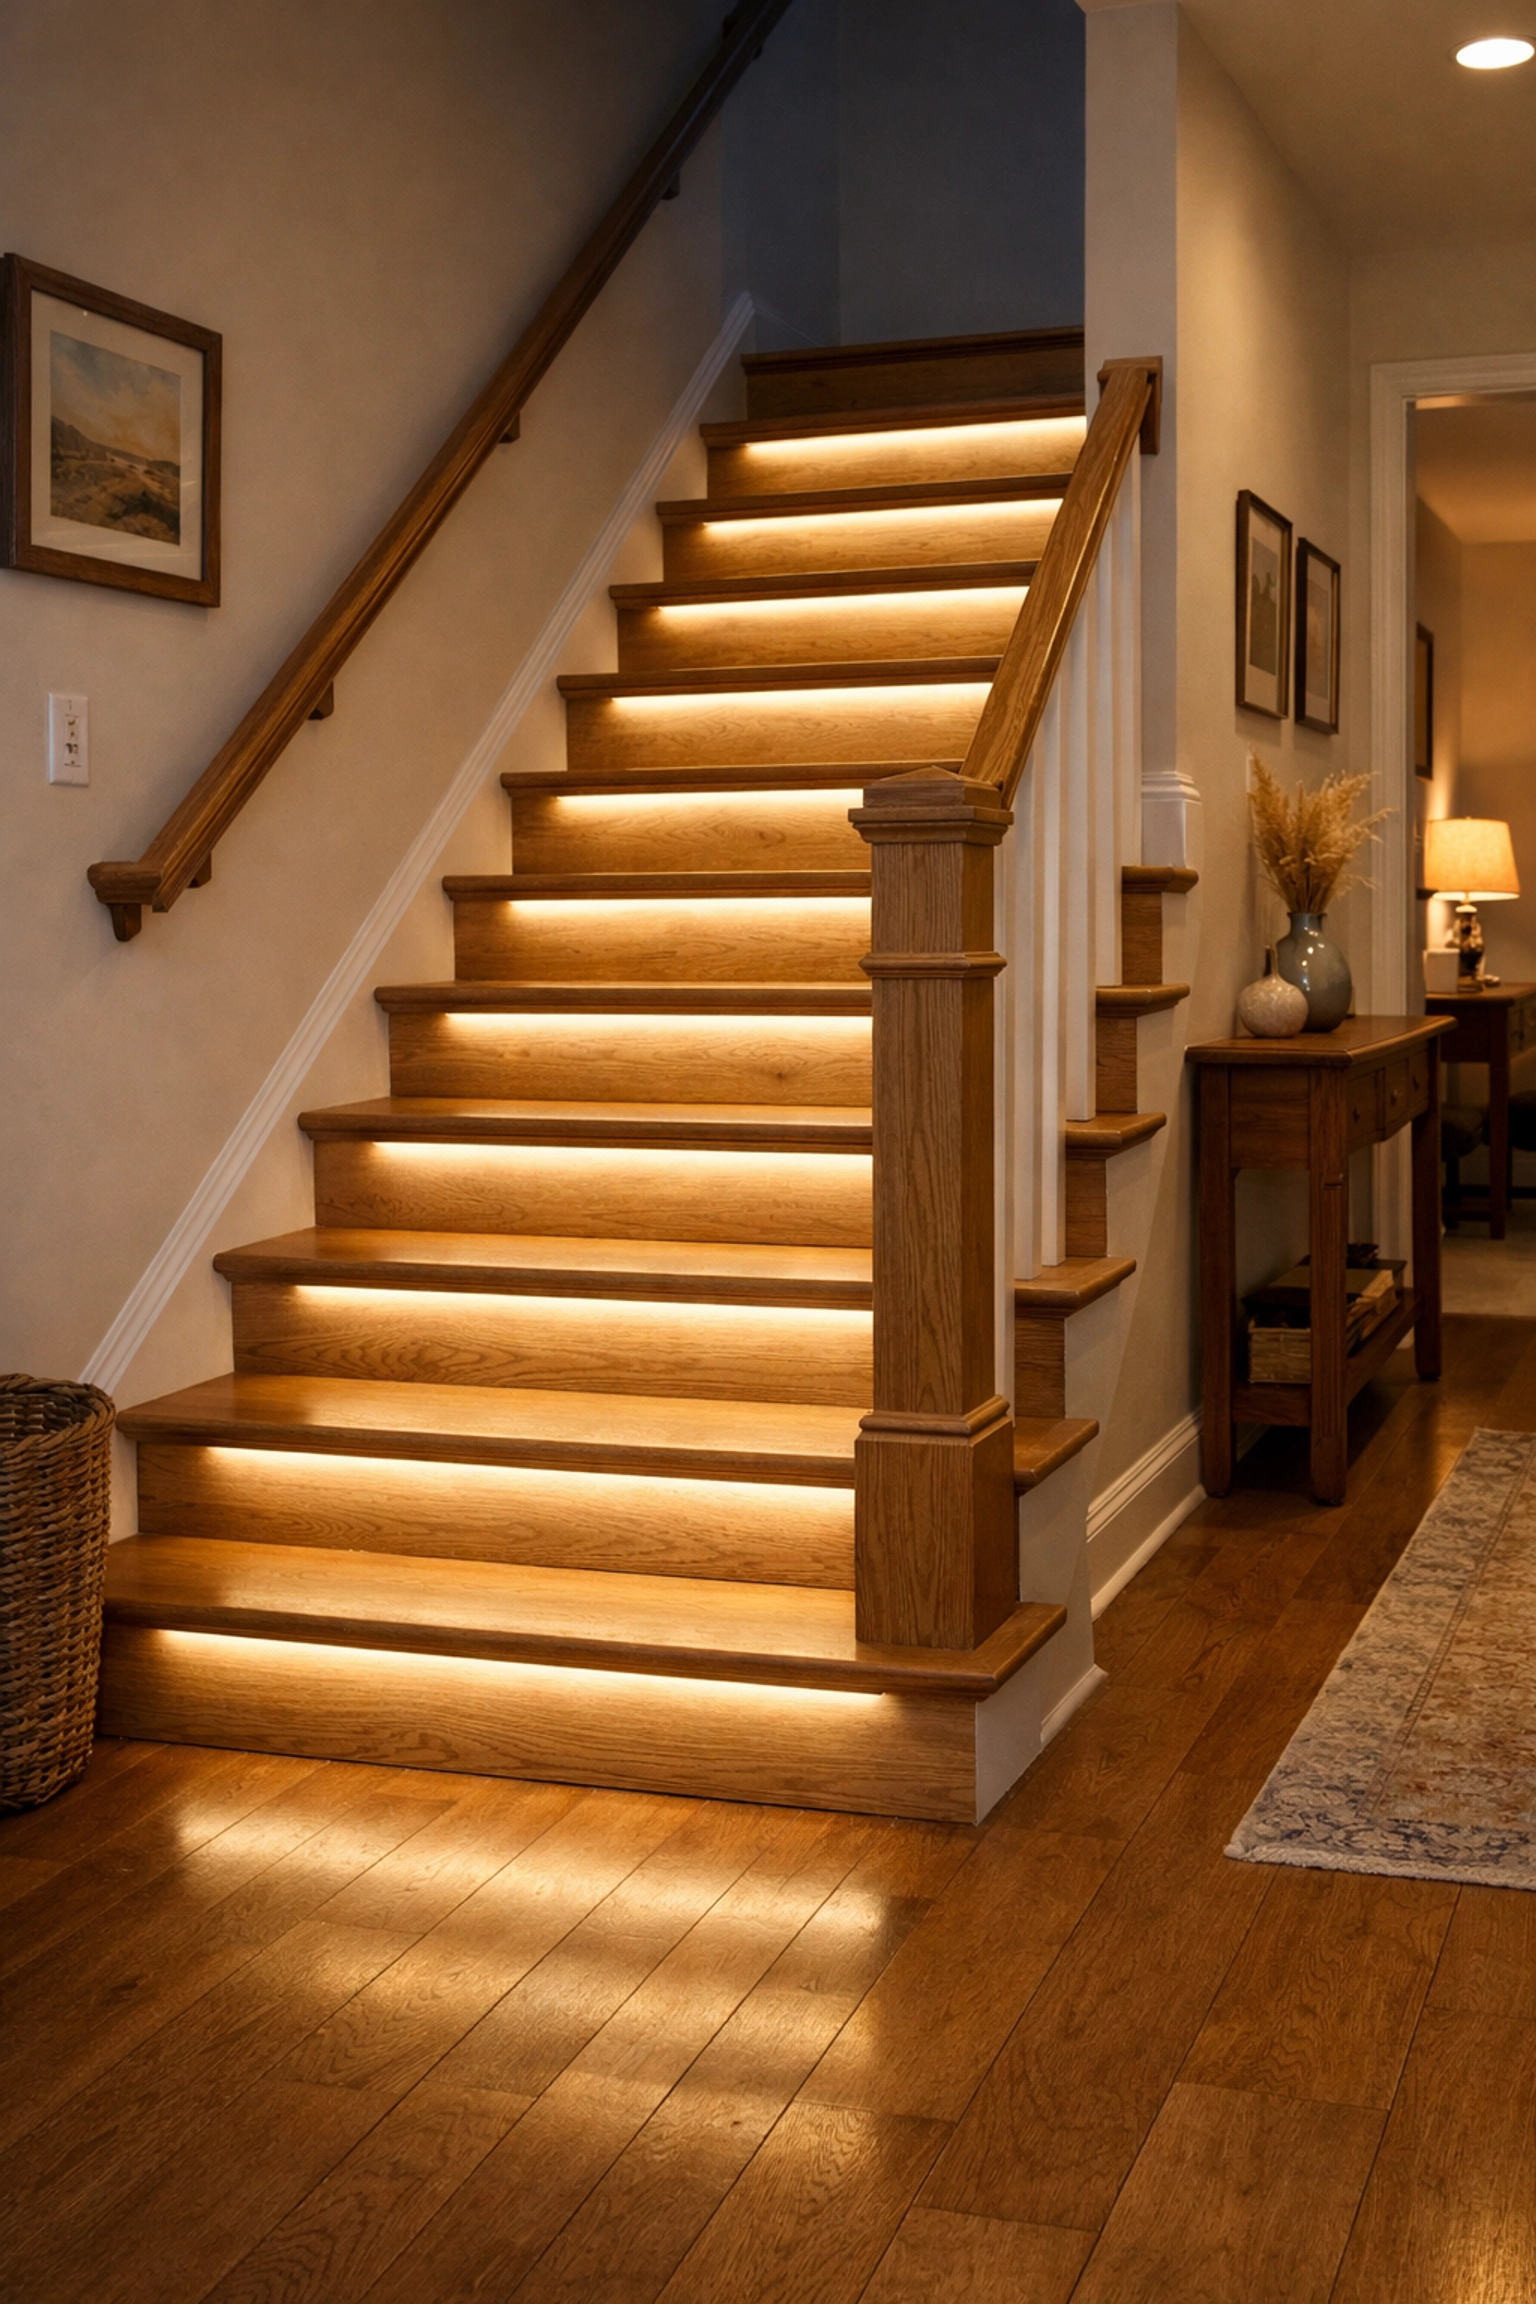
3. Living in the "Shadow Zone" (Poor Lighting)
This is perhaps the most common mistake of all. Many staircases have a single light at the top or bottom, leaving the middle of the flight in a "shadow zone." When you can't clearly see where one step ends and the next begins, your depth perception is compromised.
As we age, our eyes require more light to see clearly and take longer to adjust to changes in brightness. Walking from a brightly lit hallway into a dim staircase is a recipe for a misstep.
How to Fix It:
- Dual-End Switches: Ensure there are light switches at both the top and the bottom of the stairs so you never have to navigate them in the dark to reach a switch.
- Motion-Sensing LED Strips: One of the best modern fixes is installing battery-operated, motion-sensing LED strips under the lip of each step or along the baseboard. They light up automatically as you approach, providing clear "pathfinding" without being blindingly bright.
- Increased Wattage: Simply replacing old, dim bulbs with brighter, "daylight" spectrum LED bulbs can make a world of difference.
4. Using the Stairs as a Temporary Storage Shelf
We’ve all done it. You have a stack of books or a pair of shoes that needs to go upstairs, but you aren’t going up right now. So, you set them on the bottom two steps to "take up later."
The mistake is assuming you: or someone else in the house: will remember those items are there. Clutter on the stairs is a major tripping hazard. It narrows the walking path and forces you to take awkward, uneven steps to avoid the objects.
How to Fix It:
- The "Hands-Free" Rule: Make it a household rule that nothing ever sits on the steps. Not even for a minute.
- Stair Baskets: If you have items that need to go up or down, place them in a dedicated "stair basket" kept on a table near the stairs, but never on the steps themselves.
- Clear the Path: Ensure that the landing areas at the top and bottom are also free of rugs that could bunch up or furniture that restricts movement.
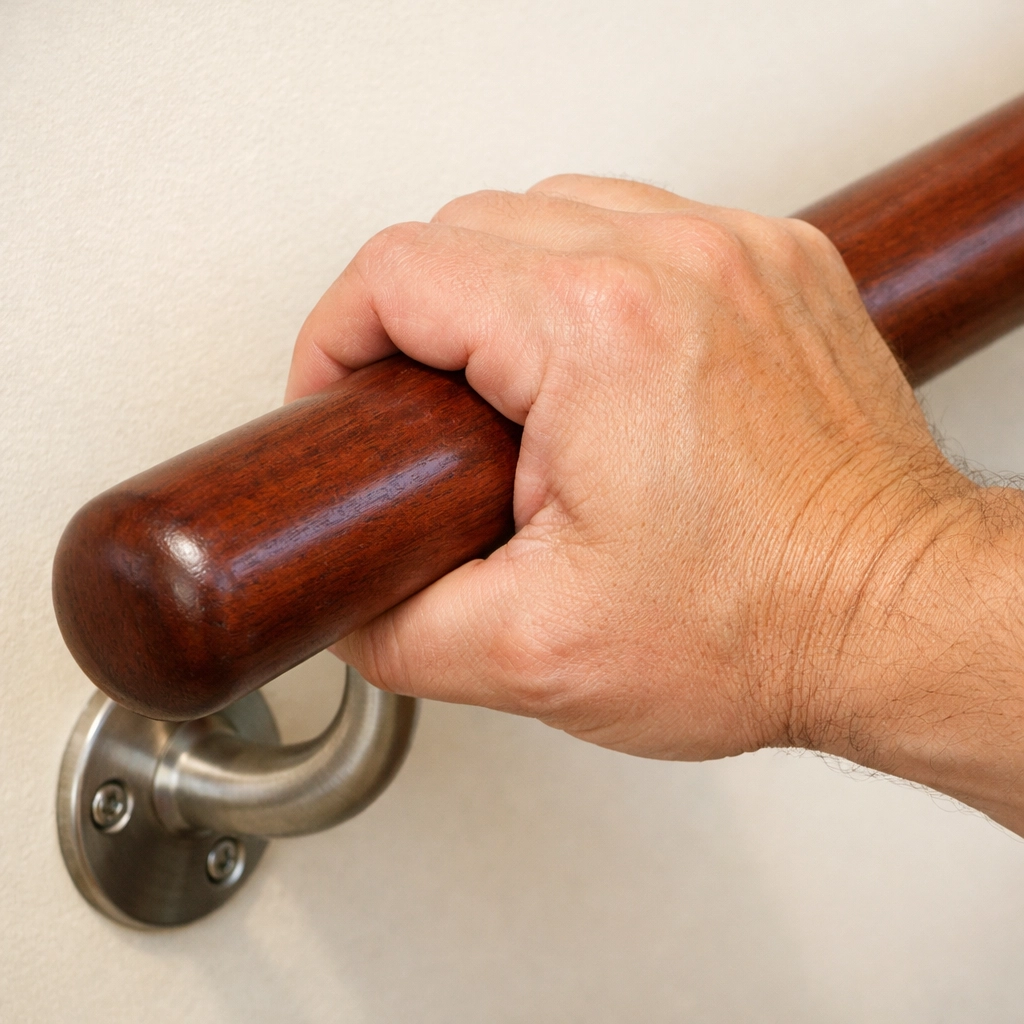
5. Inadequate or "Decorative" Handrails
A handrail is not a decoration; it is a safety device meant to support your full body weight in the event of a stumble. Many homes have handrails that are too thick to grip properly, are only on one side of the stairs, or stop a few inches before the stairs actually end.
If you can’t wrap your hand completely around the rail (a "power grip"), it won’t do much good if you actually start to fall. Furthermore, if the rail doesn't extend past the last step, you lose your stability exactly when you need it most: during the transition to a flat surface.
How to Fix It:
- Circular Rails: Replace bulky, rectangular rails with rounded ones that are about 1.5 to 2 inches in diameter.
- Double Up: If possible, install handrails on both sides of the staircase. This allows you to use both arms for balance and ensures a rail is always reachable regardless of which hand is stronger.
- Length Extension: Ensure the rail starts before the first step and ends after the last one. It should be securely bolted into the wall studs, not just the drywall.
6. Inconsistent Step Dimensions
The human brain is incredible at pattern recognition. After the first two steps of a staircase, your brain "maps" the height (riser) and depth (tread) of the steps. You stop looking at your feet because your muscle memory takes over.
The mistake occurs in older homes or DIY renovations where one step might be a half-inch taller or shorter than the others. This "irregularity" is often enough to catch a toe or cause a heel to slip, leading to a fall.
How to Fix It:
- Measure Your Stairs: Use a tape measure to check the height of every riser. If you find a significant discrepancy (more than a quarter inch), you may need a carpenter to shim or adjust the treads to create a uniform flow.
- Nosing Awareness: Ensure the "nosing" (the part that overhangs the step below) is consistent. If the top step lacks nosing while the others have it, it can cause a trip as you reach the landing.
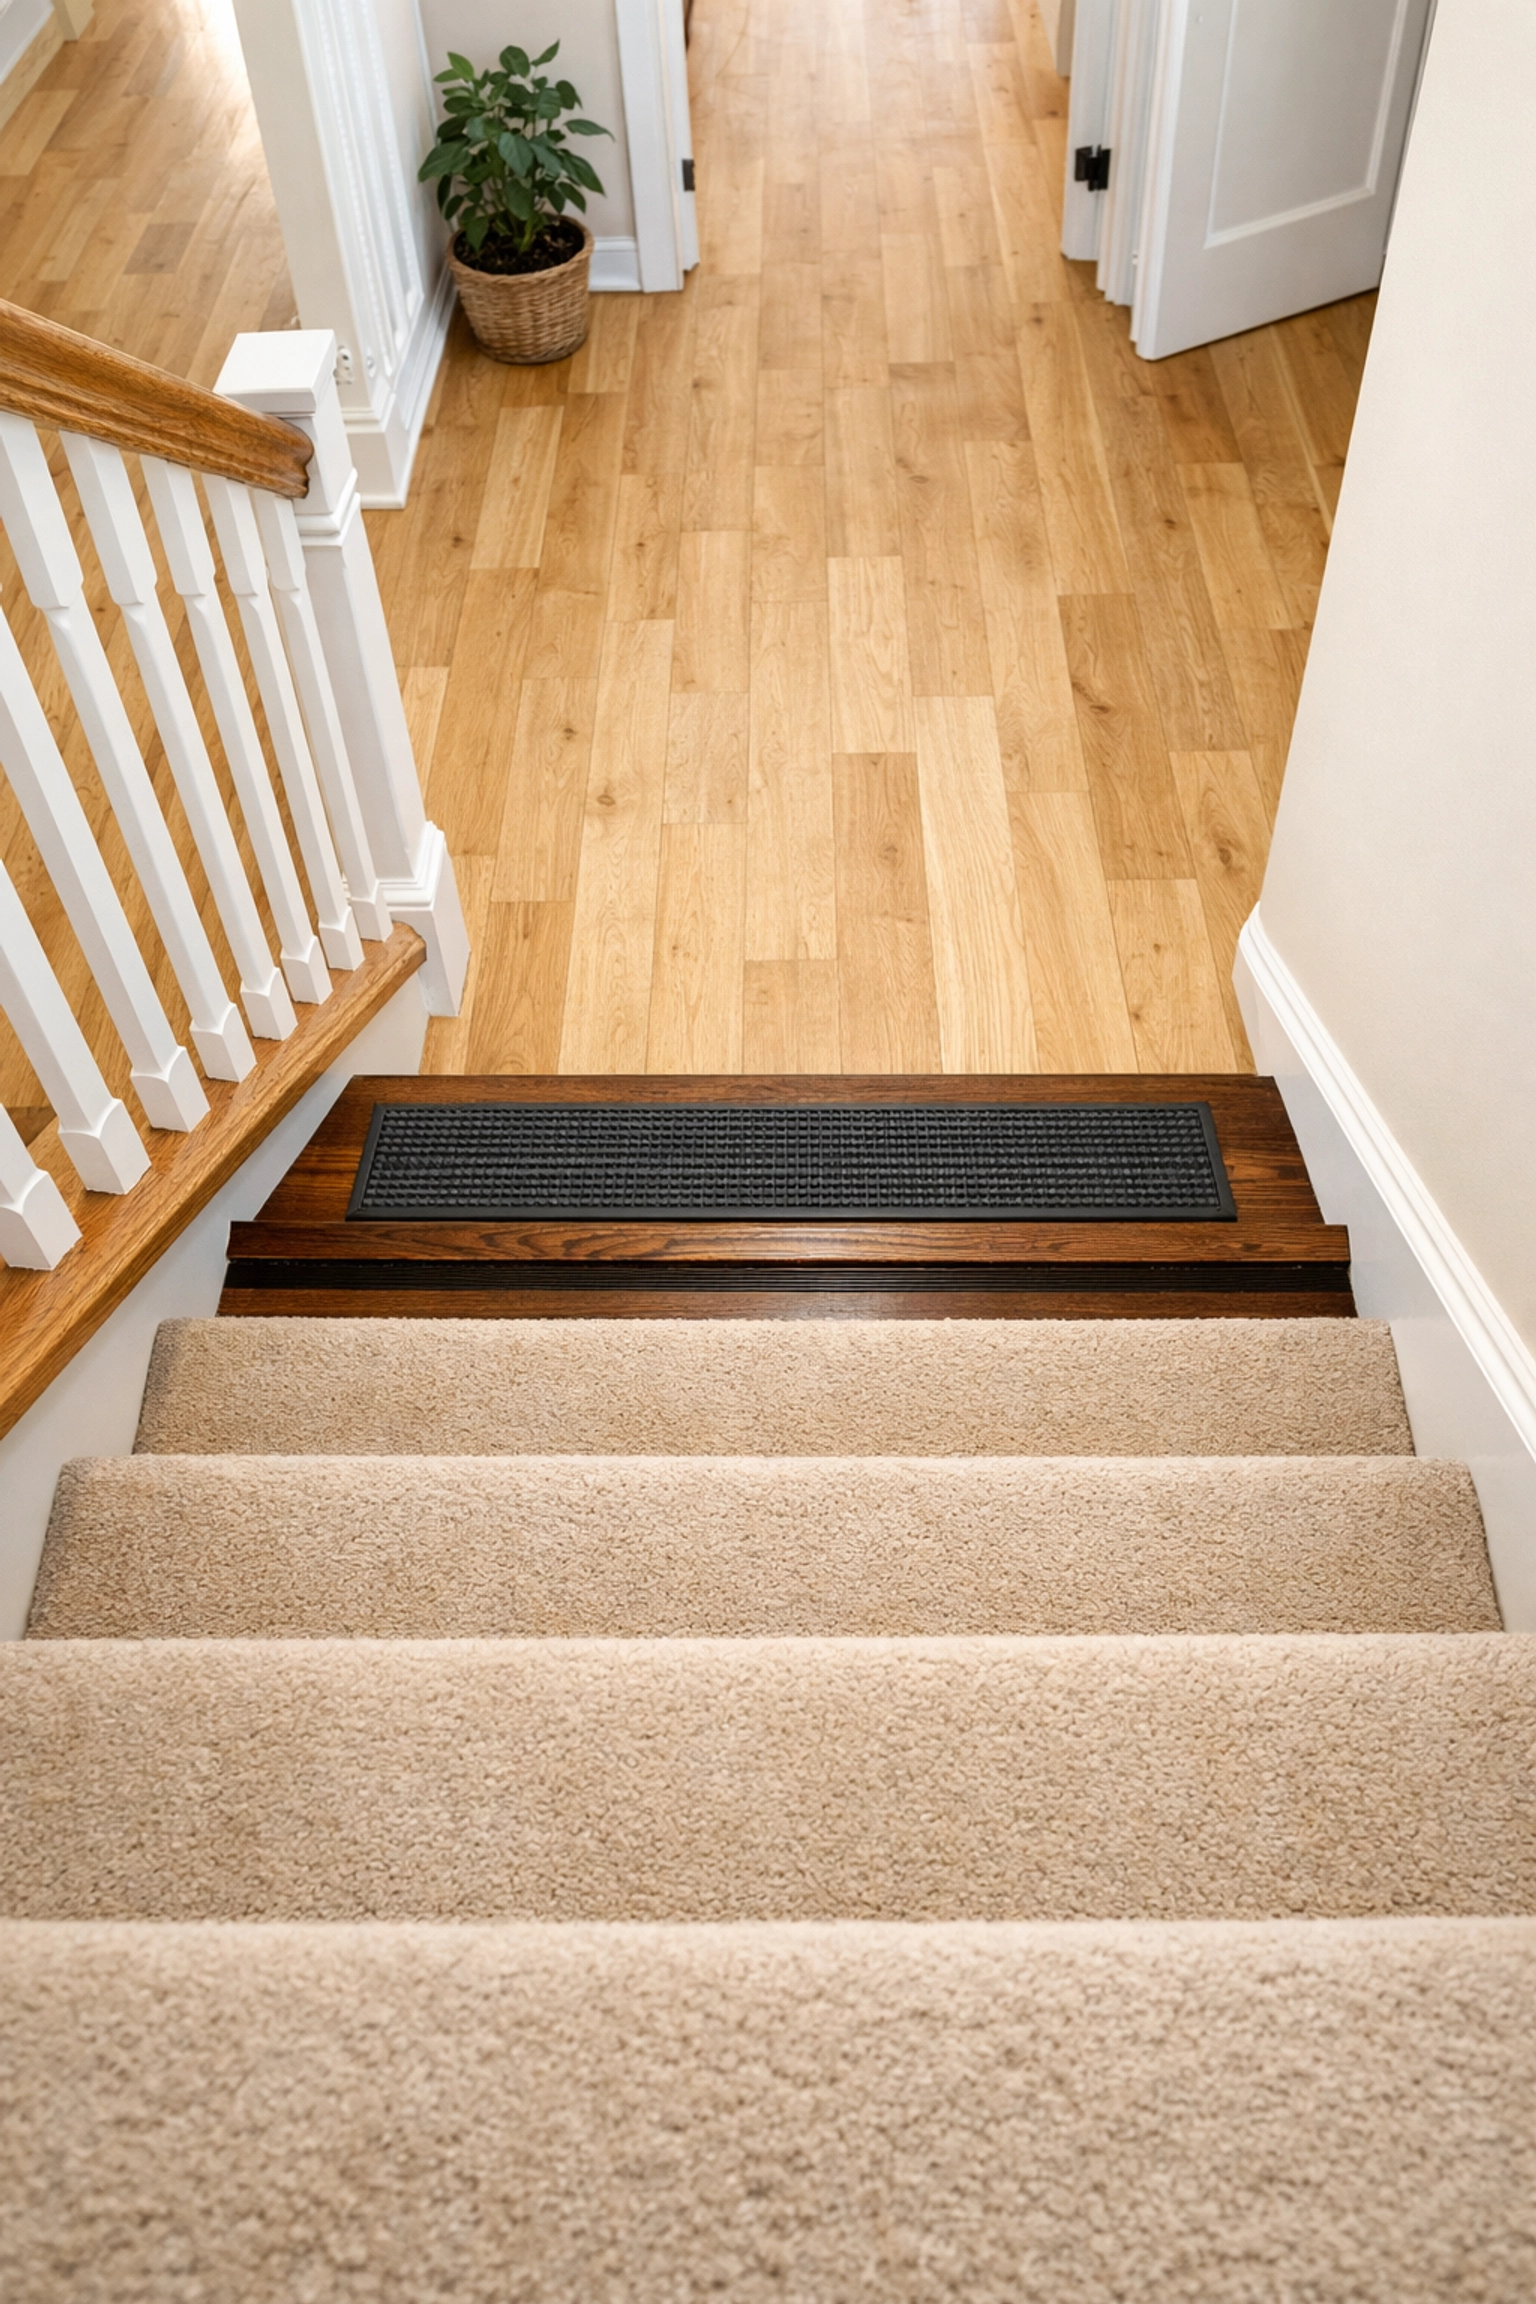
7. The "Bottom Step Illusion"
Many falls happen on the very last step. This is often because the bottom step blends into the floor or the landing, especially if the flooring material is the same. This is known as the "bottom step illusion." You think you’ve reached the floor, so you shift your weight forward, only to realize there is one more four-inch drop.
How to Fix It:
- Visual Contrast: This is a simple but highly effective fix. Use a strip of high-contrast tape or a different colored stair tread on the very last step.
- Highlighting the Edge: Marking the edge of each step with a contrasting color helps the eye distinguish where the horizontal surface ends and the vertical drop begins. This is particularly helpful for those with declining vision or cataracts.
A Note on Footwear and Habit
While fixing the environment is crucial, we also have to look at our own habits. Walking downstairs in just socks is one of the most dangerous things you can do in a home with hardwood or polished stairs.
- Proper Shoes: Wear sturdy, well-fitting shoes with non-slip soles, even inside the house. If you prefer slippers, ensure they have a rubberized bottom and a back that keeps your heel from sliding out.
- Take Your Time: Rushing is a primary cause of accidents. Make it a habit to pause for a second at the top of the stairs, find the handrail, and descend slowly.
- The "One Hand" Rule: Try to always keep at least one hand free to hold the railing. If you have to carry something large, consider using a backpack or asking for help rather than blocking your vision or occupying both hands.
Building a Culture of Safety
At the end of the day, stair safety is about being proactive. We often wait until a "near miss" occurs before we decide to fix the lighting or tighten a loose rail. By taking a weekend to audit your staircase using these seven points, you are making a significant investment in your long-term health and independence.
Stairs don't have to be a source of anxiety. With the right lighting, solid handrails, clear paths, and high-contrast edges, they can remain a safe and functional part of your home for years to come. Remember, the goal isn't just to prevent a fall today: it's to ensure you feel confident and secure in every room of your house, every single day.

