Stairs are often the most intimidating part of a home as we get older. They represent a transition between floors, but they also represent a significant physical challenge. If you’ve ever felt that slight flutter of anxiety when looking down from the top of a staircase, you aren’t alone. It is one of the most common concerns I hear from families looking to make a home safer for aging in place.
While there are many complex ways to modify a home: like installing stairlifts or completely remodeling a floor plan: there is one simple, incredibly effective trick that can be done in about twenty minutes. It doesn't require a contractor, and it costs very little.
The simple trick? Improving the friction and visibility of the stair treads.
In this guide, we’re going to dive deep into why this works, the science behind stair falls, and a few other immediate actions you can take to reclaim your confidence on the stairs.
Why Slipping is the Silent Enemy
Most people assume that stair falls happen because someone "trips": meaning their toe hits the riser and they stumble forward. While that does happen, research into home safety shows that a much higher percentage of serious accidents on stairs are caused by "slips."
A slip happens when there isn't enough friction between your foot (or shoe) and the stair surface. This usually occurs as you are descending. When your heel plants on the step below, if it doesn't "grip" immediately, your foot slides forward. Because your weight is already shifting downward, a slip almost always results in a fall backward onto the spine or a jarring tumble down the remaining steps.
Many of our homes feature beautiful hardwood, polished tile, or laminate stairs. While these look great, they are often as slick as a skating rink, especially if you are wearing socks or smooth-soled slippers.
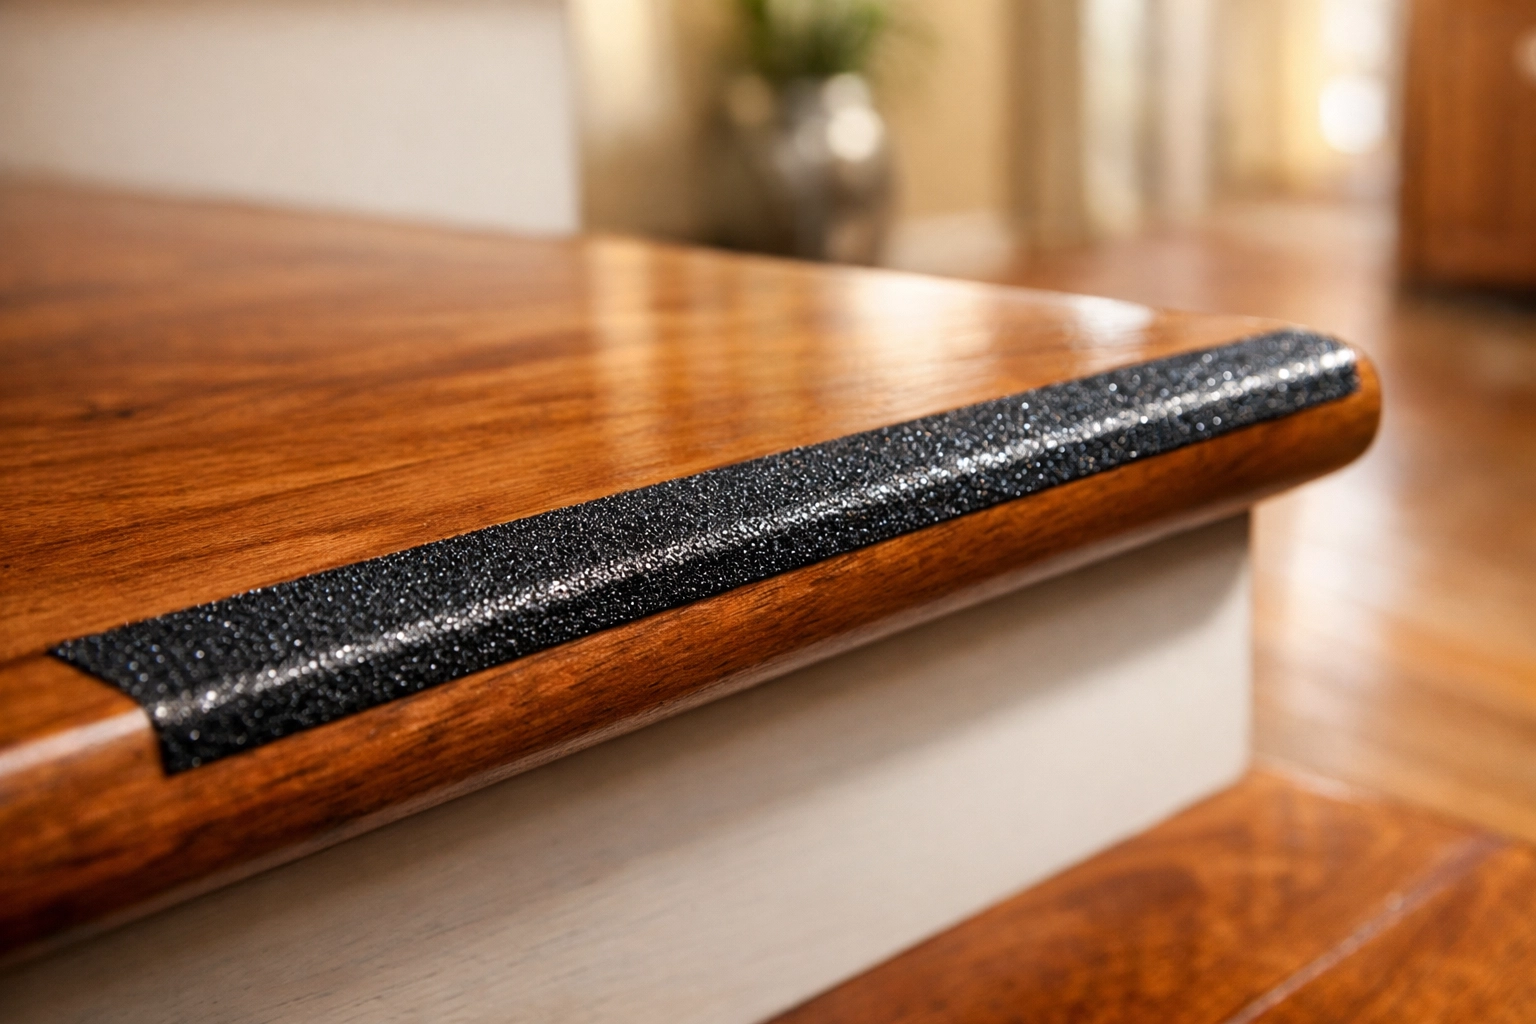
The Friction Fix: Non-Slip Strips
The most immediate thing you can do right now is add non-slip adhesive strips to the edge of every single step. These are often called "tread tape" or "anti-slip "strips."
These strips come in several varieties:
- Grit Tape: This feels like sandpaper. It provides the highest level of grip but can be a bit rough on bare feet.
- Rubberized Textured Strips: These are much softer and "grippy" rather than "scratchy." They are ideal for indoor use where people might be walking in socks or barefoot.
- Clear Adhesive Strips: If you don't want to change the look of your wood stairs, clear strips provide the friction you need without being visually intrusive.
By applying these to the "nose" (the front edge) of each step, you provide your foot with an immediate anchor point. Even if the rest of the step is smooth, that high-friction edge catches your heel as you go down and your toe as you go up.
The Power of Visual Contrast
There is a second part to this "simple trick" that is just as important as the physical grip: Visual Contrast.
As we age, our depth perception can change. Our eyes need more light and more distinct boundaries to tell where one surface ends and another begins. On a staircase where every step is the same shade of oak or the same beige carpet, the steps can "blur" together into one long, confusing ramp. This is especially dangerous at the top of the stairs, where the transition from the hallway to the first step occurs.
If you choose a non-slip strip that contrasts with the color of your stairs: for example, a dark grey strip on a light wood step: you are doing two things at once. You are adding safety through friction, and you are providing a clear visual "map" for your brain.
Your brain can instantly see exactly where the edge of the step is located. This reduces the cognitive load of navigating the stairs, allowing you to move more naturally and with less hesitation.
Marking the First and Last Step
If you aren't ready to put strips on every single step, the most critical areas are the very top and the very bottom. Most stair accidents occur at these transition points.
Using a bright, contrasting color on the first and last step acts as a "warning" to your nervous system that the terrain is changing. It helps prevent that terrifying moment of "overstepping" at the top or "understepping" at the bottom because you thought there was one more (or one fewer) step than there actually was.
Beyond the Strips: Enhancing Stair Safety Immediately
While the non-slip strips are the fastest fix, stair safety is best handled with a "layered" approach. Once you’ve secured the treads, there are three other areas you should look at today.
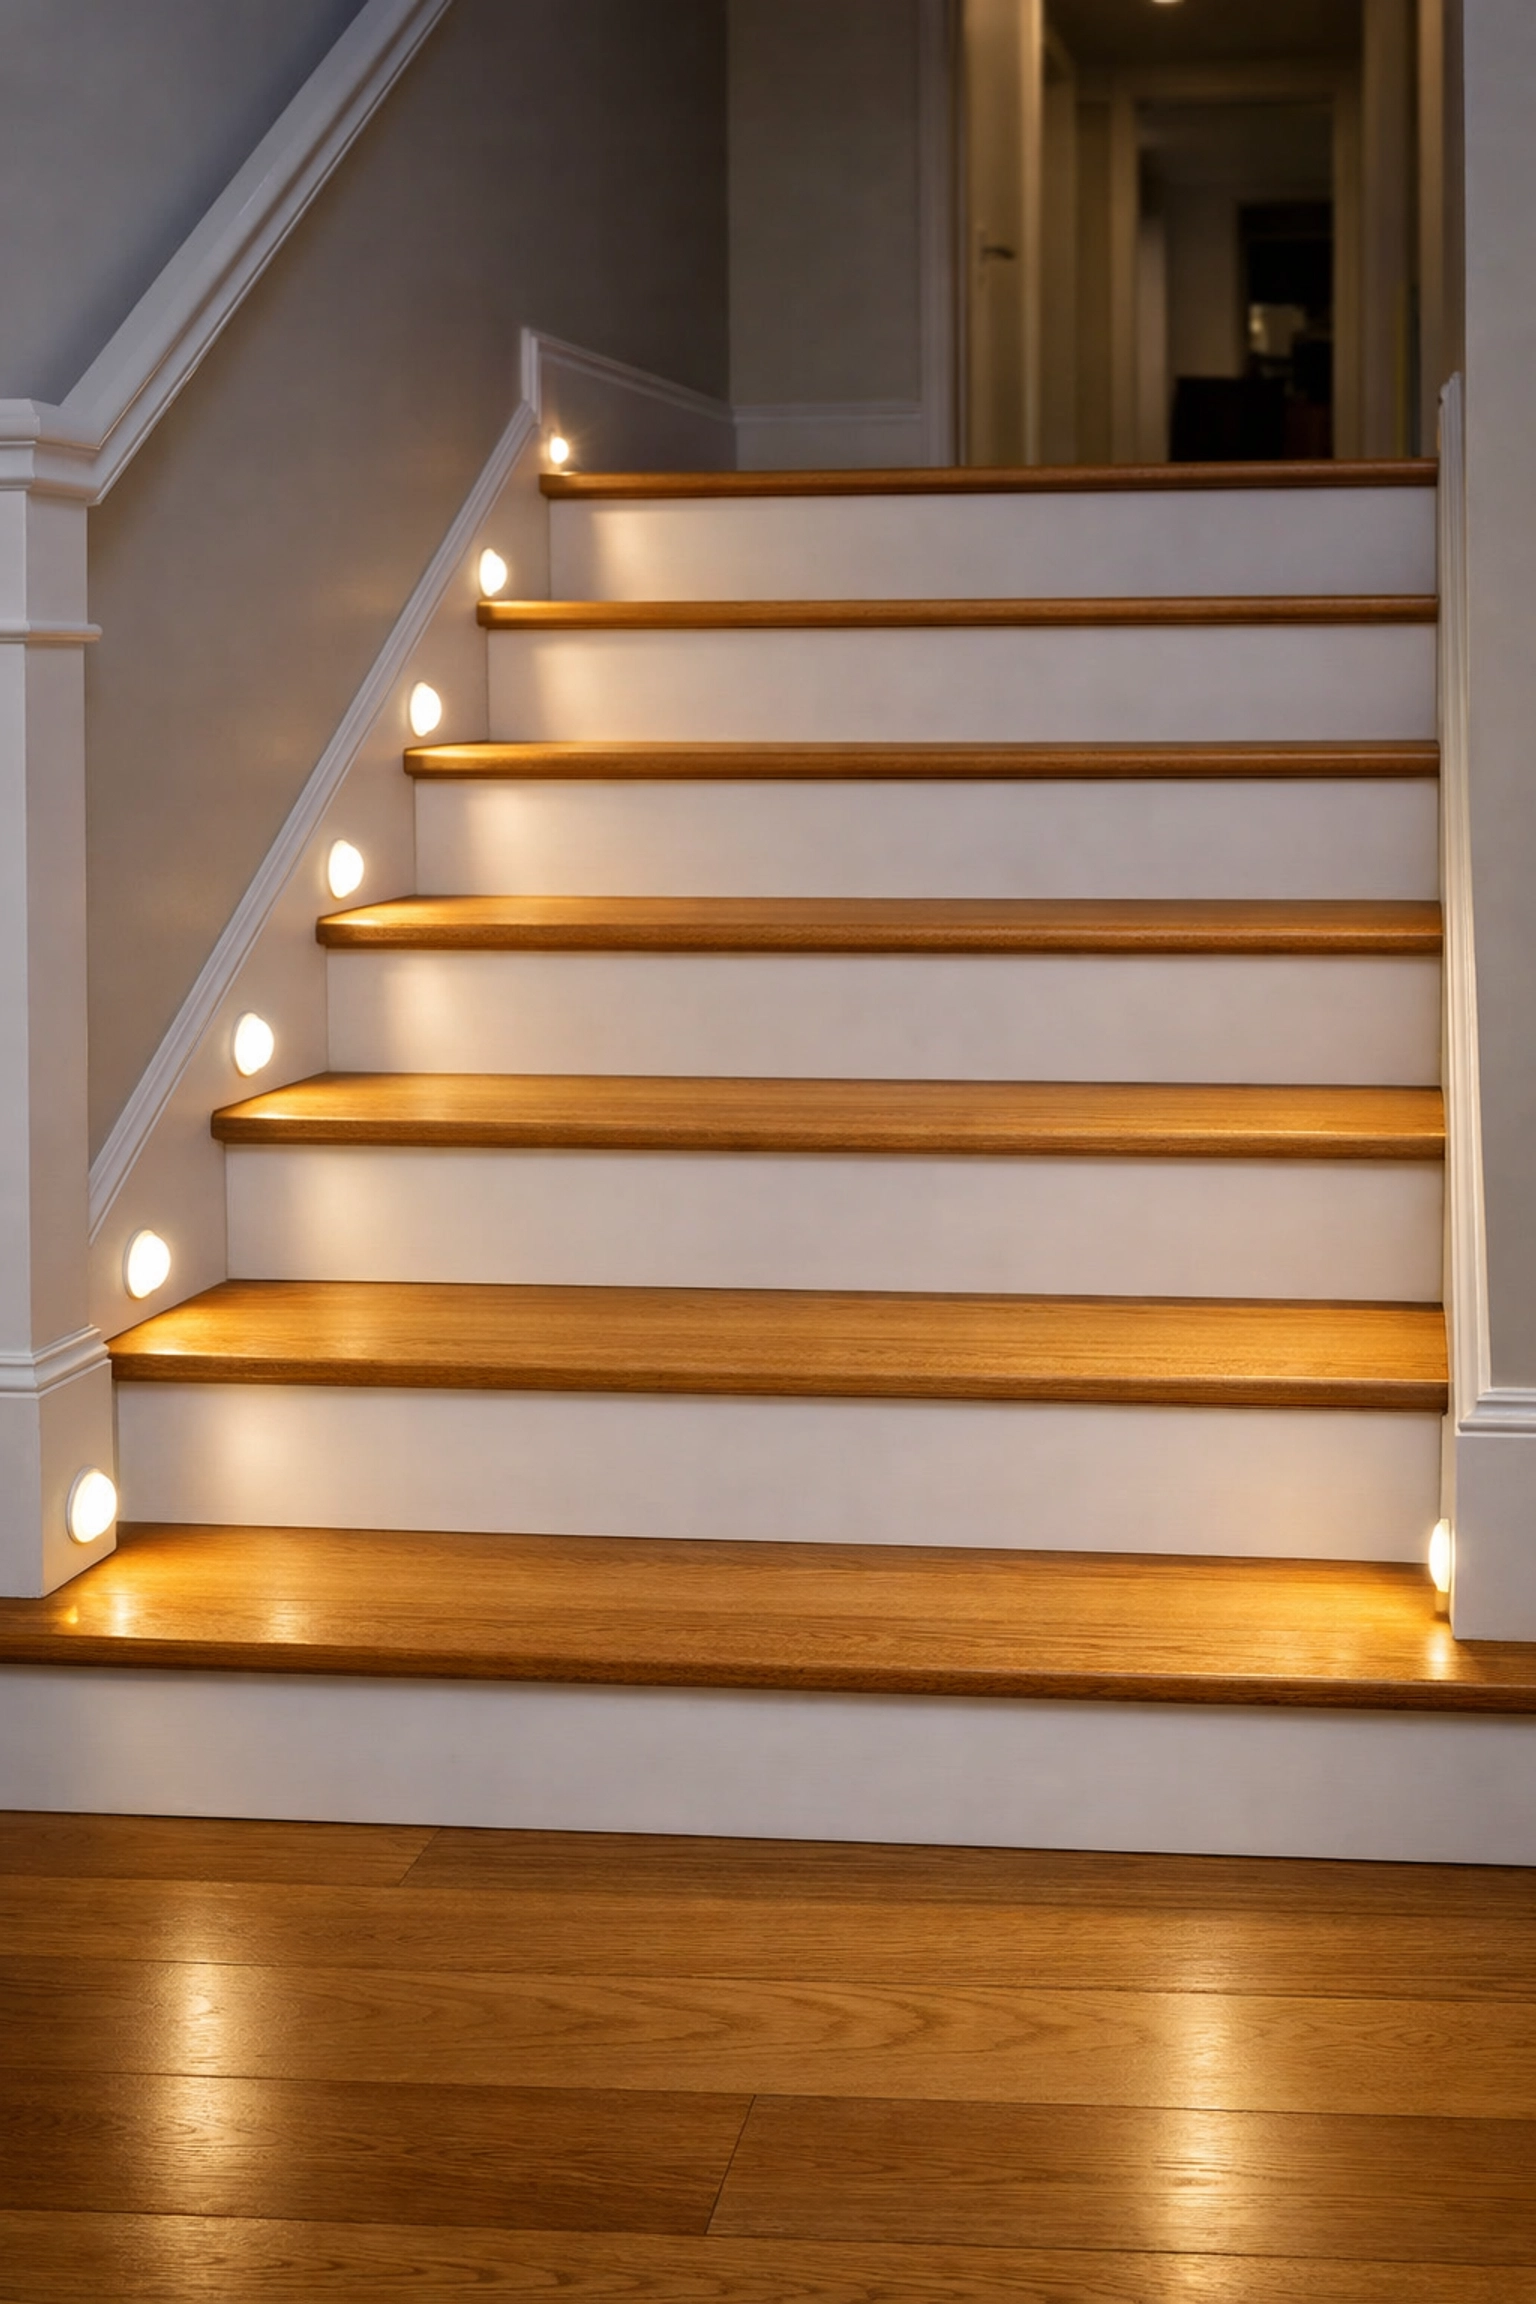
1. The Lighting Audit
Poor lighting is a major contributor to falls. Even if you have a light switch at the top and bottom of the stairs, many people don't use them for a quick trip "just to grab one thing."
Go to your stairs right now and look at the shadows. Are the edges of the steps clear? Or are there pockets of darkness?
- The Fix: If you can't change your overhead lighting, consider battery-powered, motion-sensor LED lights. You can stick these to the wall along the baseboards of the staircase. They will glow softly as soon as you approach, illuminating the path without you having to hunt for a switch in the dark.
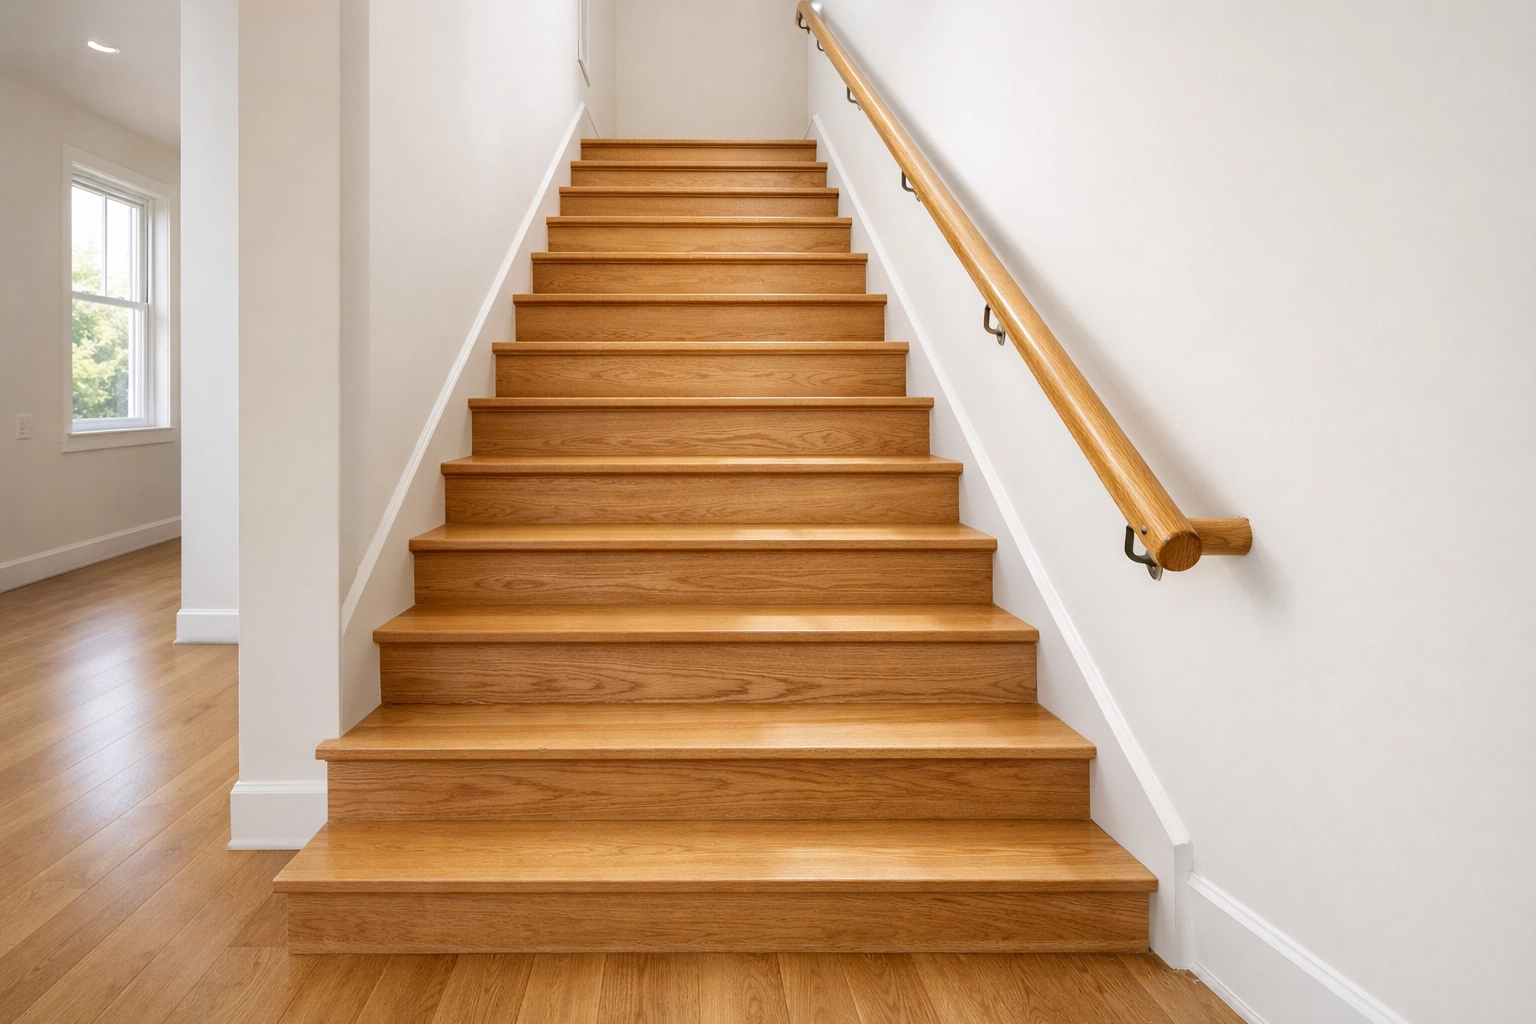
2. Handrail Integrity
A handrail is not just a decorative element; it is a safety device that needs to hold your full body weight in an emergency.
- The Grip Test: Can you wrap your hand all the way around your handrail? Many modern homes have "architectural" handrails that are wide, flat, or rectangular. These are hard to grip tightly. A safe handrail should be "graspable," meaning your fingers and thumb can meet or nearly meet underneath it.
- The Shake Test: Give your handrail a firm shake. Does it wiggle? Does the wood creak? If it isn't rock-solid, it needs to be tightened or re-anchored into the wall studs immediately.
3. Clearing the "Staging Area"
We all have a habit of leaving things on the stairs that need to "go up" or "go down" later. A book, a basket of laundry, or a pair of shoes.
On a staircase, clutter isn't just a mess; it’s a landmine. Because stairs require our full attention and a specific stepping pattern, having to "step around" an object breaks our rhythm and shifts our center of gravity in a way that makes a fall much more likely.
- The Rule: Keep the stairs, and at least three feet of space at the top and bottom, completely clear of all objects at all times.
The Role of Footwear in Stair Safety
We’ve talked a lot about the stairs themselves, but we also need to talk about what is on your feet.
In many homes, it is common to walk around in socks to keep the floors clean or the feet warm. However, socks on finished wood or tile are incredibly dangerous. They provide zero traction.
If you prefer not to wear outdoor shoes inside, the best solution is a dedicated "house shoe" or slipper with a firm, non-slip rubber sole. Avoid "scuff" slippers that don't have a back, as your foot can slide out of them while you are moving between steps. A secure, closed-back slipper with a grippy bottom works in tandem with your non-slip stair strips to create a very safe environment.
When to Seek Professional Advice
While non-slip strips and better lighting are great DIY fixes, sometimes the stairs themselves are inherently risky. This might be the case if:
- The steps are uneven in height.
- The "tread" (the part you step on) is too narrow for your foot.
- The staircase is very steep or has a "winding" turn with triangular steps.
In these cases, a Physical Therapist or an Occupational Therapist can perform a mobility assessment. They can help you determine if your current physical strength and balance are a good match for your home’s layout, or if more significant modifications are needed.

Summary of Action Steps
If you want to improve your stair safety today, here is your checklist:
- Purchase Non-Slip Strips: Look for rubberized or clear adhesive treads.
- Apply with Contrast: Choose a color that stands out from your flooring to help with depth perception.
- Check the "Ends": Ensure the top and bottom steps are the most visible and well-lit.
- Add Motion Lights: Stick-on LED lights can remove dangerous shadows.
- Clear the Path: Remove all clutter from the steps and the landing areas.
- Assess Your Shoes: Switch from socks to grippy house shoes or slippers.
Small changes often have the biggest impact. You don't always need a major construction project to make your home a safer place. By simply increasing the friction on your steps and making the edges easier to see, you are taking a massive step toward preventing falls and maintaining your independence for years to come.
Safety is about more than just equipment; it's about the peace of mind that comes from knowing you've looked after the details. Take twenty minutes this weekend to look at your stairs with fresh eyes( your future self will thank you.)

