Here's a reality check: falling is scary, but lying on the floor unable to get up is often more dangerous than the fall itself. The longer you stay down, the greater your risk of hypothermia, dehydration, pressure sores, and pneumonia. Even worse, many seniors develop a fear of falling again, which can lead to reduced mobility and independence.
The good news? There's a proven method for safely getting up after a fall, and it's something every senior should practice regularly. Think of it like a fire drill: you hope you never need it, but you'll be grateful you practiced if the time comes.
This isn't about being weak or admitting defeat. It's about being prepared and taking control of your safety. Let's walk through the technique that physical therapists and occupational therapists teach to help seniors regain independence after a fall.
Before You Begin: Take Stock of the Situation
The moment after a fall, your first instinct might be to get up quickly out of embarrassment or frustration. Resist that urge. Taking a few moments to assess yourself could prevent further injury.
Here's what to do first:
Breathe and calm yourself. Panic increases your heart rate and can cloud your judgment. Take several slow, deep breaths and remind yourself that you have time to figure this out.
Check for pain or injuries. Move slowly through each body part. Can you wiggle your fingers and toes? Rotate your ankles? Any sharp pain, unusual angles, or inability to move a limb could indicate a fracture or serious injury.
Look around for help. Is anyone nearby who could assist you? Can you reach a phone or medical alert device? If you're seriously injured, it's better to wait for help than to risk making things worse.
Identify sturdy furniture. Look for a solid chair, couch, or bed that can support your weight as you work your way up. Avoid anything with wheels or that might tip over.
If you determine that you're not seriously hurt and can attempt to get up on your own, it's time to use the Sequential Method.

The Sequential Method: Your Step-by-Step Guide
The Sequential Method breaks down the process of getting up into manageable stages. Each position is a rest stop where you can catch your breath and prepare for the next movement. There's no rush: move at your own pace.
Stage One: Roll to Your Side
From lying on your back, bend your knees and turn your head in the direction you want to roll. Use your arms to help push yourself onto your side. Choose the side that feels stronger or less painful.
Once on your side, extend your lower arm out in front of you for stability. Your upper arm should be free to help push you up in the next stage.
Rest here for a moment. This position is already safer than lying flat on your back because it reduces the risk of choking if you feel nauseous.
Stage Two: Move to Side-Sitting
Using your upper arm, push yourself up while swinging your legs toward the ground. You're aiming for a position where you're sitting on your hip with both legs pointing to the same side and your knees bent.
Your hand should be flat on the floor beside your hip, supporting your weight. Your other hand can rest on your thigh or help with balance.
This is a stable resting position. Take a few breaths here before moving on.
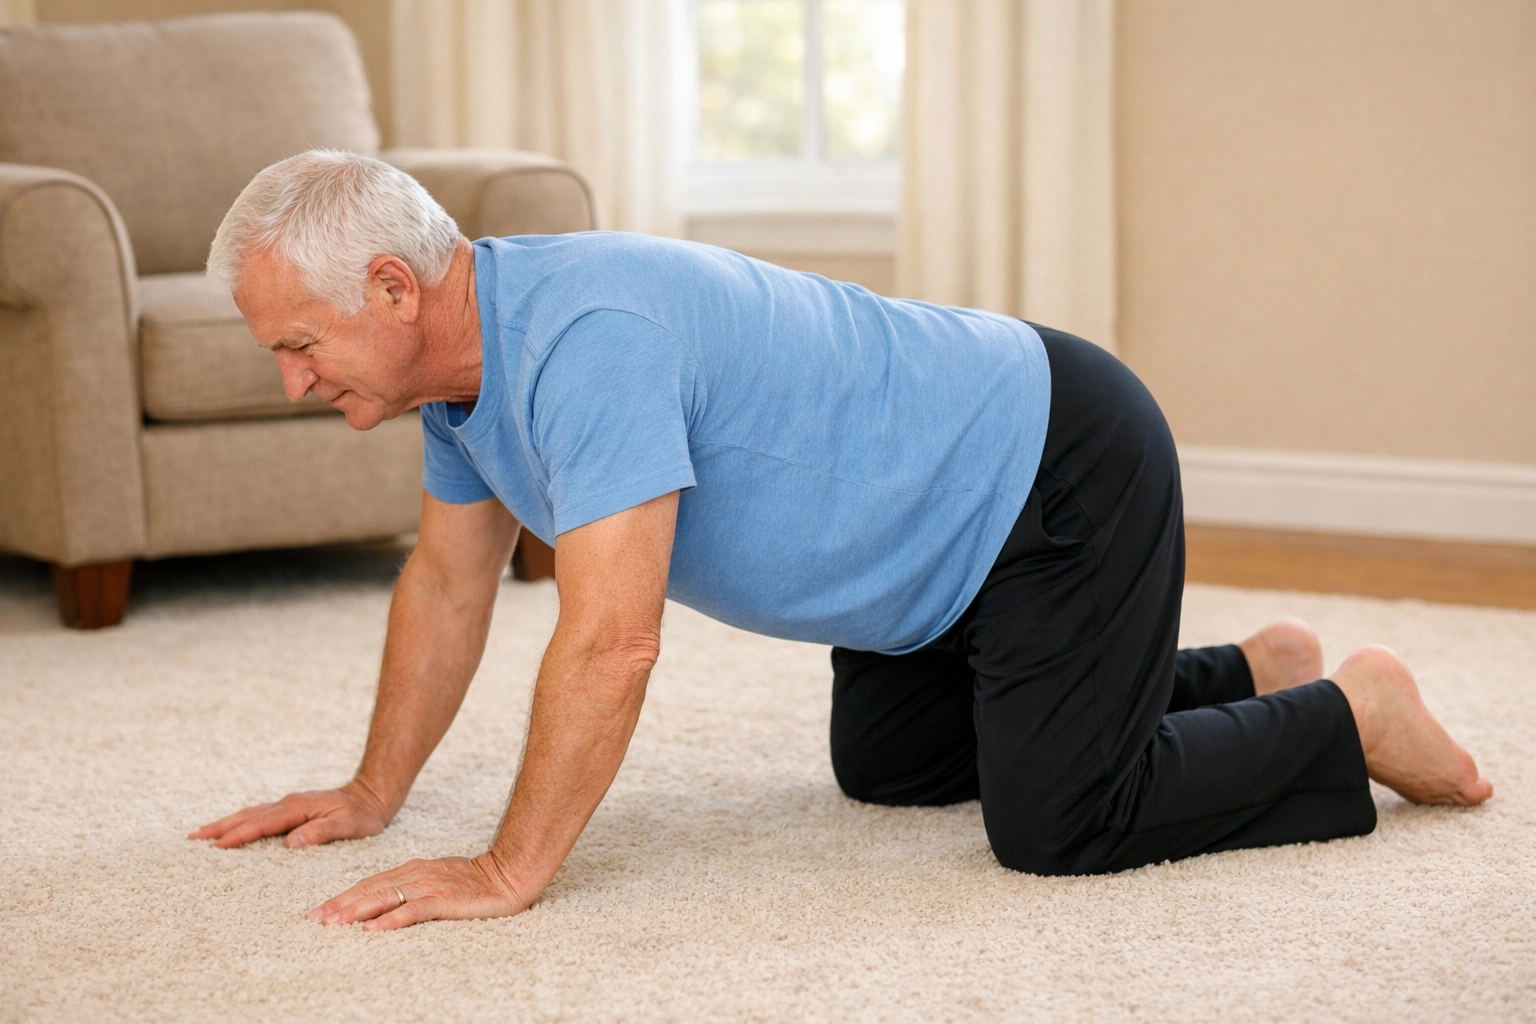
Stage Three: Get on Your Hands and Knees
From side-sitting, lean forward and place both hands on the floor. Carefully bring one knee up, then the other, until you're in a crawling position.
Keep your hands shoulder-width apart and your knees hip-width apart for the most stable base. Your back should be relatively flat, not arched or hunched.
If the floor is hard on your knees, don't worry about it right now: just focus on getting up. You can address any soreness later.
Stage Four: Crawl Toward Furniture
If you're not already next to sturdy furniture, now's the time to crawl toward it. Move slowly and steadily. There's no prize for speed.
A heavy chair without wheels, a sturdy coffee table, a couch, or your bed are all good options. Test the furniture by pushing on it slightly before putting your full weight on it.
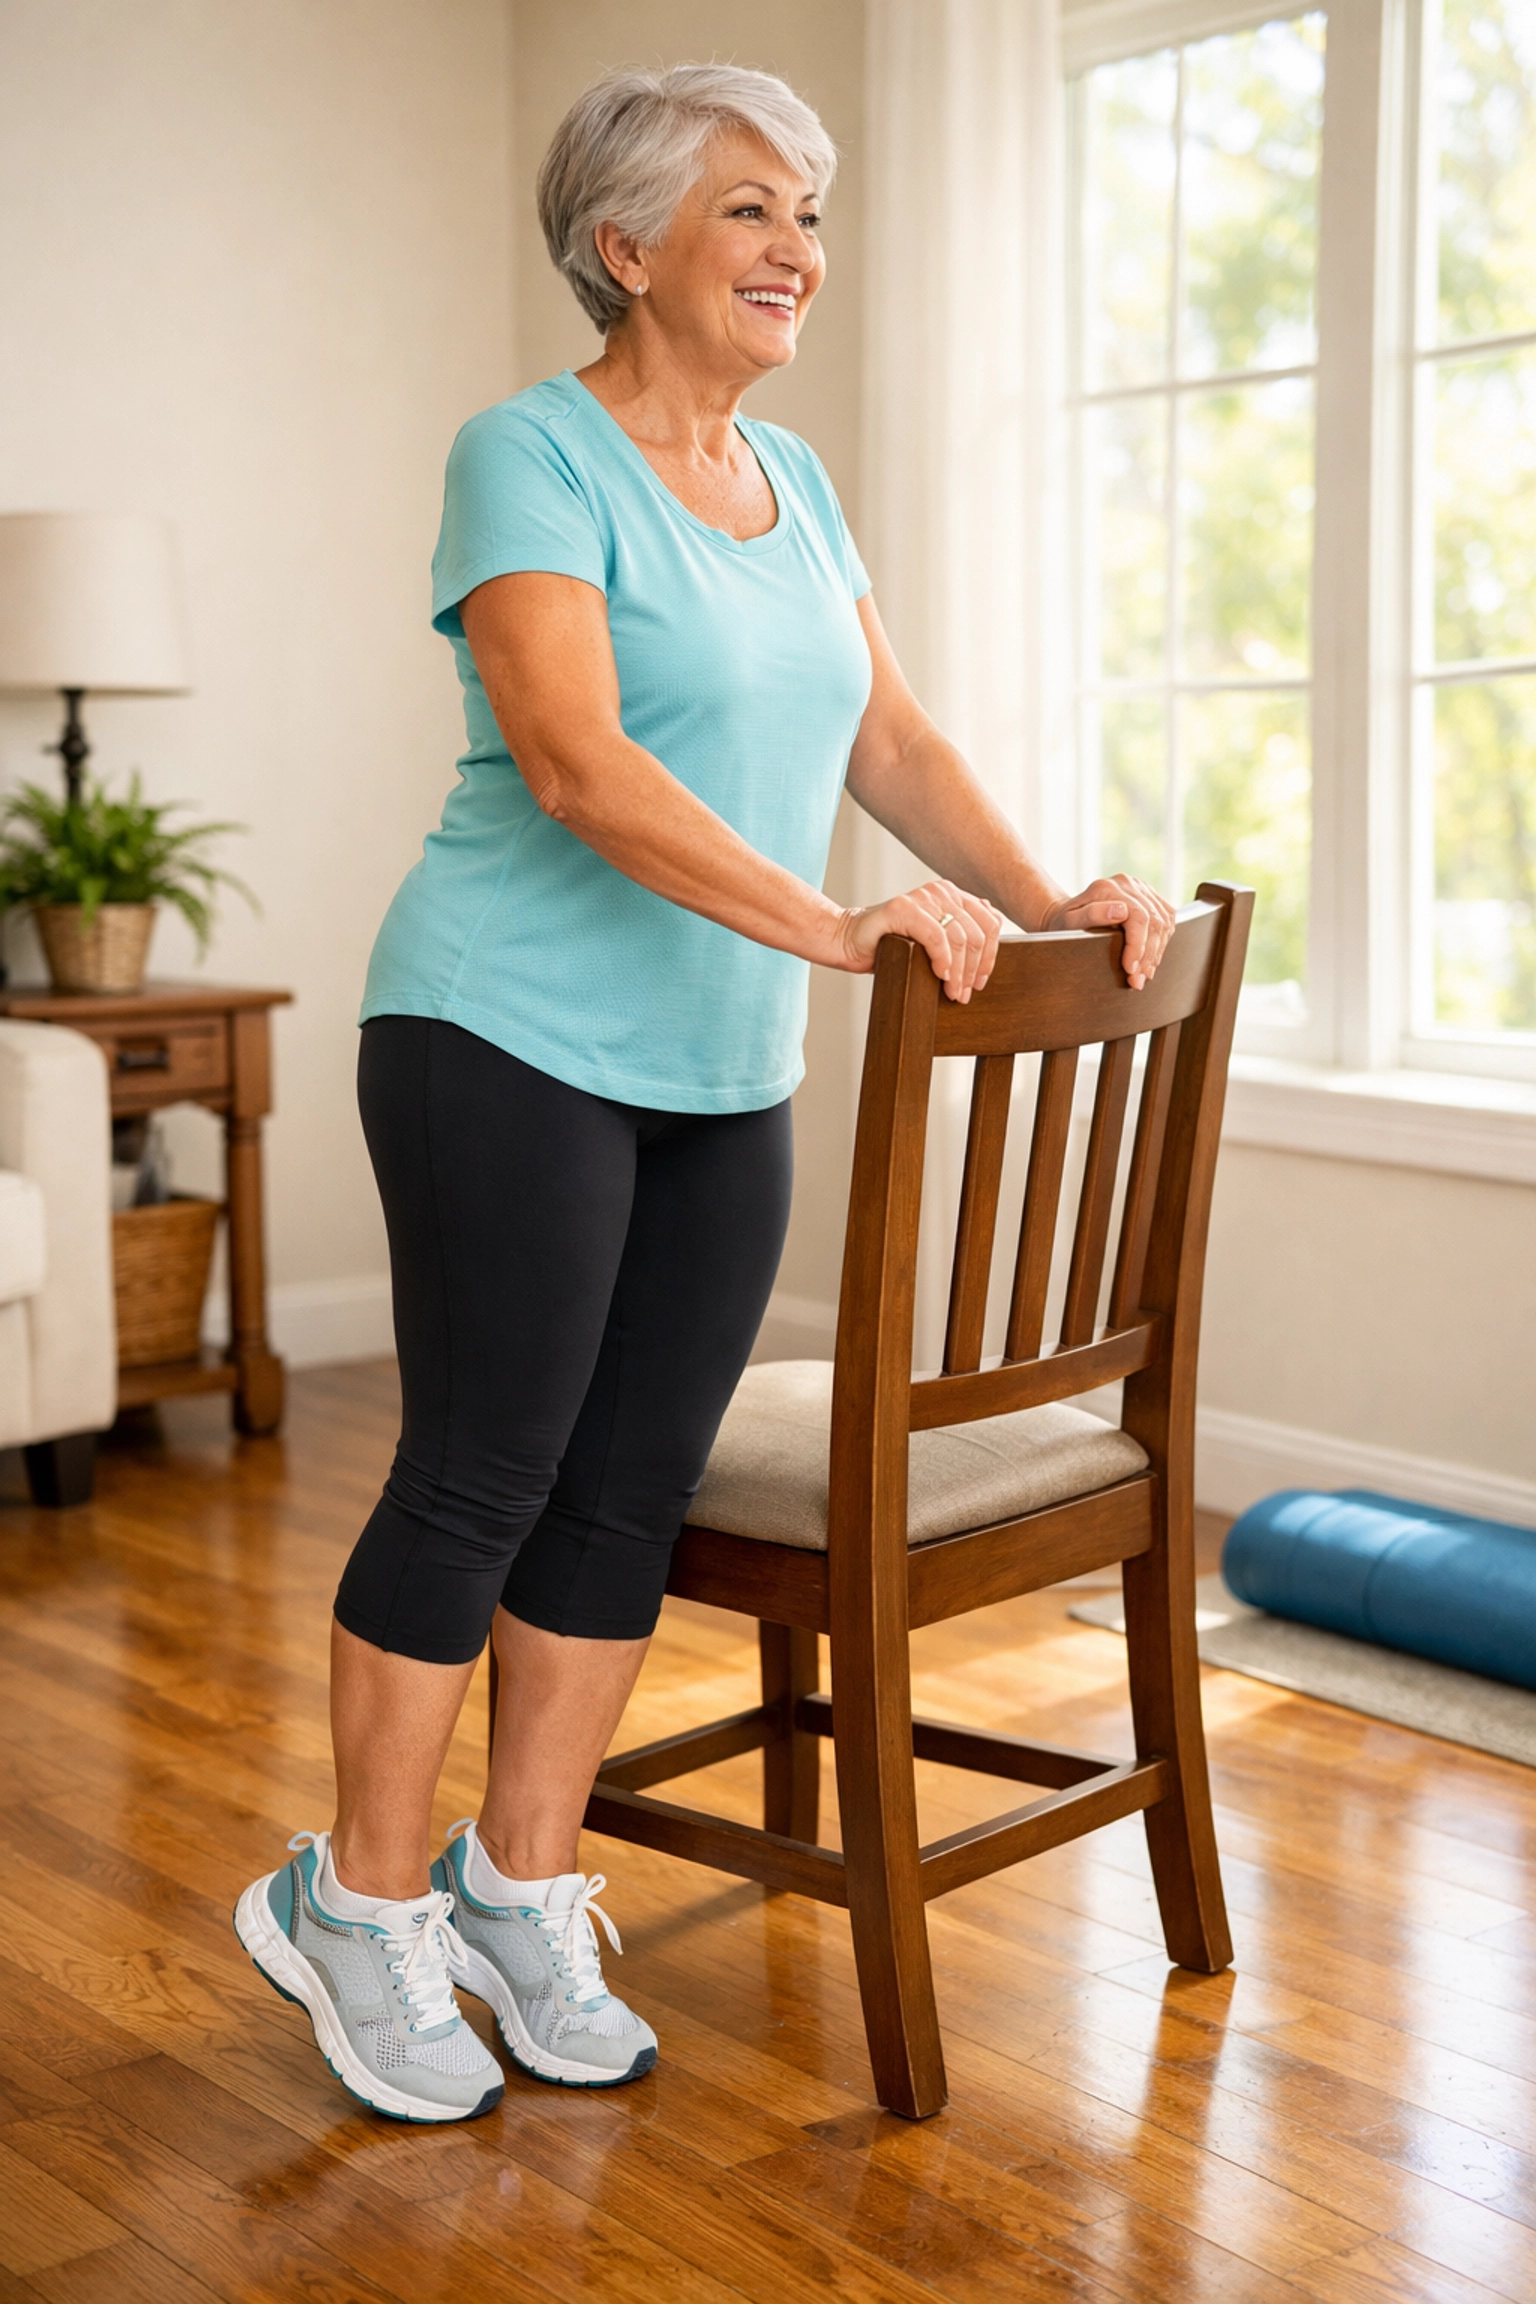
Stage Five: Prepare to Rise
Once you're next to your chosen furniture, place both hands on the seat of the chair or surface of the furniture. Position your stronger leg forward, placing that foot flat on the floor with your knee bent at about a 90-degree angle. This is similar to a lunge position.
Your other leg should remain on the floor behind you, knee down. This creates a stable base before you push up.
Take a moment in this half-kneeling position to gather your strength.
Stage Six: Push to Standing
Press down firmly with your hands on the furniture while pushing up through your front leg. Use the strength in your leg to lift yourself, not just your arms. Think of it as a coordinated effort between your leg muscles and your arms.
As you rise, bring your back leg up to meet your front leg. Don't rush this part: it's better to take an extra second than to lose your balance.
Stage Seven: Rest and Recover
Once you're standing, hold onto the furniture for support and rest. Your body has just done significant work, and you may feel tired or shaky.
Stand still for several minutes. Check in with your body again: any pain that developed during the process? Any dizziness or shortness of breath?
When you feel stable, slowly walk to a chair and sit down properly. Have some water, and continue monitoring how you feel.
The Backward Approach: Building Confidence Gradually
If the thought of lowering yourself all the way to the floor feels overwhelming, you can practice this method in reverse. This approach helps you build strength and confidence at each stage before progressing further.
Start from standing next to a sturdy chair. Lower yourself to the half-kneeling position (one knee down, one foot forward), then return to standing. Practice this until it feels comfortable and controlled.
Once you're confident with half-kneeling, add the next stage: lowering to hands and knees, then returning to half-kneeling, then standing. Again, practice until comfortable.
Continue working backward through the sequence, adding one more stage each time you feel ready. Eventually, you'll be able to move from fully lying down all the way to standing.
This progressive approach is particularly helpful if you have mobility limitations, balance concerns, or if you're recovering from an injury. There's no shame in taking it slow: every bit of practice makes you more prepared.
Building Strength for Recovery
Knowing the technique is important, but having the physical strength to execute it is equally critical. The Centers for Disease Control and Prevention recommends strength and balance exercises at least three times per week to reduce fall risk and improve your ability to recover if you do fall.
Here are some exercises that directly support the Sequential Method:
Leg Strengthening (Knee Extensions)
Sit in a sturdy chair with your back supported. Slowly straighten one knee until your leg is extended in front of you (but not locked). Hold for five seconds, feeling the muscle engage in your thigh. Slowly lower your foot back to the floor.
Repeat ten times on each leg. As you get stronger, you can add ankle weights or resistance bands.
Calf and Ankle Work
Stand behind a sturdy chair, holding the back for support. Rise up onto your toes, lifting your heels off the ground. Hold for a moment, then slowly rock back, lifting your toes off the ground while balancing on your heels.
Repeat this ten times. This exercise strengthens the muscles you need for balance and helps you push up from the floor.
Floor-to-Chair Practice
If you're physically able, practice the actual sequence of getting up from the floor once or twice a week. Use cushions or folded towels under your knees for comfort. Having someone nearby for safety is a good idea when you first start practicing.
The more you practice, the more automatic the movements become. Your muscles develop memory, and your confidence grows.
Practice Makes Prepared
Let's be honest: practicing how to get up from the floor isn't exactly a fun activity. But neither is lying on the floor for hours because you don't know what to do or you're too frightened to try.
Set aside time once a week to run through the Sequential Method. Make it part of your routine, like brushing your teeth or taking your vitamins. Start on a soft surface like a carpeted floor or exercise mat with cushions for your knees.
If you live with family or have a caregiver, invite them to learn the method too. They can practice alongside you, which makes it less intimidating and ensures they understand how to coach you through it if needed.
Consider practicing different scenarios: What if you fall near the bathroom versus the living room? What if you fall when you're home alone versus when someone is in the next room? Thinking through these possibilities reduces panic if a real fall occurs.
Creating a Safer Environment
While learning to get up after a fall is essential, preventing falls in the first place is even better. Take a critical look at your living space and make adjustments that reduce your risk.
Remove tripping hazards like loose rugs, electrical cords, and clutter from walkways. Make sure all areas of your home are well-lit, especially hallways and stairs. Install nightlights in your bedroom and bathroom for safer nighttime movement.
Wear supportive footwear with nonslip soles, even indoors. Those comfortable slippers might feel nice, but if they're loose or have slick bottoms, they're increasing your fall risk.
Consider strategically placing sturdy furniture throughout your home so you always have something to grab if you feel unsteady. Think about your most common paths: from bedroom to bathroom, from kitchen to living room: and ensure there's support along the way.
When to Call for Help
Knowing when to attempt getting up on your own versus calling for help is crucial. Always call 911 or emergency services if you:
- Suspect a broken bone or fracture
- Hit your head or feel confused
- Experience chest pain or difficulty breathing
- Cannot move a limb or feel numbness
- Have severe pain that worsens with movement
- Feel dizzy or faint
There's no shame in calling for help. Emergency responders are trained to assess injuries and help you up safely. They'd much rather respond to a fall where you waited for assistance than be called later because you injured yourself further trying to get up alone.
If you're not injured but simply can't get up on your own, call a family member, neighbor, or friend. Many communities also have non-emergency services that can assist with falls.
Moving Forward with Confidence
Learning the Sequential Method for getting up after a fall doesn't mean you're expecting to fall: it means you're taking responsibility for your safety and independence. You're refusing to let fear control your life or limit your mobility.
Practice the technique regularly, maintain your strength through exercise, and create a safer home environment. This three-pronged approach gives you the best chance of staying safe and, if you do fall, getting back up with minimal complications.
Remember, the ability to get up after a fall isn't just about physical technique. It's about mental preparedness, knowing you have a plan, and trusting in your ability to execute it. That confidence can make all the difference in maintaining your independence as you age.

