Falling when you're alone can be frightening, but knowing how to safely get back up can make all the difference. Whether you're a senior living independently or someone recovering from an injury, having a plan helps you stay calm and avoid further harm.
This guide walks you through the safest method to get up after a fall, step by step. We'll also cover what to do if you can't get up, modifications for different physical abilities, and why practicing these techniques matters.
The First Rule: Don't Rush
When you fall, your first instinct might be to jump right back up. Resist this urge. Taking a moment to assess yourself prevents turning a simple fall into a more serious injury.
After a fall, your body experiences an adrenaline rush that can mask pain or injury. Your blood pressure may also drop temporarily, especially if you've been lying down. Standing too quickly can cause dizziness or lightheadedness, leading to another fall.
Give yourself at least 30 seconds to a full minute before attempting to move. Use this time to breathe deeply and let your heart rate settle.
Step 1: Check Yourself for Injuries
Before you attempt any movement, conduct a quick self-assessment:
Start with your extremities. Gently wiggle your fingers and toes. Move them one at a time, checking for numbness, tingling, or sharp pain.
Test your limbs. Slowly bend and straighten your arms and legs. Notice any areas of significant discomfort.
Check for bleeding. Run your hands over your body, looking for wet spots that might indicate cuts or scrapes.
Assess your head. Did you hit your head? Do you feel confused, dizzy, or nauseous? These could be signs of a concussion.
Notice sharp or severe pain. If you experience intense pain in your hip, back, or any joint, or if you suspect you've broken a bone, do not attempt to get up on your own.
If you find any serious injuries, call for help immediately. Use a medical alert device if you have one, call 911 on your cell phone, or shout for neighbors if possible. It's better to wait for professional help than risk making an injury worse.

Step 2: Look Around and Make a Plan
Once you've determined you're not seriously injured, survey your surroundings. The key to getting up safely is using stable furniture as support.
Look for sturdy options like:
- A heavy chair with arms
- A solid coffee table or side table
- Your bed or couch
- The bottom step of a staircase
- A kitchen counter or island
The furniture should be close enough to reach by crawling, and it must be stable enough to support your weight without sliding or tipping. Avoid wheeled chairs, lightweight end tables, or anything that might move when you lean on it.
Also locate your phone if it's nearby. Even if you don't need help now, having it within reach provides peace of mind.
Step 3: Roll Onto Your Side
Movement should be slow and deliberate. Start by rolling onto your side, moving your body as one unit.
Turn your head first in the direction you want to roll. Let your eyes lead the movement.
Follow with your shoulders, allowing your upper body to rotate.
Let your hips come next, maintaining alignment with your shoulders.
Bring your leg over last, completing the roll onto your side.
Rest in this position for a moment. This gives your body time to adjust and helps prevent dizziness when you eventually stand. If you feel lightheaded at this point, wait until it passes before continuing.
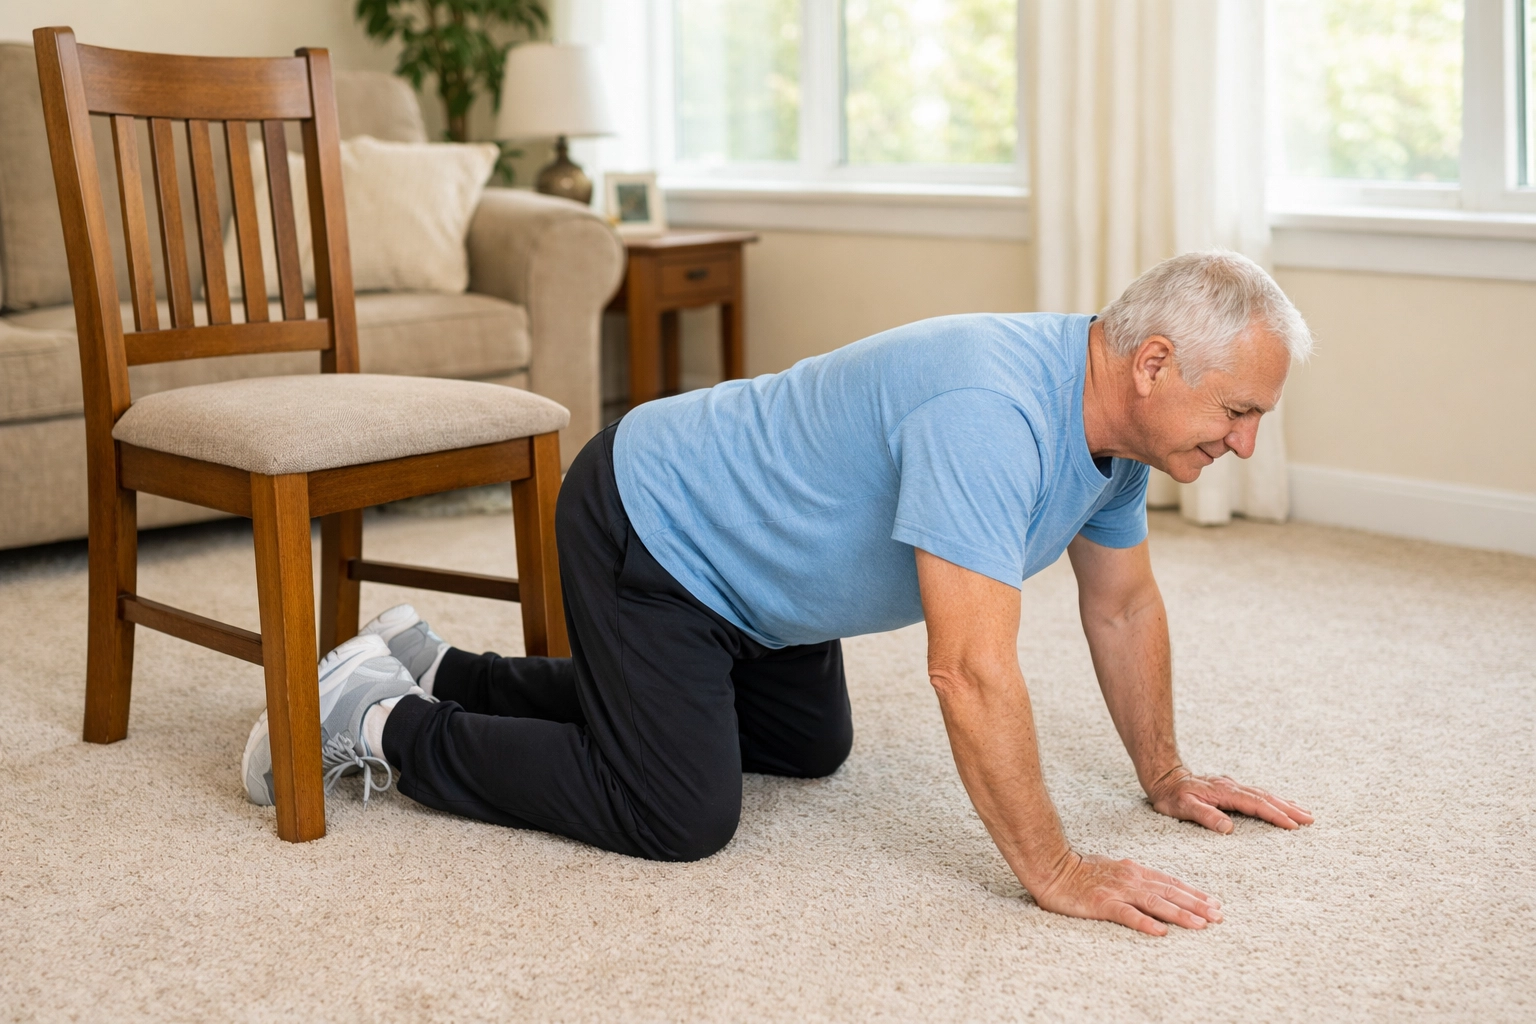
Step 4: Push Up to Hands and Knees
From your side, you'll transition to a hands-and-knees position. This is often called the "all-fours" position.
Use your arms to prop yourself up, pushing your upper body off the ground. Your bottom arm will do most of the work initially.
Bring both hands to the floor, positioning them shoulder-width apart for stability.
Draw your knees under you, one at a time if needed. You should now be on all fours with your back roughly parallel to the floor.
Take another moment to rest in this position. Catch your breath and make sure you feel steady before moving forward.
Step 5: Crawl to Your Support
Now comes the journey to your chosen piece of furniture. Crawl slowly and carefully, keeping your movements controlled.
Keep your knees bent and close to the floor. This lowers your center of gravity and provides better stability.
Move one hand forward, then the opposite knee. This creates a balanced crawling pattern.
Take your time. There's no rush, and moving too quickly could cause you to lose balance.
If you need to rest during the crawl, simply lower yourself back down to lying on your side, then resume when you're ready.
Step 6: Get Into a Half-Kneeling Position
Once you've reached your support furniture, position yourself so you can use it effectively.
Place both hands firmly on the seat or surface of the furniture. Your hands should be shoulder-width apart with palms flat against the surface.
Slide your stronger leg forward, placing your foot flat on the floor. Your knee should be bent at roughly 90 degrees, as if you're proposing or taking a knee. Keep your other knee on the ground behind you.
This half-kneeling position is crucial. It allows you to use both leg and arm strength to rise, distributing the effort and reducing strain on any single joint or muscle group.
Step 7: Push Up to Standing
This is the most challenging part, but breaking it into smaller movements makes it manageable.
Press down firmly with your hands on the furniture surface. Your arms will provide significant lifting power.
Push through the foot that's flat on the floor, driving your body upward. Your front leg will do most of the leg work.
Rise slowly and steadily, keeping most of your weight forward over your front foot. Don't try to stand up in one quick motion.
Use your back leg for balance as you come up, but the majority of the push should come from your front leg and arms.
If you start to feel dizzy or weak partway through, it's okay to lower yourself back down to the half-kneeling position, rest, and try again.

Step 8: Sit and Rest
Once you're standing, immediately turn and sit down on the furniture you used to get up. Don't try to walk right away.
Sit for at least five to ten minutes. This rest period is critical for several reasons:
Your blood pressure needs time to stabilize after the position change. Your body has been through a stressful event and needs recovery time. You want to assess whether any delayed pain or dizziness appears before attempting to walk.
While sitting, do a second self-check. How do you feel? Any new aches or pains? Any dizziness or confusion? If anything concerning appears, call someone for help even if you managed to get up on your own.
Before you stand again to walk, test your stability. Hold onto your support and stand in place for 15 to 30 seconds. Gently shift your weight from side to side and forward to back. This helps you gauge your balance before taking steps.
When You Can't Get Up
Sometimes, despite your best efforts, you simply can't manage to rise on your own. This doesn't mean you've failed: it means you need help, and that's perfectly okay.
If you've tried the method above and cannot complete it, here's what to do:
Don't exhaust yourself with repeated attempts. After two or three tries, it's time to call for help.
Stay calm and conserve energy. If you're not injured, you're not in immediate danger.
Call for help using whatever method is available. This might be a medical alert device, cell phone, or calling out for neighbors.
Keep warm while you wait. If possible, cover yourself with anything nearby: a throw blanket, coat, or even curtains. Falls can happen to anyone, and professional first responders are trained to help people in exactly this situation.
Move to a carpeted area if you're on a hard floor, even if you have to scoot or drag yourself. This provides some cushioning while you wait.
Modifications for Different Abilities
Not everyone has the same physical capabilities, and the standard method may need adjustments based on your individual situation.
If you have weak legs or knee pain: Look for furniture that's slightly higher than standard seat height. A higher surface means you don't have to bend as deeply when rising. You can also keep your weaker leg in the kneeling position longer, letting your stronger leg do more of the work.
If you have limited arm strength: Find support surfaces that are higher, such as a sturdy table rather than a low chair. The higher you can place your hands, the less arm strength you'll need. You can also rest your forearms on the surface rather than just your hands, distributing the weight more broadly.
If you use a walker or cane: Position your assistive device within arm's reach before you start. As you rise to standing, you can use it as additional support alongside the furniture. Make sure it's locked in place if it has brakes.
If you have balance issues: Consider doing this near a corner where two walls meet, or next to a wall. This provides an additional reference point for stability. You can also press one hand against the wall while the other pushes on furniture.
The Importance of Practice
Reading about this technique is helpful, but actually practicing it makes a world of difference. When you're calm, uninjured, and not stressed, your body learns the movement pattern. Then, if you ever do fall, the movements feel familiar rather than foreign.
Ask your physical therapist or doctor if they can supervise a practice session. They can spot you during the movements and offer personalized modifications based on your abilities.
Start by simply getting down on the floor in a controlled way, then practicing the steps to get back up. Do this on a soft surface like carpet or an exercise mat. Repeat the process until it feels comfortable.
Many people discover that they lack the strength or flexibility to easily complete certain steps. This is valuable information. It tells you which areas to work on through targeted exercises.
Building Strength for Fall Recovery
Certain exercises directly improve your ability to get up after a fall. Incorporating them into your routine builds both physical capability and confidence.
Sit-to-stand exercises strengthen your legs in the exact motion you need for rising from furniture. Practice standing up from a chair without using your hands if possible, or with minimal hand support.
Floor-to-chair transitions are literally practicing the fall recovery technique. Start seated on the floor next to a chair, then practice the sequence of getting to hands and knees, moving to half-kneeling, and standing.
Planks or modified planks on your hands and knees build core and arm strength needed for pushing yourself up.
Leg strengthening exercises like squats, lunges, or leg presses make the final push to standing easier.
Consult with a physical therapist to design an exercise program tailored to your current fitness level and goals.
Moving Forward After a Fall
Once you're safely up and rested, there's one more important step: figure out why you fell in the first place.
Falls don't just happen randomly. There's usually a cause: an environmental hazard, a change in your physical condition, a medication side effect, or a combination of factors.
Consider scheduling a check-up with your doctor to discuss the fall. They may want to review your medications, check your blood pressure and balance, or assess your vision.
Also look at your home environment. Was there a tripping hazard? Poor lighting? A slippery surface? Identifying and addressing these issues prevents future falls.
Remember, knowing how to get up after a fall is important, but preventing falls in the first place is even better. This knowledge should give you confidence to live independently while also motivating you to create a safer environment.

