If you're thinking about bathroom safety, you're already ahead of the game. The bathroom is one of the most dangerous rooms in any home, especially for older adults. Between the hard surfaces, slippery floors, and tight spaces, it's no wonder that bathroom falls are so common.
The good news? Installing safety rails and grab bars can make a significant difference. This guide will walk you through everything you need to know about bathroom safety rails: from understanding where they're needed most to choosing the right type and installing them properly.
Why the Bathroom Is a High-Risk Area
Let's start with some context. Bathrooms combine several fall risk factors in one compact space. You've got wet, slippery surfaces. Hard tile and porcelain that offer zero forgiveness if you do fall. Limited space that makes it harder to catch yourself. And activities that require balance and movement, like stepping over a tub edge or standing up from the toilet.
Add in potential dizziness from standing too quickly, fatigue from daily routines, and reduced balance that naturally comes with age, and you've got a recipe for accidents waiting to happen.
The reality is that most people don't think about bathroom safety until after a fall happens. But being proactive: installing the right safety equipment before it's urgently needed: can prevent injuries and maintain independence for years to come.

Where Bathroom Falls Happen Most
Understanding where falls typically occur helps you prioritize where to install safety rails. Research and healthcare professionals consistently identify two primary danger zones.
The Toilet Area
Many seniors fall while getting up from the toilet. This makes sense when you think about it: people of any age can experience temporary dizziness when standing quickly after sitting for a while. Blood pressure adjusts when you change positions, which can cause lightheadedness.
For older adults, this effect is often more pronounced. Add in limited leg strength, reduced balance, and medications that might affect blood pressure, and you can see why this seemingly simple movement becomes risky.
The Shower and Tub Area
This is the other high-risk zone. Wet surfaces are naturally slippery, whether it's the bathtub floor, shower floor, or wet tile walls. Water and soap residue create conditions where balance can be lost in an instant.
Getting in and out of the tub or shower requires lifting your leg, shifting your weight, and maintaining balance: often while standing on one foot. For someone with reduced mobility or balance issues, this movement pattern is challenging even without the added risk of slippery surfaces.
Types of Safety Rails and Grab Bars
You have several options when it comes to bathroom safety rails. The right choice depends on your specific bathroom layout, the user's needs, and personal preferences.
Straight Grab Bars
These are the most common and versatile option. They're available in various lengths: typically ranging from 12 to 48 inches: and come in different finishes to match your bathroom décor. You can install them horizontally, vertically, or at an angle depending on where support is needed.
Straight bars work well in most situations and are often the most affordable option. They're simple, functional, and get the job done.
Curved Grab Bars
These feature an "S" or wave shape rather than a straight line. The curved design can provide better ergonomics for certain gripping positions and many people find them more comfortable to use. They also tend to look more stylish if aesthetics matter to you.
The curved shape can make it easier to adjust your grip as you move, which is particularly helpful when getting in and out of a tub or shower.
Multi-Use Safety Bars
These combine support with practical features. You might find grab bars that also function as towel bars, toilet paper holders, or even small shelves. This dual-purpose design can be helpful in smaller bathrooms where every inch of space matters.
Just make sure that any multi-use bar is actually rated for weight-bearing support, not just designed to look like a grab bar while primarily serving another function.
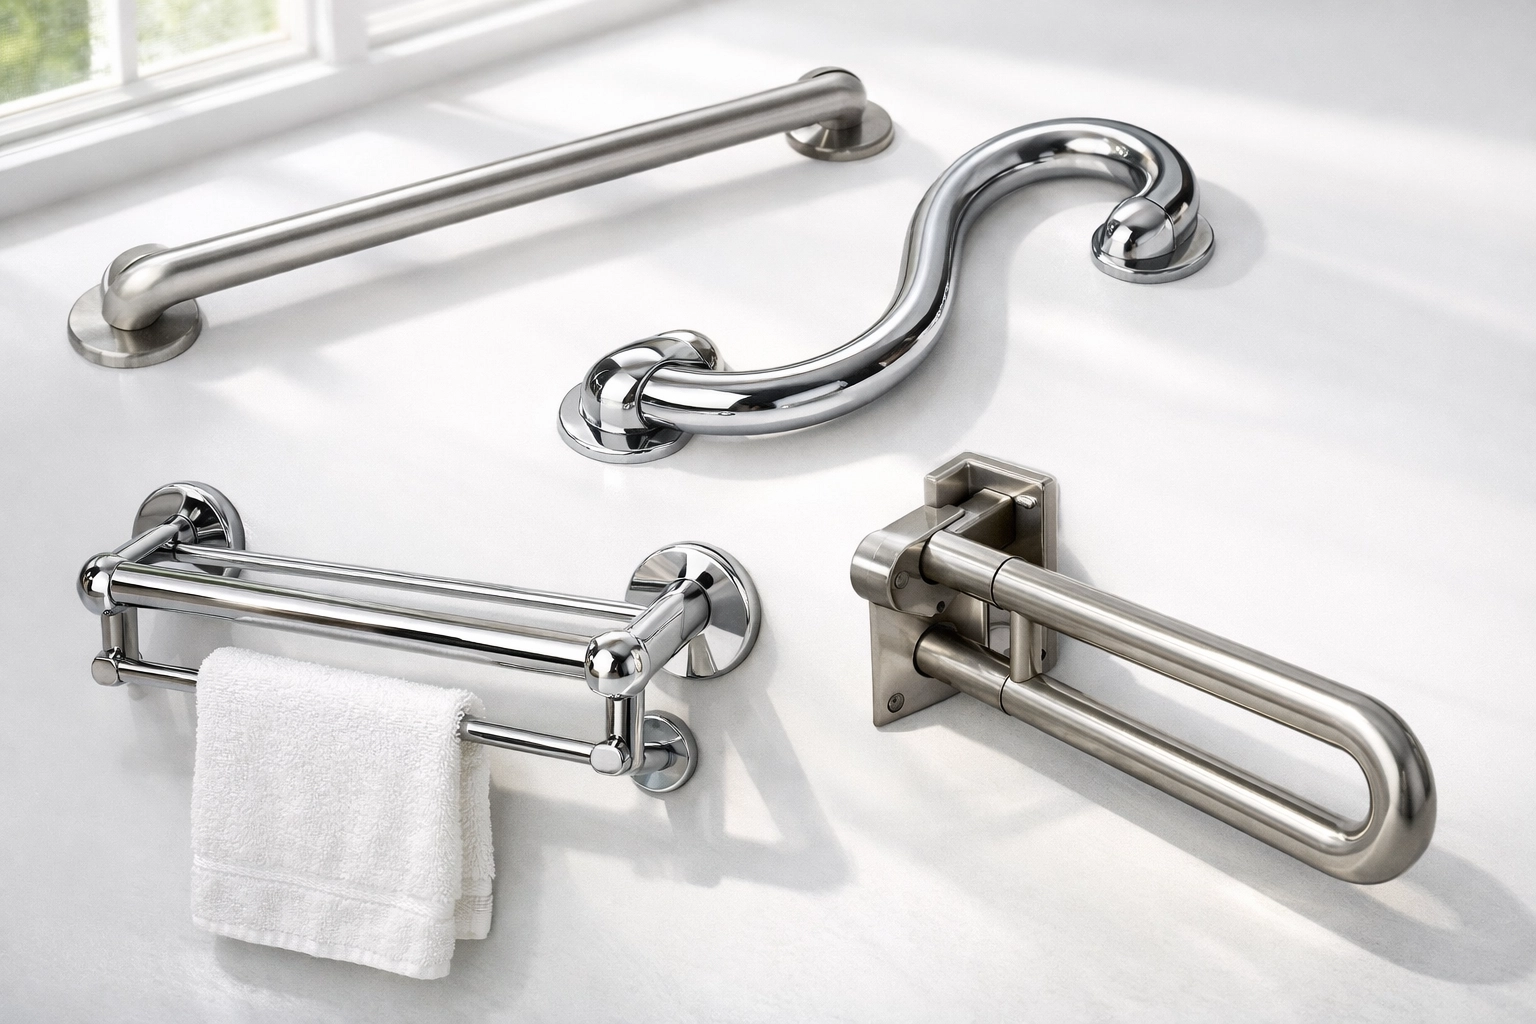
Safety Rails
These are longer handrail-style bars designed for bathrooms with more space. They work well along walls where someone might need support while walking, or as continuous support along the length of a bathtub.
Safety rails provide extended support over a longer distance, which can be helpful for people with significant mobility challenges.
Moveable Grab Bars
These bars can fold flat against the wall when not in use. They're particularly useful in shared bathrooms or smaller spaces where a permanently extended bar might get in the way.
Keep in mind that any moveable component needs to be secure when locked in the open position. The convenience of folding shouldn't compromise safety.
Angled Grab Bars
These are designed for corners or situations where the wall surface is uneven. They're less common but can be the right solution for tricky bathroom layouts.
Material and Finish Requirements
Whatever type of bar you choose, it must have a rustproof finish. Bathrooms are humid environments, and metal that isn't properly protected will corrode over time. This isn't just about appearance: rust can compromise the structural integrity of the bar.
High-quality stainless steel is an excellent choice. It resists corrosion, maintains its strength over time, and comes in finishes that can match various bathroom styles.
The bar's surface should also be slip-resistant, even when wet. Look for textured finishes or materials that provide good grip.
Where to Place Grab Bars Around the Toilet
Proper placement makes all the difference between a grab bar that actually helps and one that doesn't get used because it's in an awkward position.
For the toilet area, the general recommendation is to install two grab bars on the wall beside the toilet: not behind it. Here's why this configuration works:
Horizontal Bar at Sitting Height
This bar should be positioned at a height that allows someone to grip it while sitting down or standing up. This provides stability during those transitions when balance is most at risk.
The exact height will depend on the user, but generally, this bar sits approximately at seat level or slightly higher.
Vertical Bar Above the Horizontal Bar
This second bar provides support if someone feels lightheaded after standing. They can grip this vertical bar to steady themselves while their blood pressure adjusts.
The combination of horizontal and vertical bars addresses both the physical movement of sitting/standing and the potential dizziness that can follow.
Work with the person who will be using the bathroom to test positioning before final installation. Everyone's height and reach are different, and comfort matters when safety equipment will be used multiple times daily.
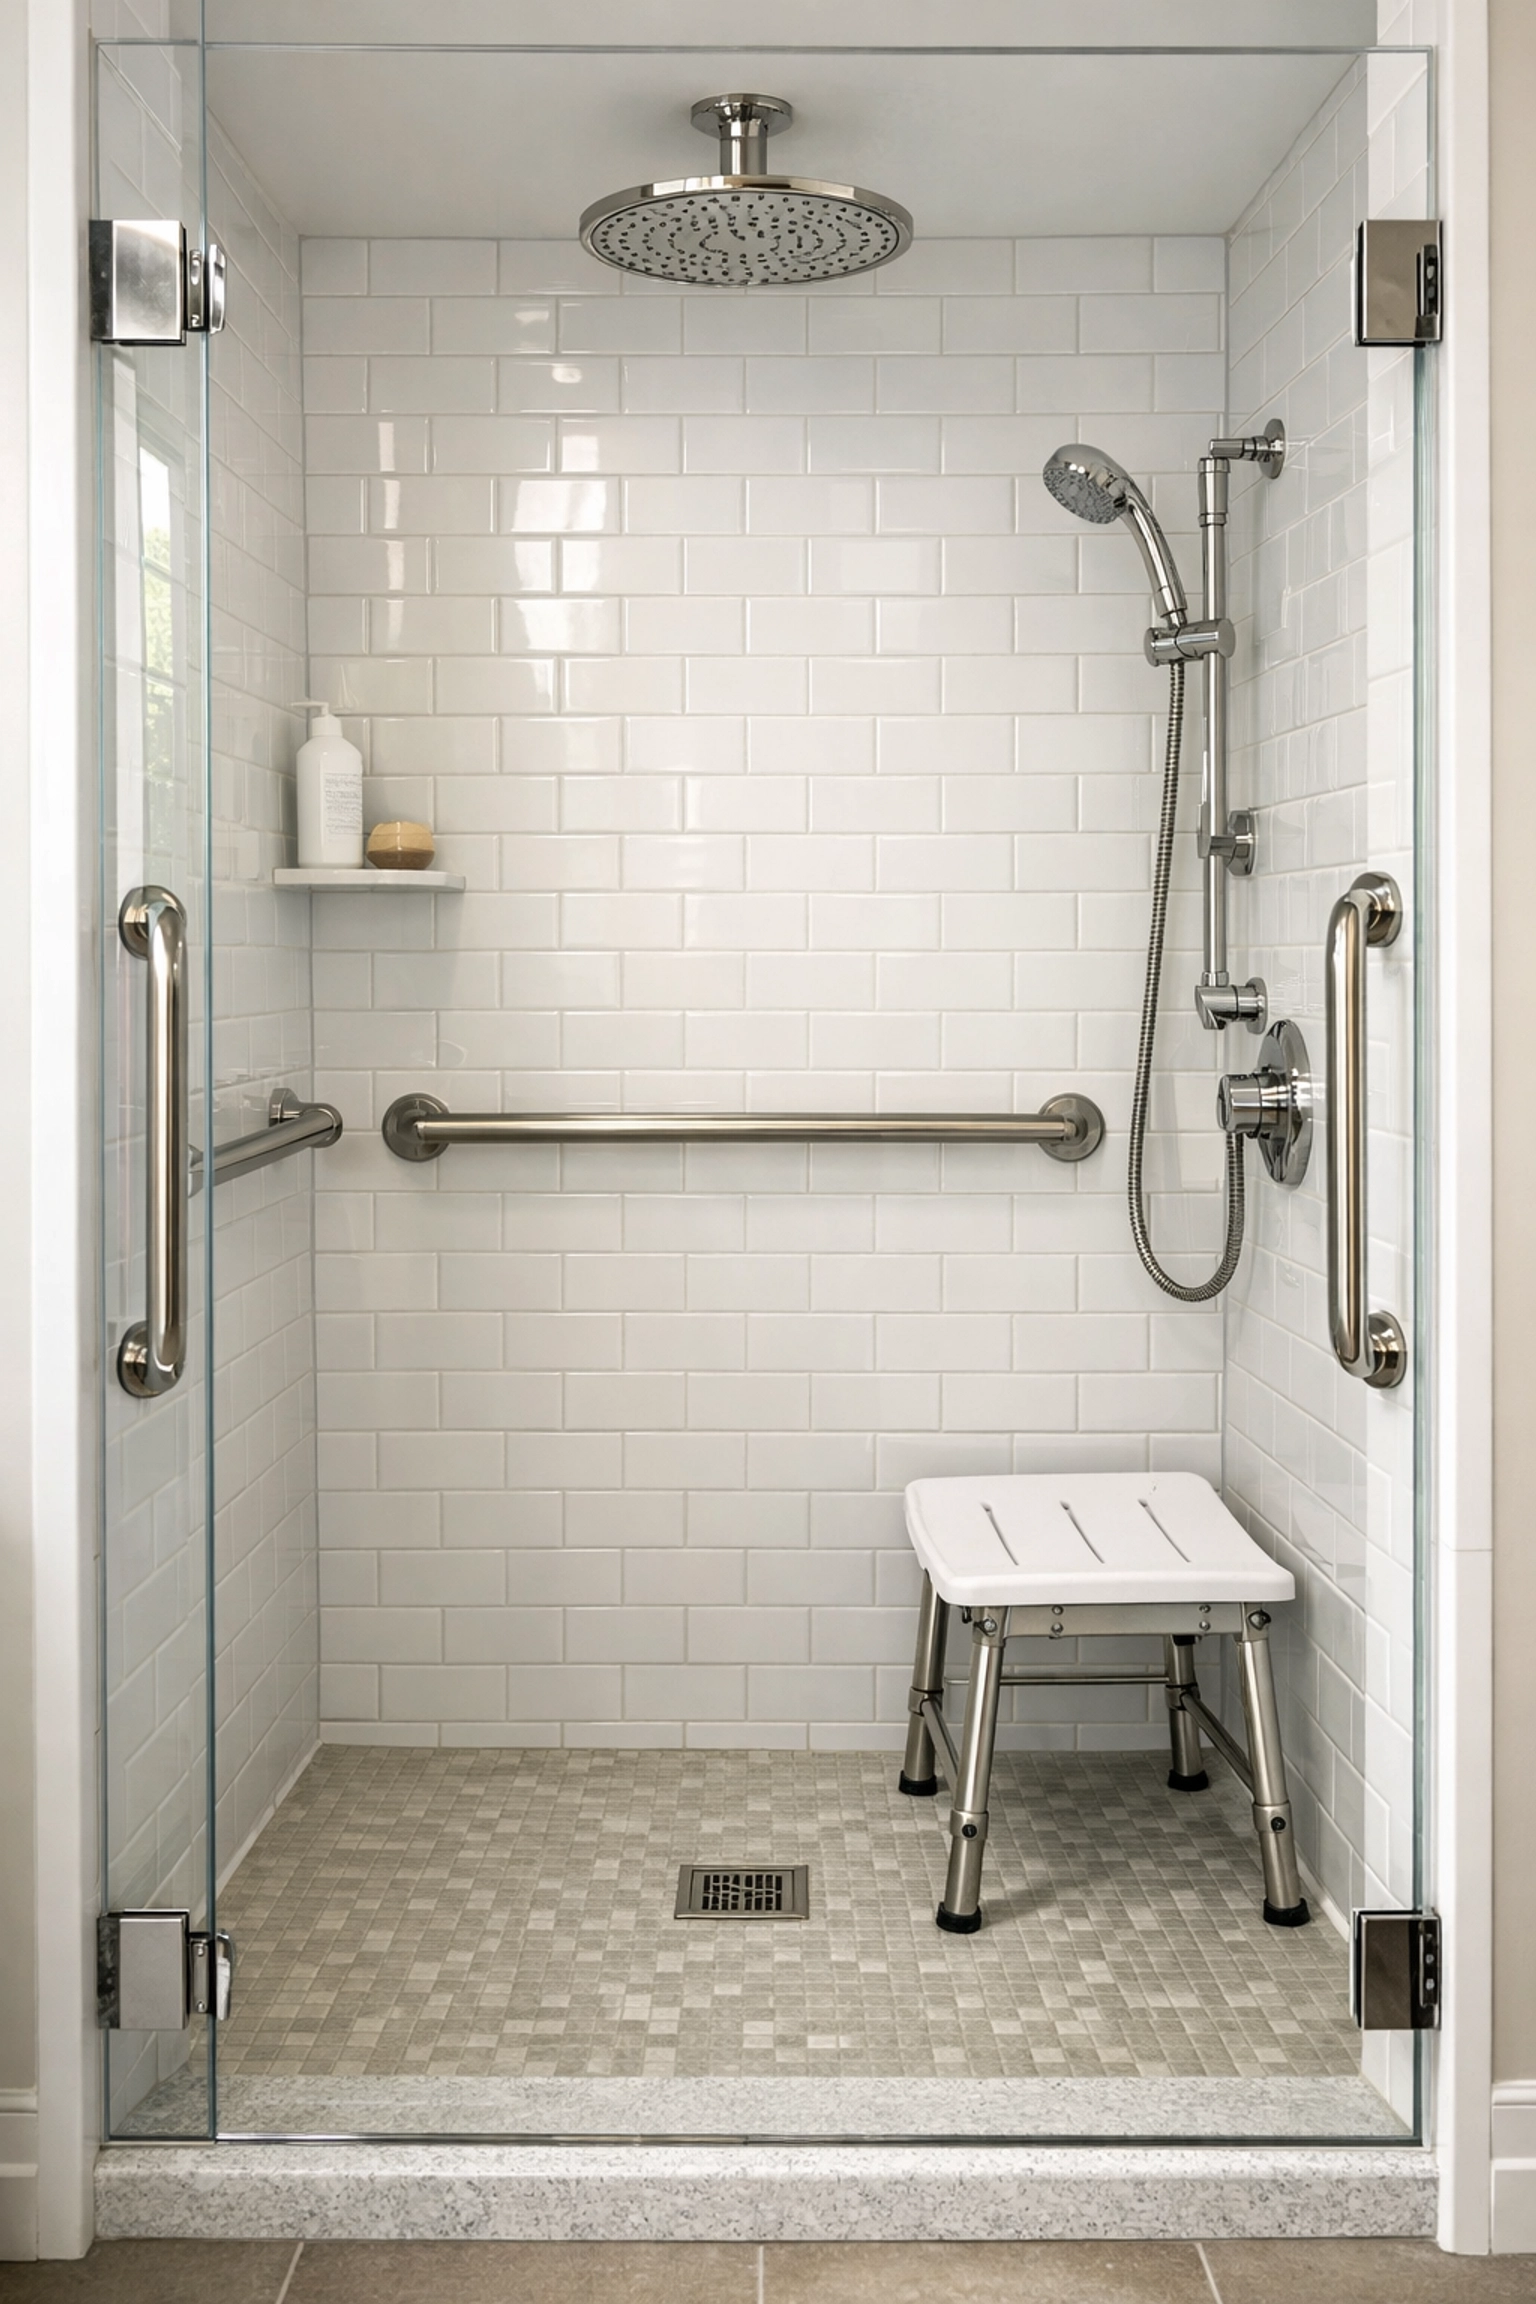
Where to Place Grab Bars in Shower and Tub Areas
Shower and tub areas require different configurations depending on your setup.
Universal Placement
Regardless of whether you have a tub, shower, or combination, install a horizontal bar above the faucet. This steadies users while they're adjusting water temperature: a moment when you might be reaching or leaning in an awkward position.
For Bathtubs
If you have a standalone bathtub, install grab bars at elbow height to assist with entry and exit. A long horizontal bar positioned 6 to 8 inches above the tub rim provides support along the length of the tub.
This configuration helps with the challenging task of lifting your leg over the tub edge and shifting your weight safely.
For Shower Stalls
Install vertical bars on either side of the entrance. These should be at least 18 inches long and positioned where someone can grip them while stepping in or out.
Add at least one horizontal bar at waist height inside the shower, with a minimum length of 24 inches. This provides support while showering and helps with balance when reaching for soap or shampoo.
Height Standards
Grab bars in showers should generally be positioned 33 to 36 inches from the floor. This height range works for most adults, but again, test with the actual user before finalizing placement.
The goal is for the bars to be easily reachable without stretching or bending awkwardly.
Installation Essentials: Getting It Right
This is the most critical section of this guide. A grab bar is only as safe as its installation. A poorly installed grab bar can actually increase fall risk by giving false confidence.
The Non-Negotiable Rule: Secure Attachment
Grab bars must be screwed directly into wall studs: the vertical wooden beams inside your walls. This is the only way to ensure the bar can support adequate weight. The standard minimum is 250 pounds.
Never rely solely on drywall anchors or hollow wall mounting systems for primary support. These might hold decorative items, but they won't provide the secure support needed during a fall or when someone's full weight pulls on the bar.
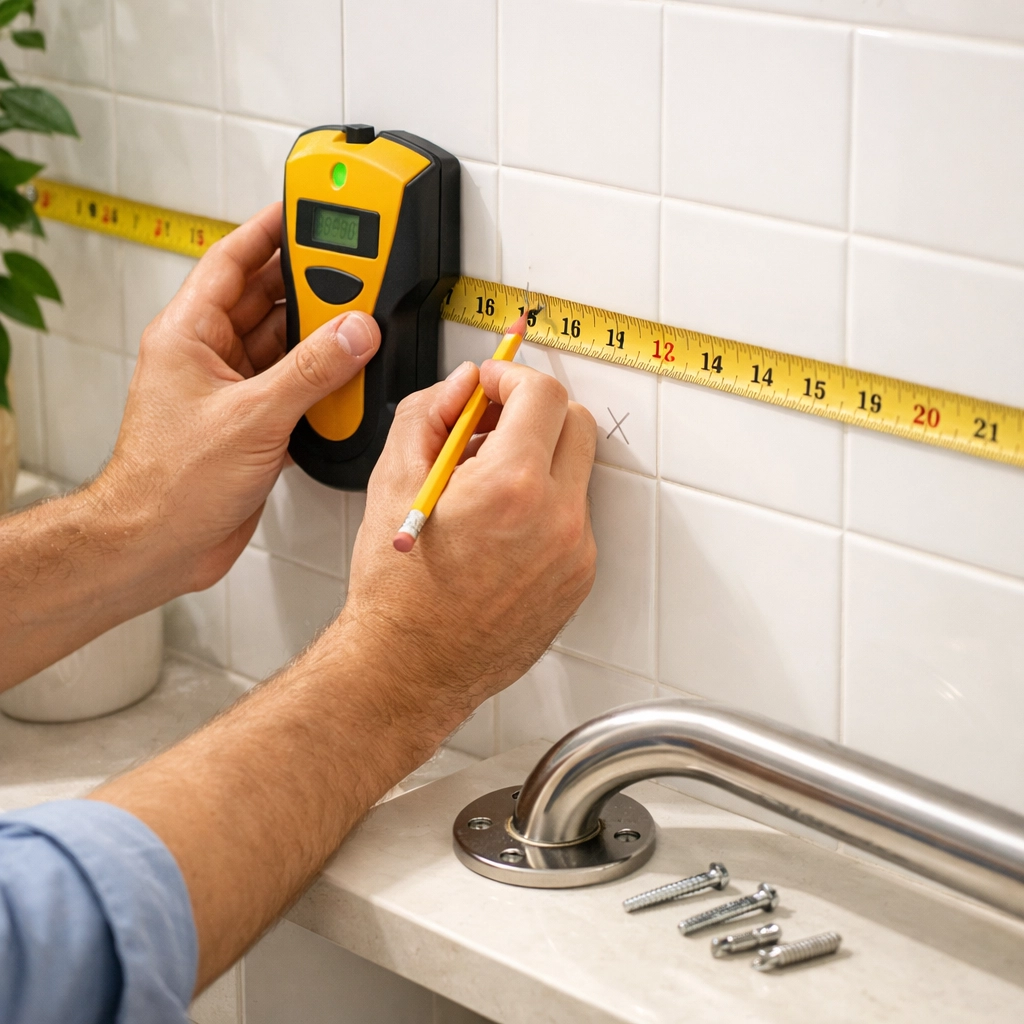
Finding Wall Studs
Use a stud finder to locate studs in your bathroom walls. These tools are inexpensive and available at any hardware store. Mark the stud locations with a pencil.
Measure the distances between studs. Standard construction has studs 16 inches apart, but this isn't universal. Choose grab bar lengths that allow you to hit at least one stud at each end of the bar.
Installation Steps
Start by positioning the bar where it will be installed and marking screw holes. If you're drilling into tile, use a masonry bit to create pilot holes. This prevents the tile from cracking.
Install the bar with at least three screws at the top and bottom mounting points. More is better when it comes to secure attachment.
Maintain 1.5 inches of space between the wall and the grab bar. This gap provides room for a comfortable grip without your knuckles rubbing against the wall.
Use a level during installation to ensure the bar is straight. An angled bar can be uncomfortable to grip and may not provide optimal support.
Hardware Requirements
All hardware should be corrosion-resistant. Stainless steel screws are your best choice for bathroom environments. Regular screws will rust over time in the humid bathroom atmosphere.
Check that the bar's mounting hardware is rated for the appropriate weight capacity. The mounting system is just as important as the bar itself.
When Studs Don't Line Up
Sometimes, the ideal bar placement doesn't align with stud locations. If you must compromise, prioritize having at least one end securely mounted to a stud. You can use high-quality hollow wall anchors as a secondary support for the other end, but understand that this is less secure than stud mounting on both ends.
In some cases, it's worth adding blocking behind the wall: reinforced mounting surfaces that span between studs. This requires opening up the wall, but it provides the most secure installation for any bar placement.
Testing and Maintenance
After installation, test the bar before relying on it. Apply firm downward and outward pressure to ensure there's no give or movement. If the bar shifts at all, it needs to be reinstalled more securely.
Periodically check all grab bars: at least once or twice a year. Make sure screws remain tight and look for any signs of loosening or corrosion. A bar that was secure when installed can loosen over time with regular use.
Clean grab bars regularly to maintain their slip-resistant surface. Use mild soap and water rather than harsh chemicals that might degrade the finish.
Beyond Grab Bars: Additional Bathroom Safety Considerations
While grab bars are essential, they're just one piece of comprehensive bathroom safety. Consider these additional measures:
Add non-slip mats or strips to shower and tub floors. Ensure adequate lighting, including nightlights for middle-of-the-night bathroom trips. Consider a shower seat or transfer bench for people who have difficulty standing for extended periods. Keep frequently used items within easy reach to minimize stretching and reaching.
Remove any clutter or tripping hazards like bath mats that can bunch up. Make sure towels and other necessities are accessible without requiring awkward movements.
Working with Professionals
If you're uncomfortable with the installation process, hiring a professional is money well spent. A handyperson or contractor experienced with accessibility modifications will have the tools and knowledge to install bars securely.
An occupational therapist can assess your specific bathroom and provide personalized recommendations for bar placement and additional safety measures. This professional evaluation can identify risks you might not have considered.
Final Thoughts
Bathroom safety rails are one of the most effective fall prevention tools available. They're relatively inexpensive, straightforward to install, and can make the difference between independence and injury.
The key is being proactive: don't wait until after a fall to make your bathroom safer. Take the time to assess risk areas, choose appropriate bars, and ensure proper installation. Your future self will thank you for thinking ahead and taking action now.

